Welcome to Mega Menu Pro

Mega Menu Pro is a visual, drag and drop, fully customizable and responsive menu builder for Shopify. This app supports different content types for menu and enables you to create an amazing mobile menu with a smooth browsing experience.

Thanks to Mega Menu Pro, you can quickly create a mega menu within minutes with the live editor, manage menu elements, change menu layout, color, font, background, etc. as you wish, and showcase your products, promote events to get more sales.

Within this document, we will describe the installation, creation and setting up of the Mega Menu Pro app process.

We did our greatest to create this manual info to be presented in a very straightforward, simple manner. But if you have any questions that are beyond the scope of this documentation, please feel free to contact us via our email address: contact@etssoft.net

Install Mega Menu Pro app

Step 1: Navigate to Mega Menu Pro app in the Shopify App Store by clicking on this link: https://apps.shopify.com/mega-menu-pro

Step 2: Click on “Add app” button >> Log in to your Shopify store and authorize the app in your Shopify admin.

Step 3: And you’re ready! Your newly installed app will appear in the Apps section of your Shopify Admin.

By default, Mega Menu Pro will create a “Home” menu to replace your current theme’s main menu. This “Home” menu will display immediately if the current theme’s main menu exists.

Workspace

Let’s take a look at the workspace of Mega Menu Pro app:

mega menu app workspace

Sidebar

  • Menu: display your menu in “Edit mode
  • Fonts: select a font and customize font size for specific menu elements
  • Colors: select color for specific menu elements
  • Transition: select a transition effect for your menu
  • Mobile: select a display mode for your mobile menu
  • Settings: general setting options for your menu
  • Tutorial: short tutorial video to help you create your first menu easier
  • Document: the full documentation of Mega Menu Pro app
  • Your profile: basic information of the Shopify store installed our app and basic Mega Menu Pro app information
  • Your plan: pick a suitable plan to use Mega Menu Pro app on your Shopify store. You can upgrade or downgrade your plan at any time.
  • Back to Shopify: Return to “Apps” section of your Shopify Admin.

Status bar

  • Edit mode: live edit your menu
  • Preview mode: see how your menu will appear on the storefront
  • Publish: All the changes you made in this mode will be directly applied to your menu
  • Unpublish: All the changes you made in this mode will not appear on the storefront. Your site’s default menu will appear on the storefront instead.
  • Desktop | Mobile: view how your menu will display on desktop device or mobile device.

Menu window: displays the mega menu you’re working on.

Add new menu

Mega Menu Pro enables you to build both basic menu (horizontal menu) and tab menu (vertical menu) on your Shopify store.

In this section, we will guide you on how to add a new menu to your online store. We have optimized Mega Menu Pro with a user-friendly interface to help you easily create an eye-catching mega menu.

Step 1: From Mega Menu Pro app’s menu window, click on “Add new menu” button.

Step 2: On “Add menu” pop-up, select the menu you want to add.

Basic menu” section includes 6 menu templates for the horizontal menu. Similarly, “Tab menu” section includes 6 menu templates for the vertical menu.

Menu templates” and “Tab templates” provide 12 pre-made mega menu templates with demo data. You can select the pre-made mega menu and then customize it as you want.

Step 3: After a new menu has been added, on the sidebar you will find the general settings for the new menu.

Similar to the basic menu, you can customize the general settings after adding a new tab menu.

Click “Save” button to save your newly added menu.

Edit a menu

Hover your mouse pointer over the menu name to select an action you want to apply to that menu. You can duplicate, edit or delete a menu. Drag and drop menu name to sort menu’s order.

Click “Save” button to save your changes.

Add a new tab

For the tab menu, to add a new tab, please click on “Add new tab” button.

You can also duplicate, edit or delete a tab. Drag and drop tab name to sort tab’s order.

Add new column

After creating a new menu, we will start adding menu columns. Each menu is built from one or several columns, you can customize the number of columns and their width size.

From Mega Menu Pro app menu window, select the menu you want to add a new column.

Click “Add new column” button under the menu item to create a new column. There are 12 columns available for each menu.

Hover your mouse pointer over the column then click on “Edit” icon to customize column width. You can also duplicate or delete a column.

If you want to show 3 columns for a menu item, then create 3 columns with width size for each column is 4/12.

  • Choose 12/12 for 1 column full width
  • Choose 6/12 for 2 same width columns
  • Choose 4/12 for 3 same width columns
  • Choose 3/12 for 4 same width columns

If you want to show the blocks of columns in each row, you can enable “Break” option.

You can drag and drop columns to sort their order.


Add new block

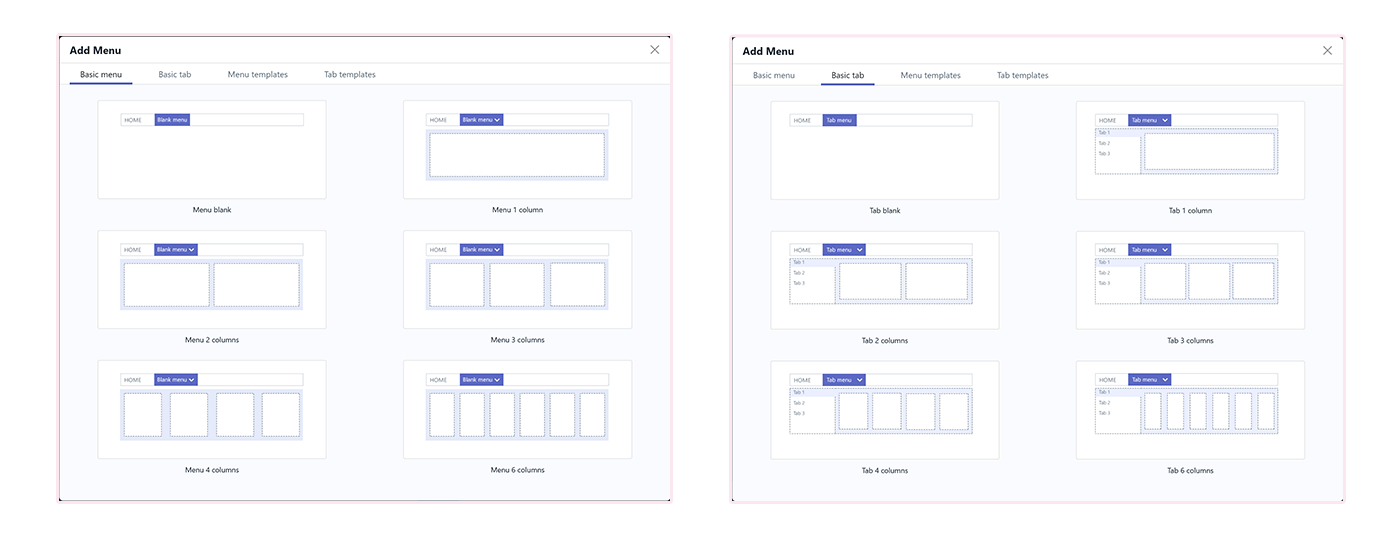
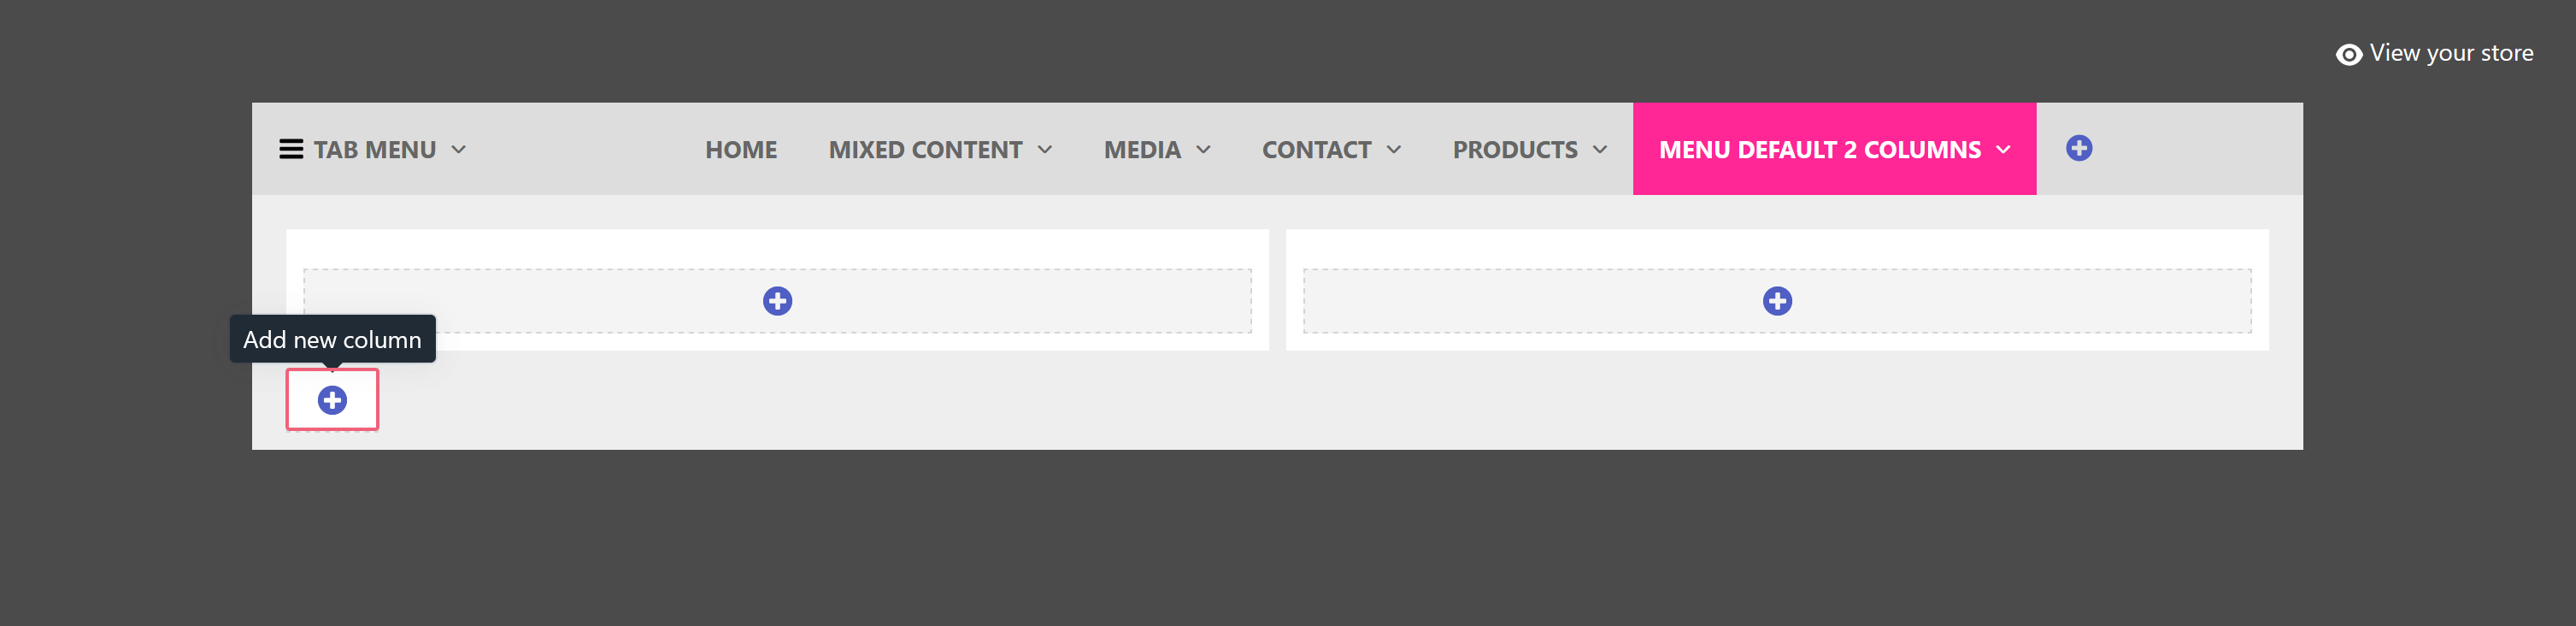
Until now we have added blank columns for our new menu. Next, let’s fill different contents into your menu.

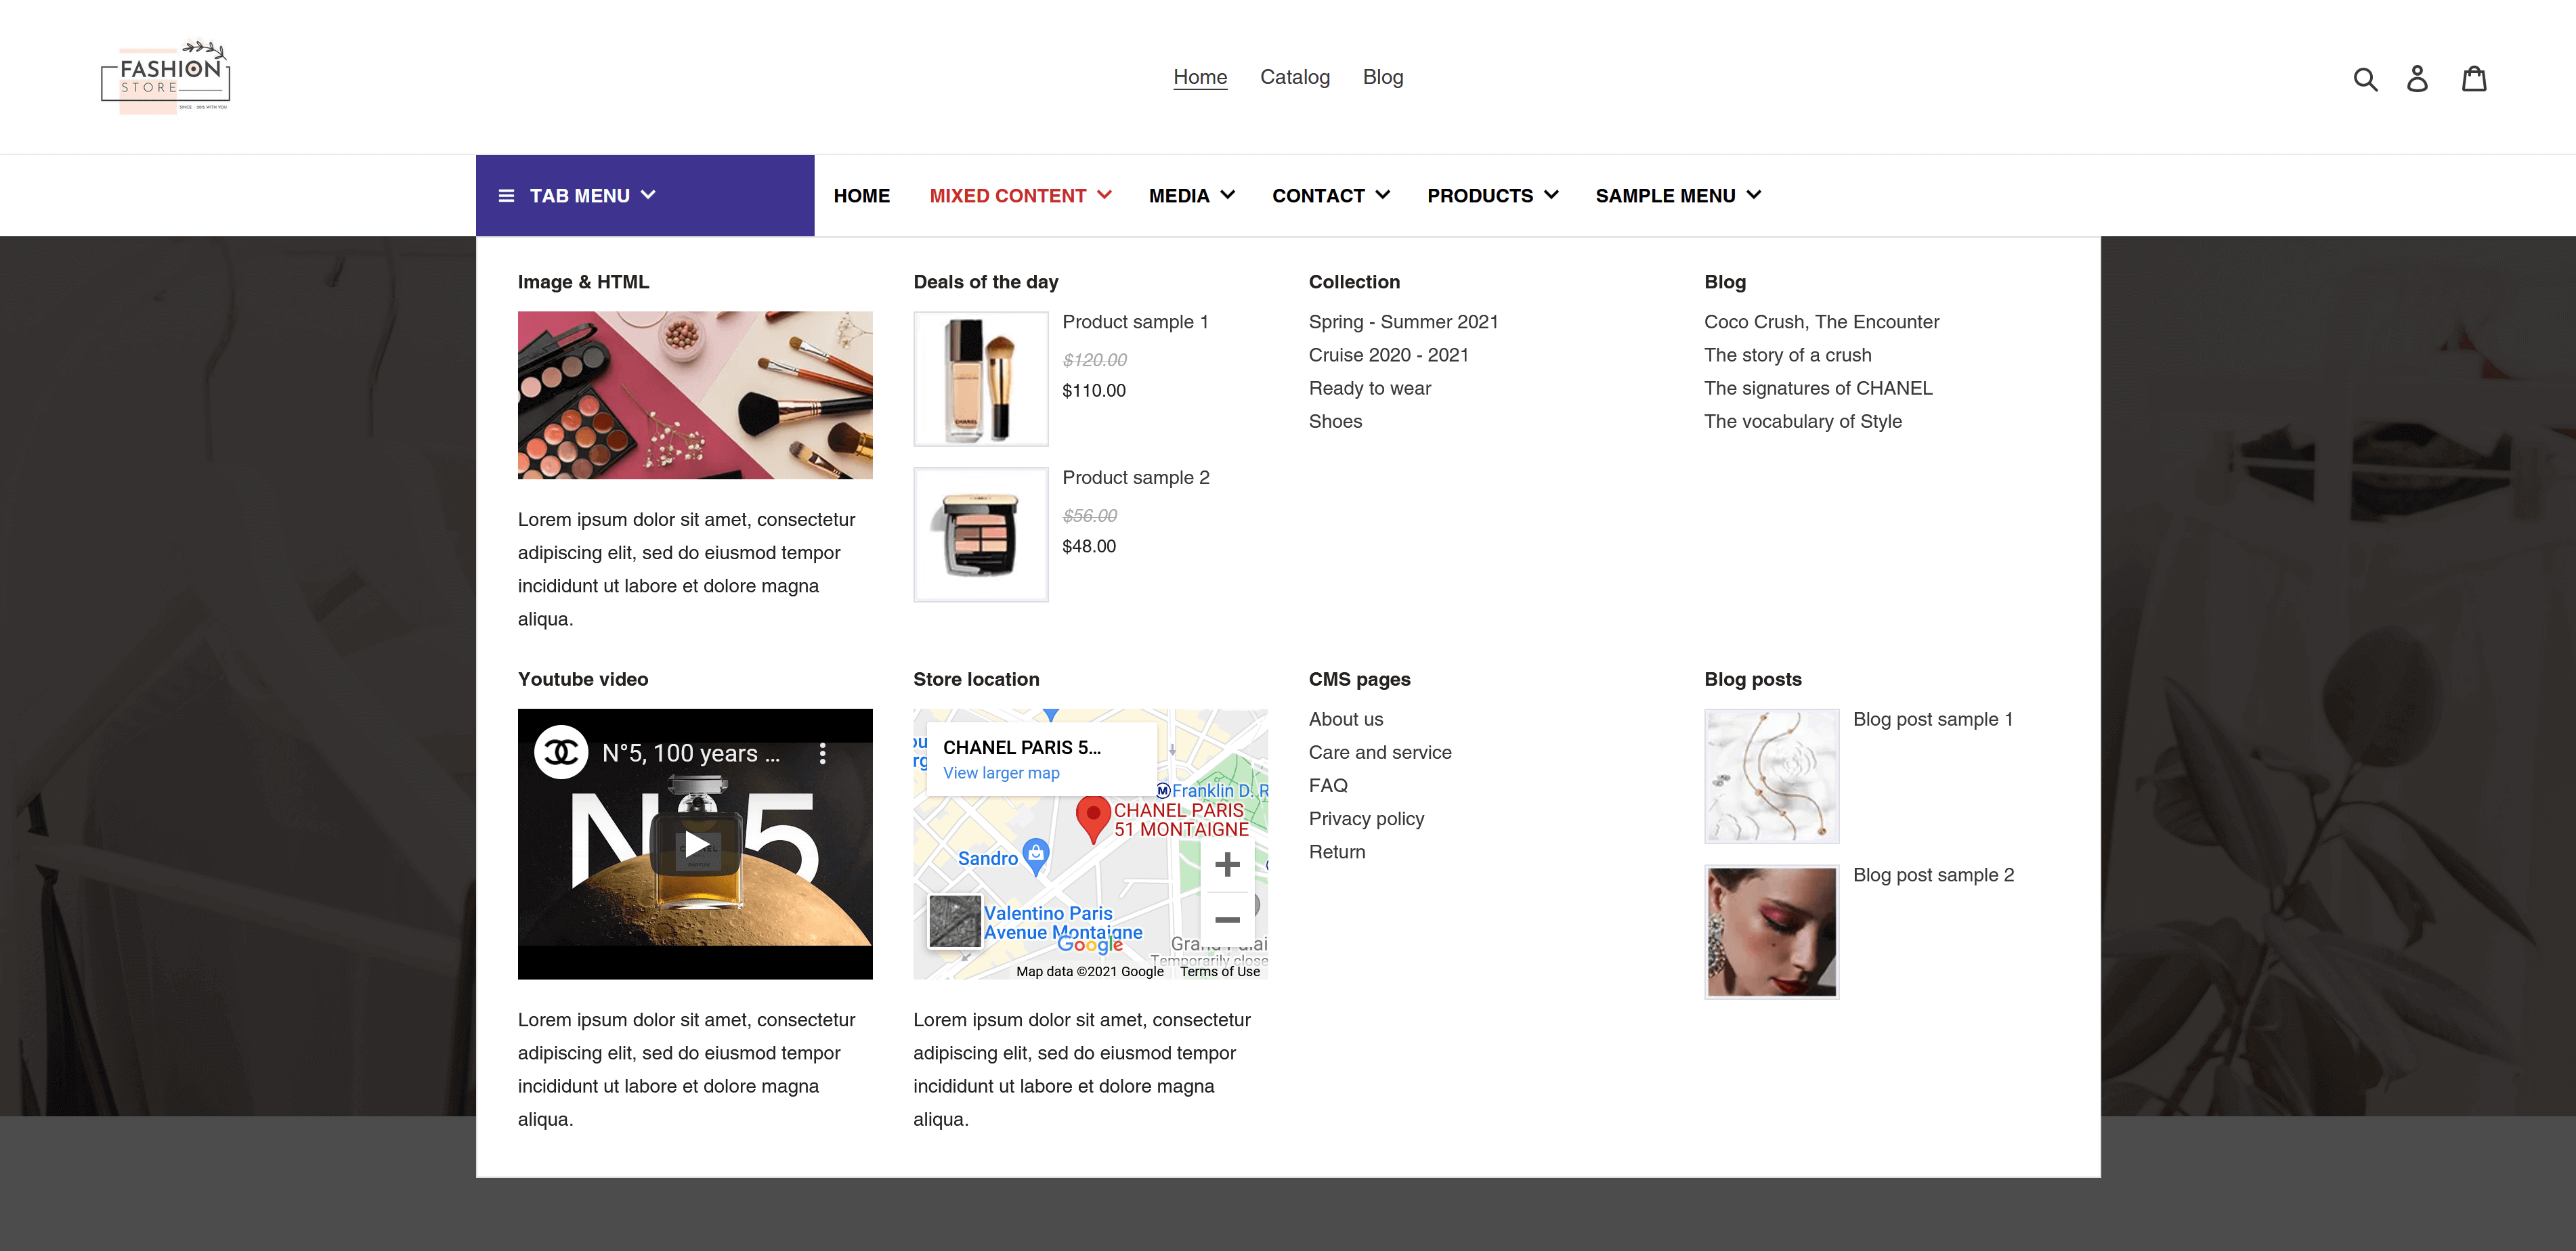
Each content will be contained in a block. Mega Menu Pro allows you to add 8 types of block into your mega menu:

  • Text/Html
  • Image
  • Collections
  • Pages
  • Blog
  • Blog posts
  • Products
  • Contact form

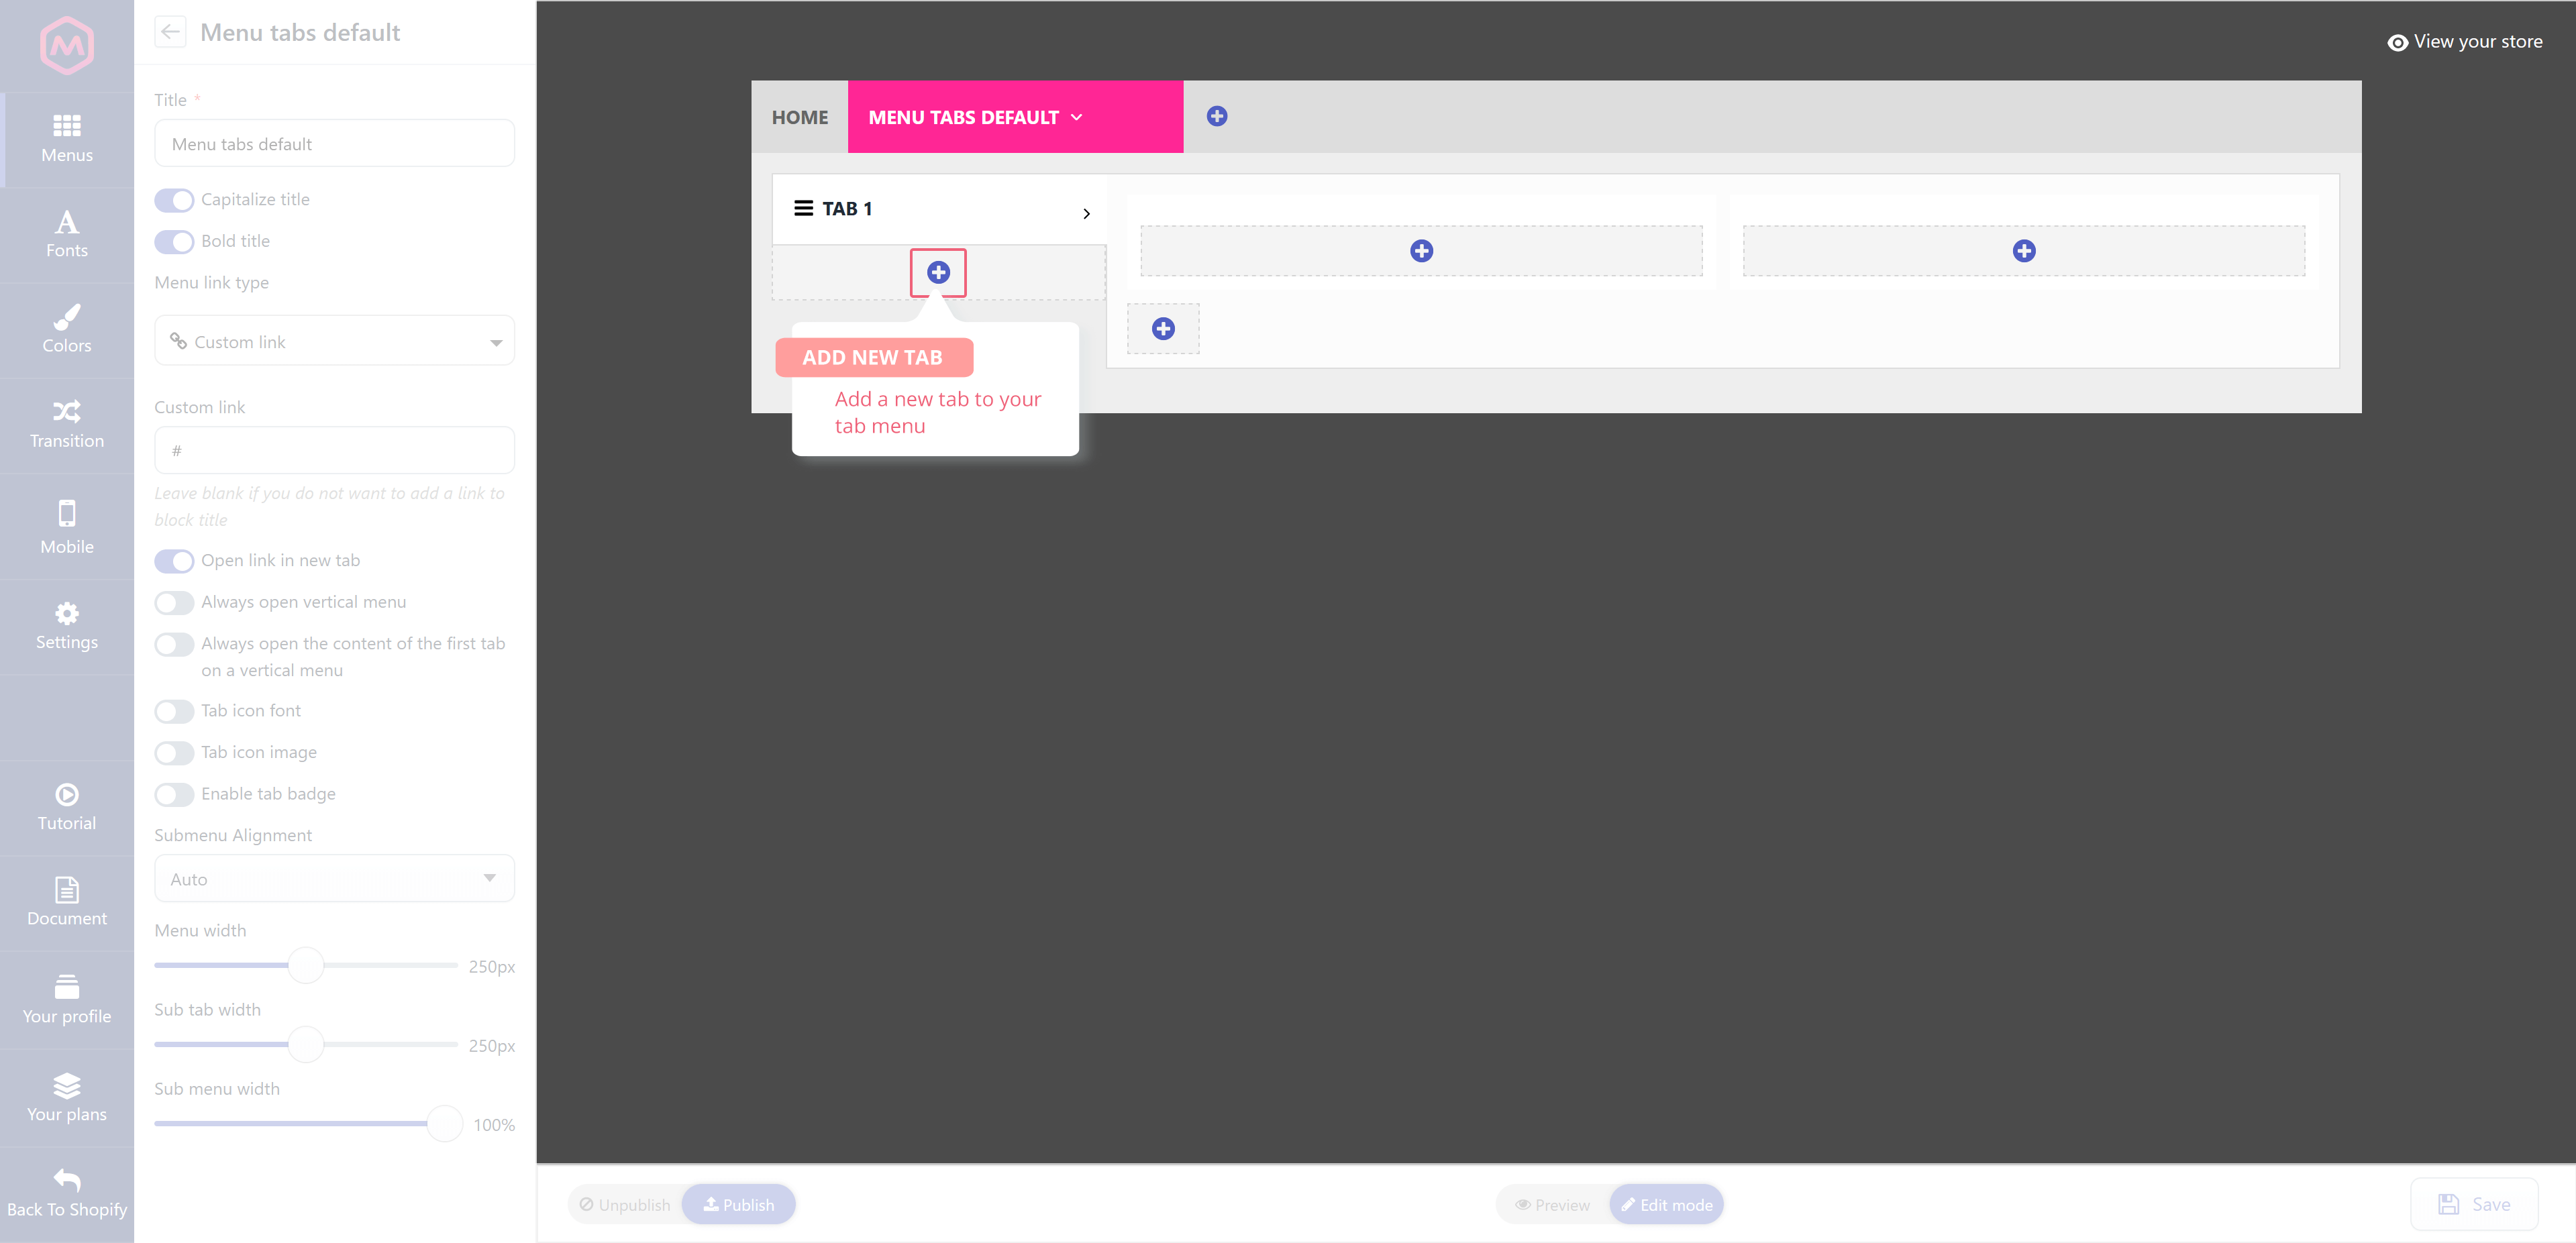
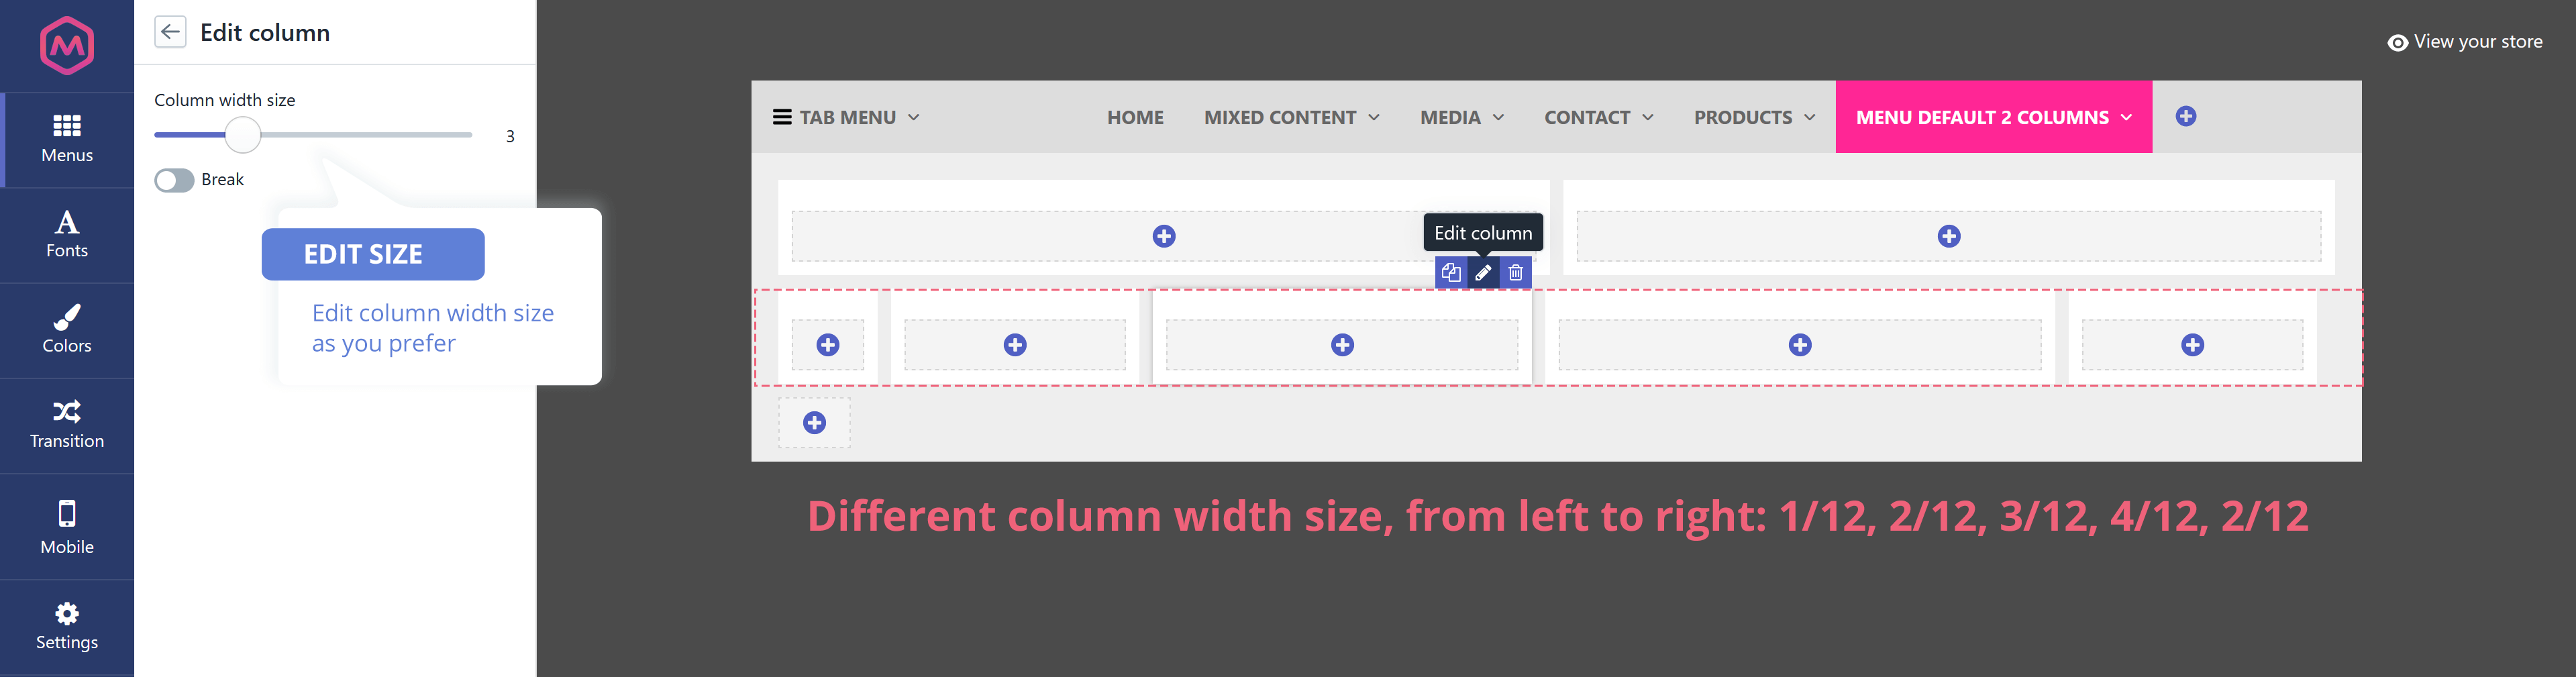
Click “Add block” button on each column to add a new block. You can duplicate, edit or delete a block. You can drag and drop any block to your preferred position.

There are 8 block types for your choice:
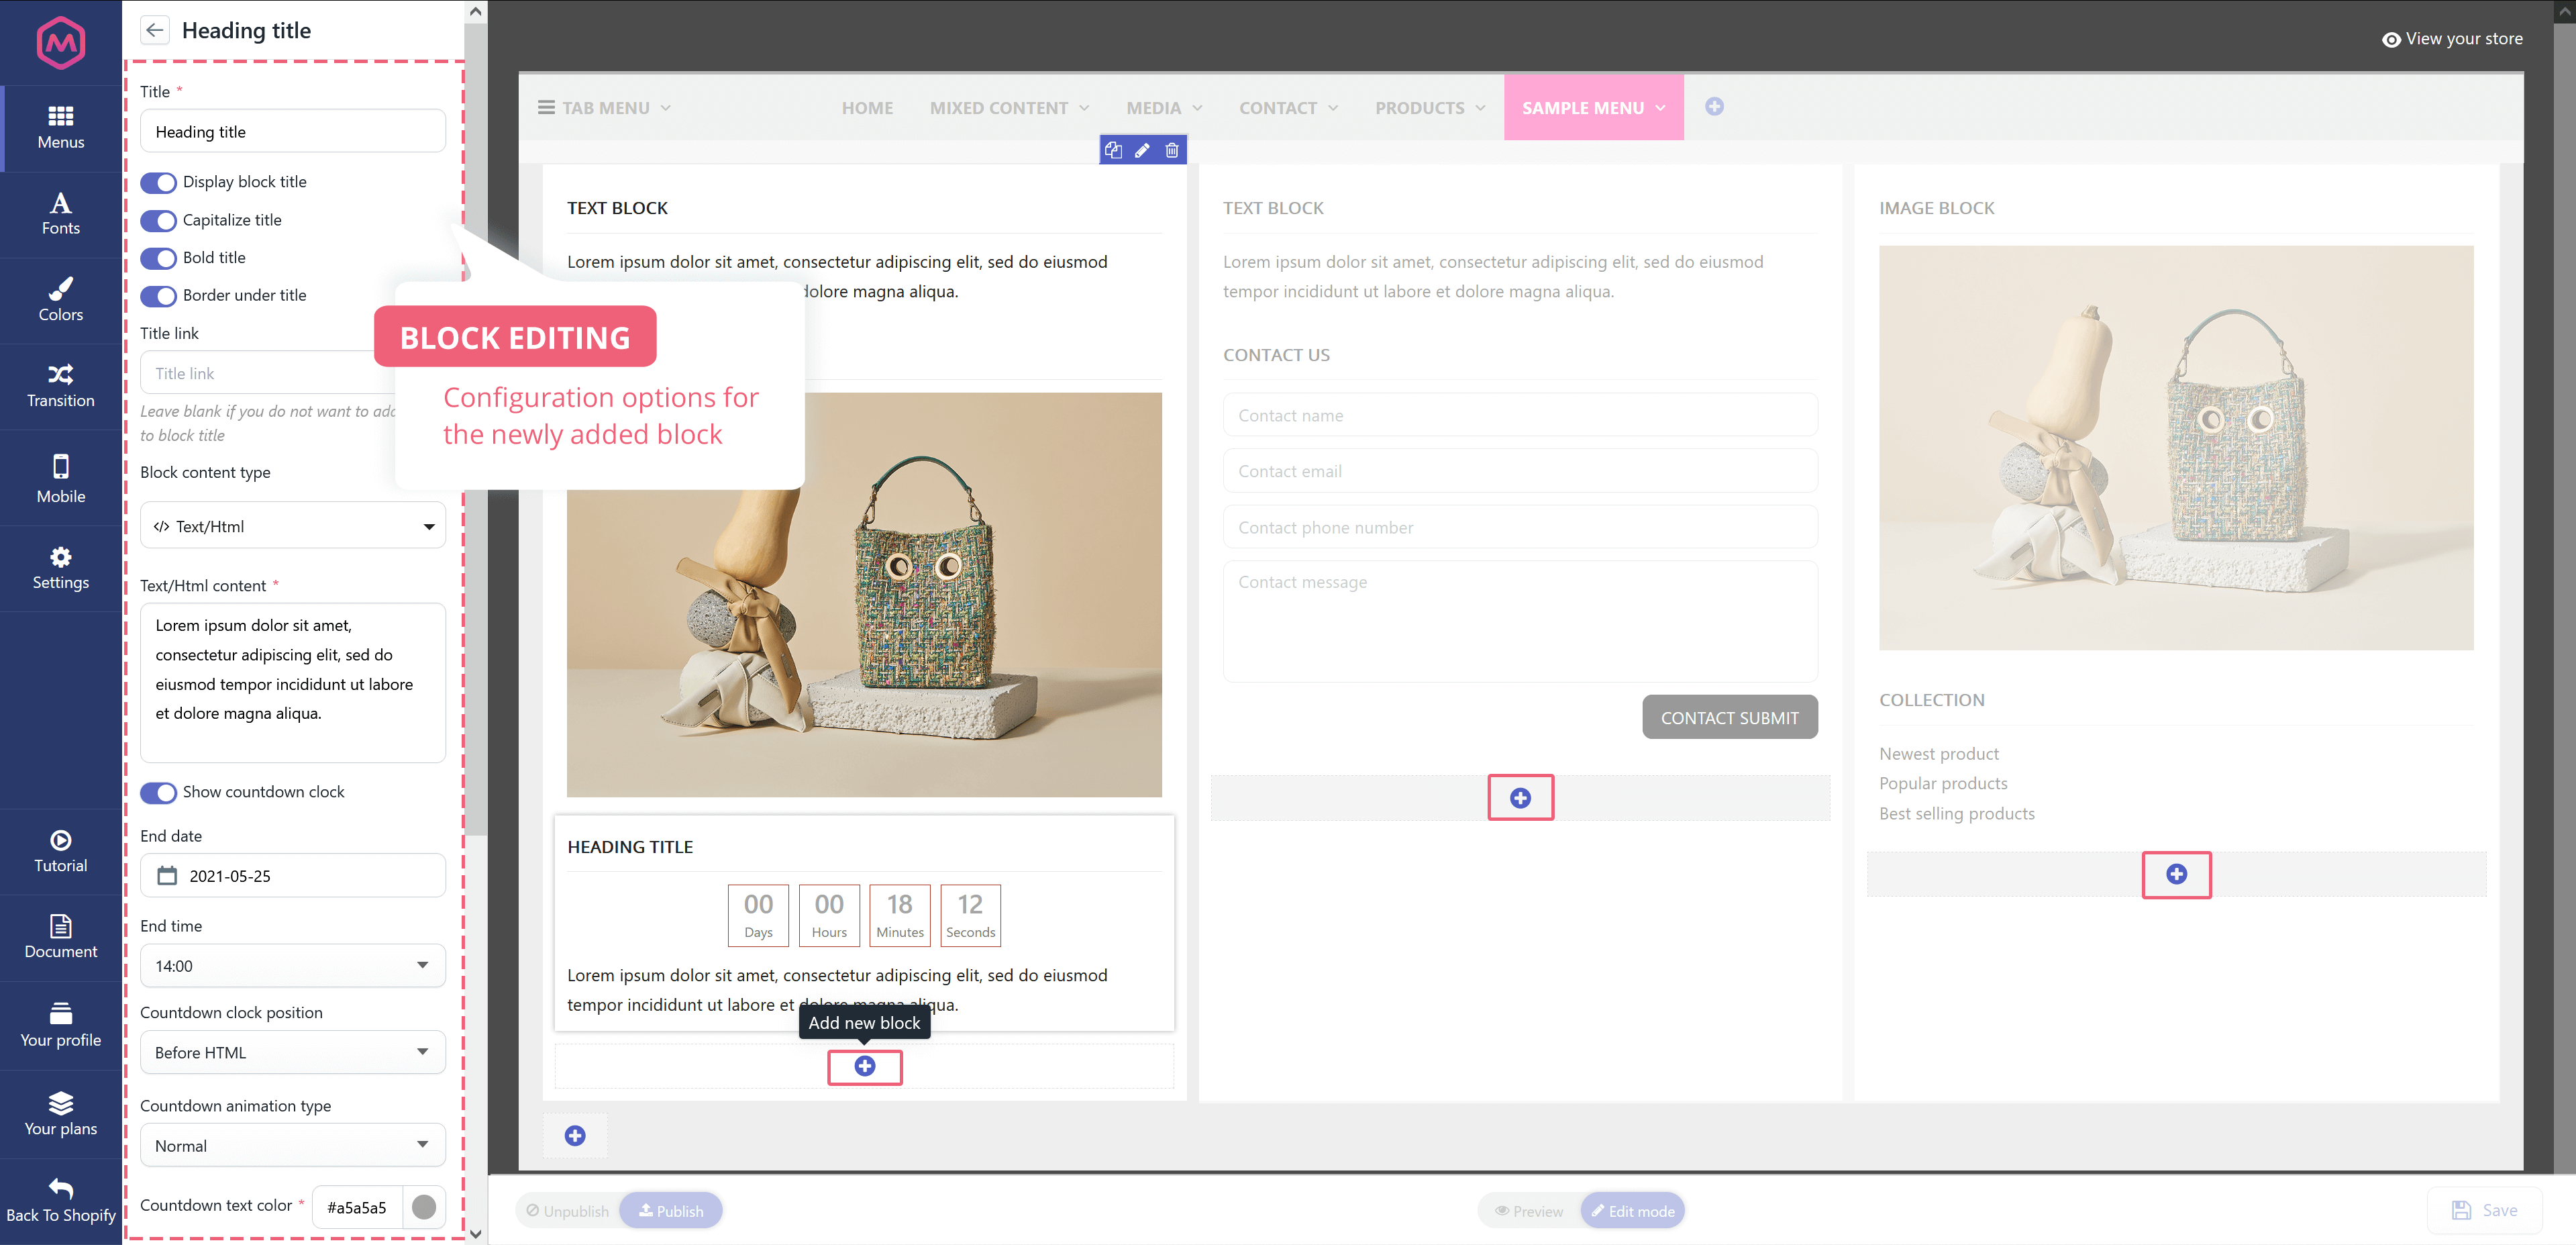
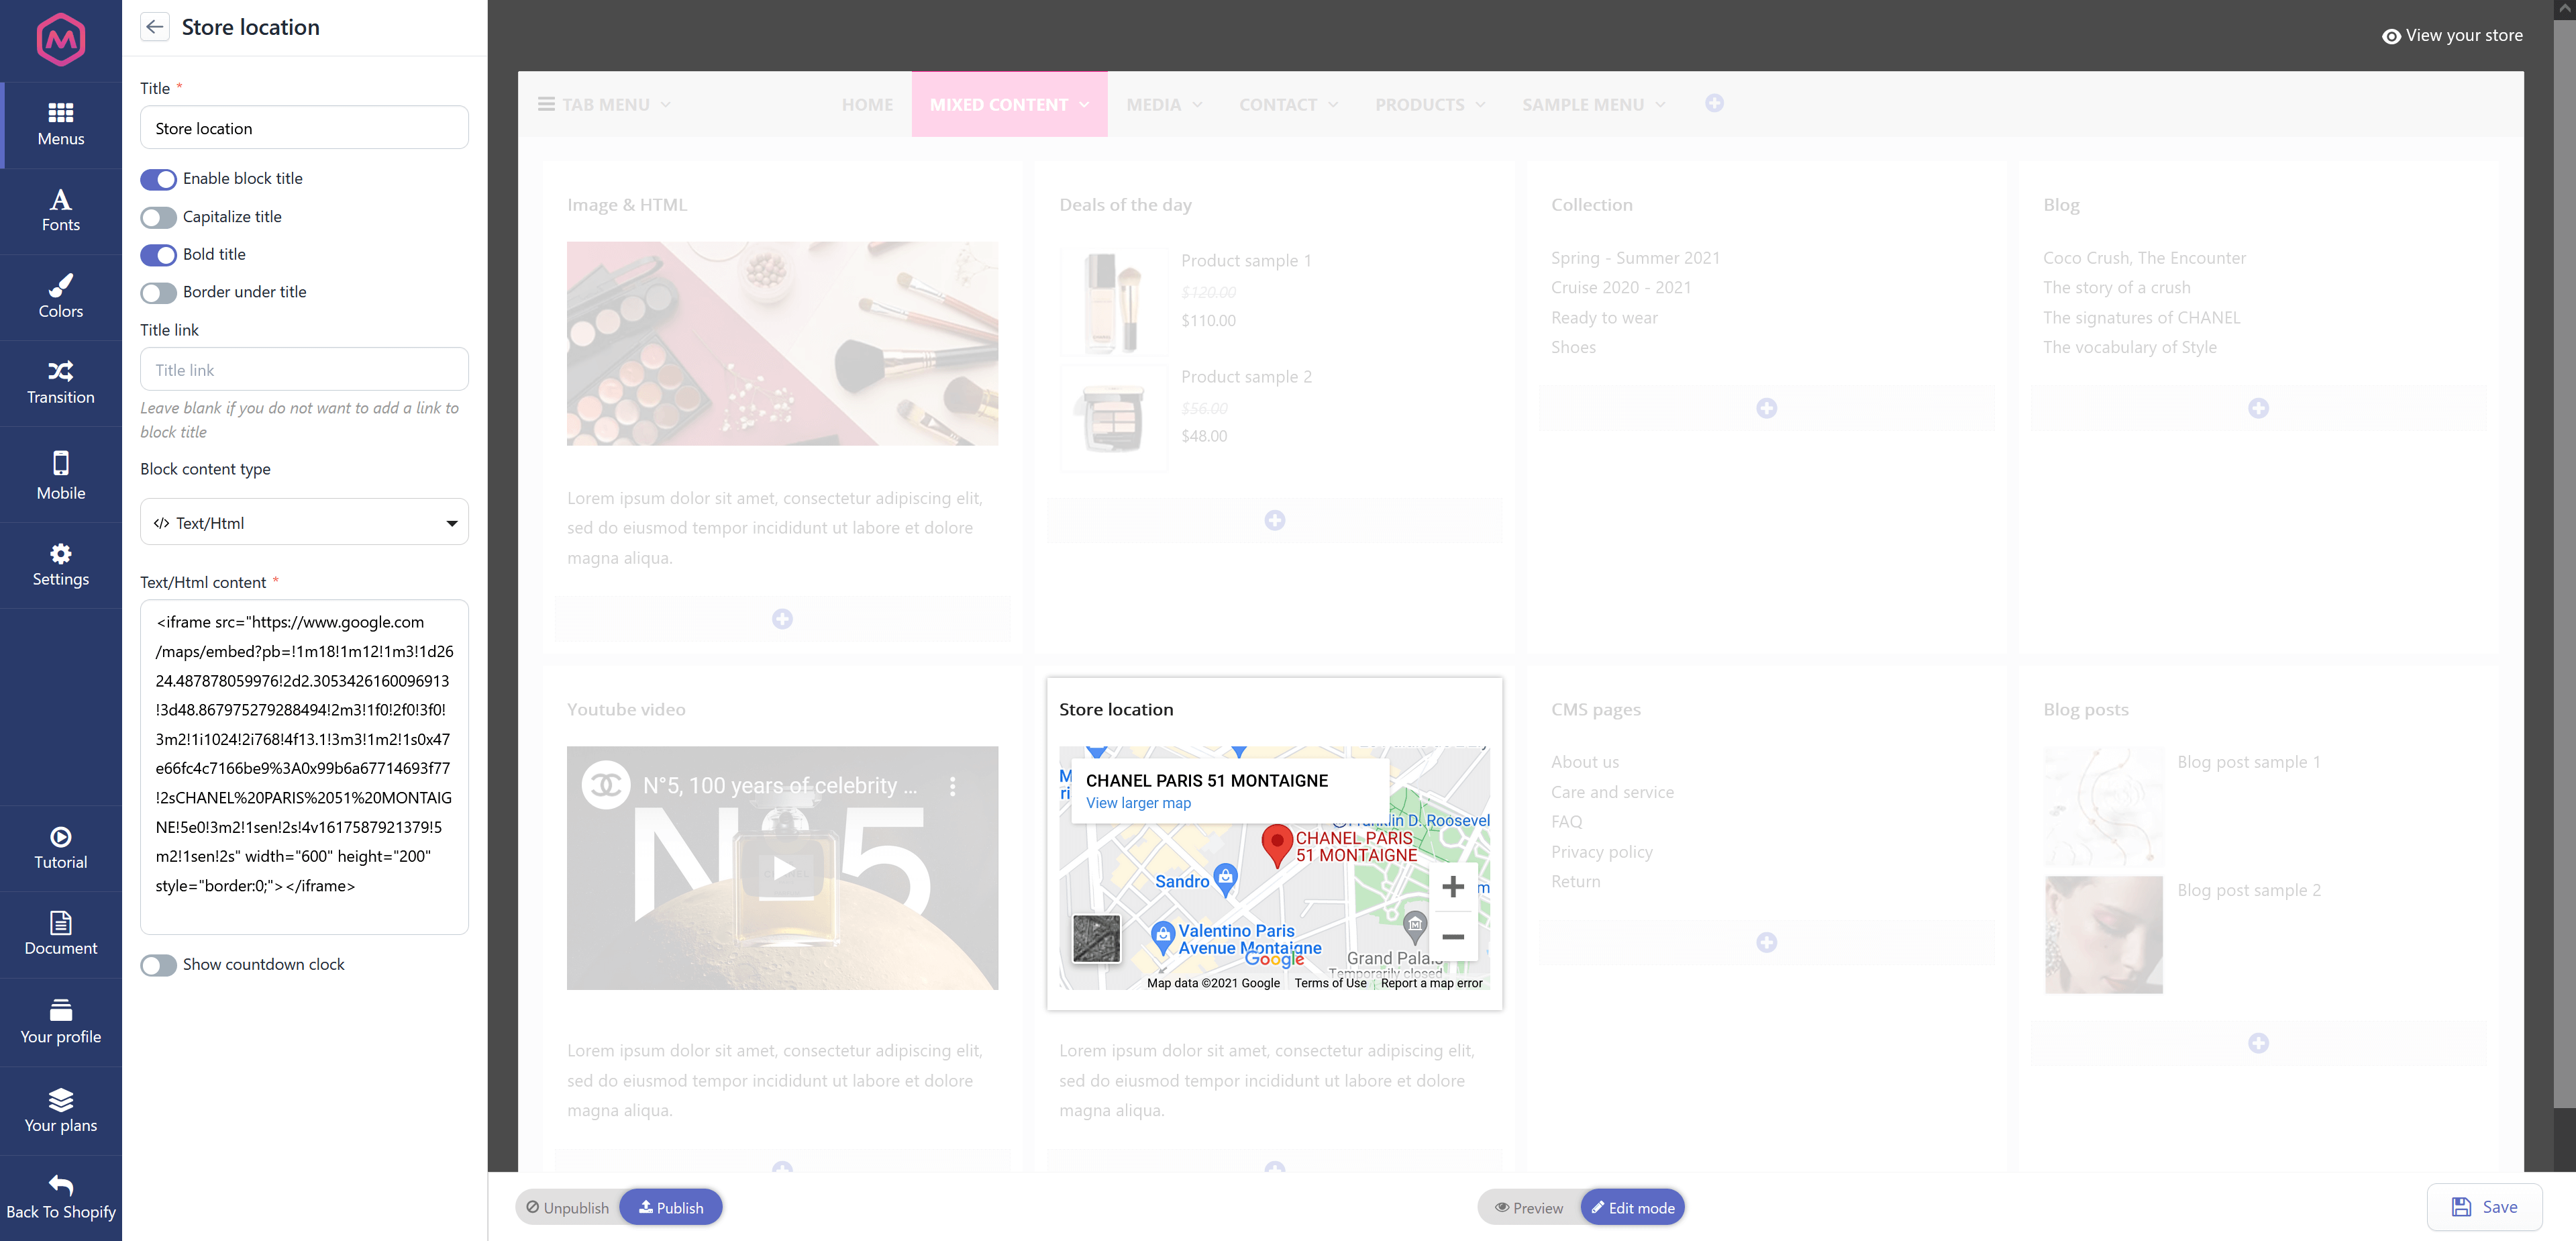
1. Text/HTML

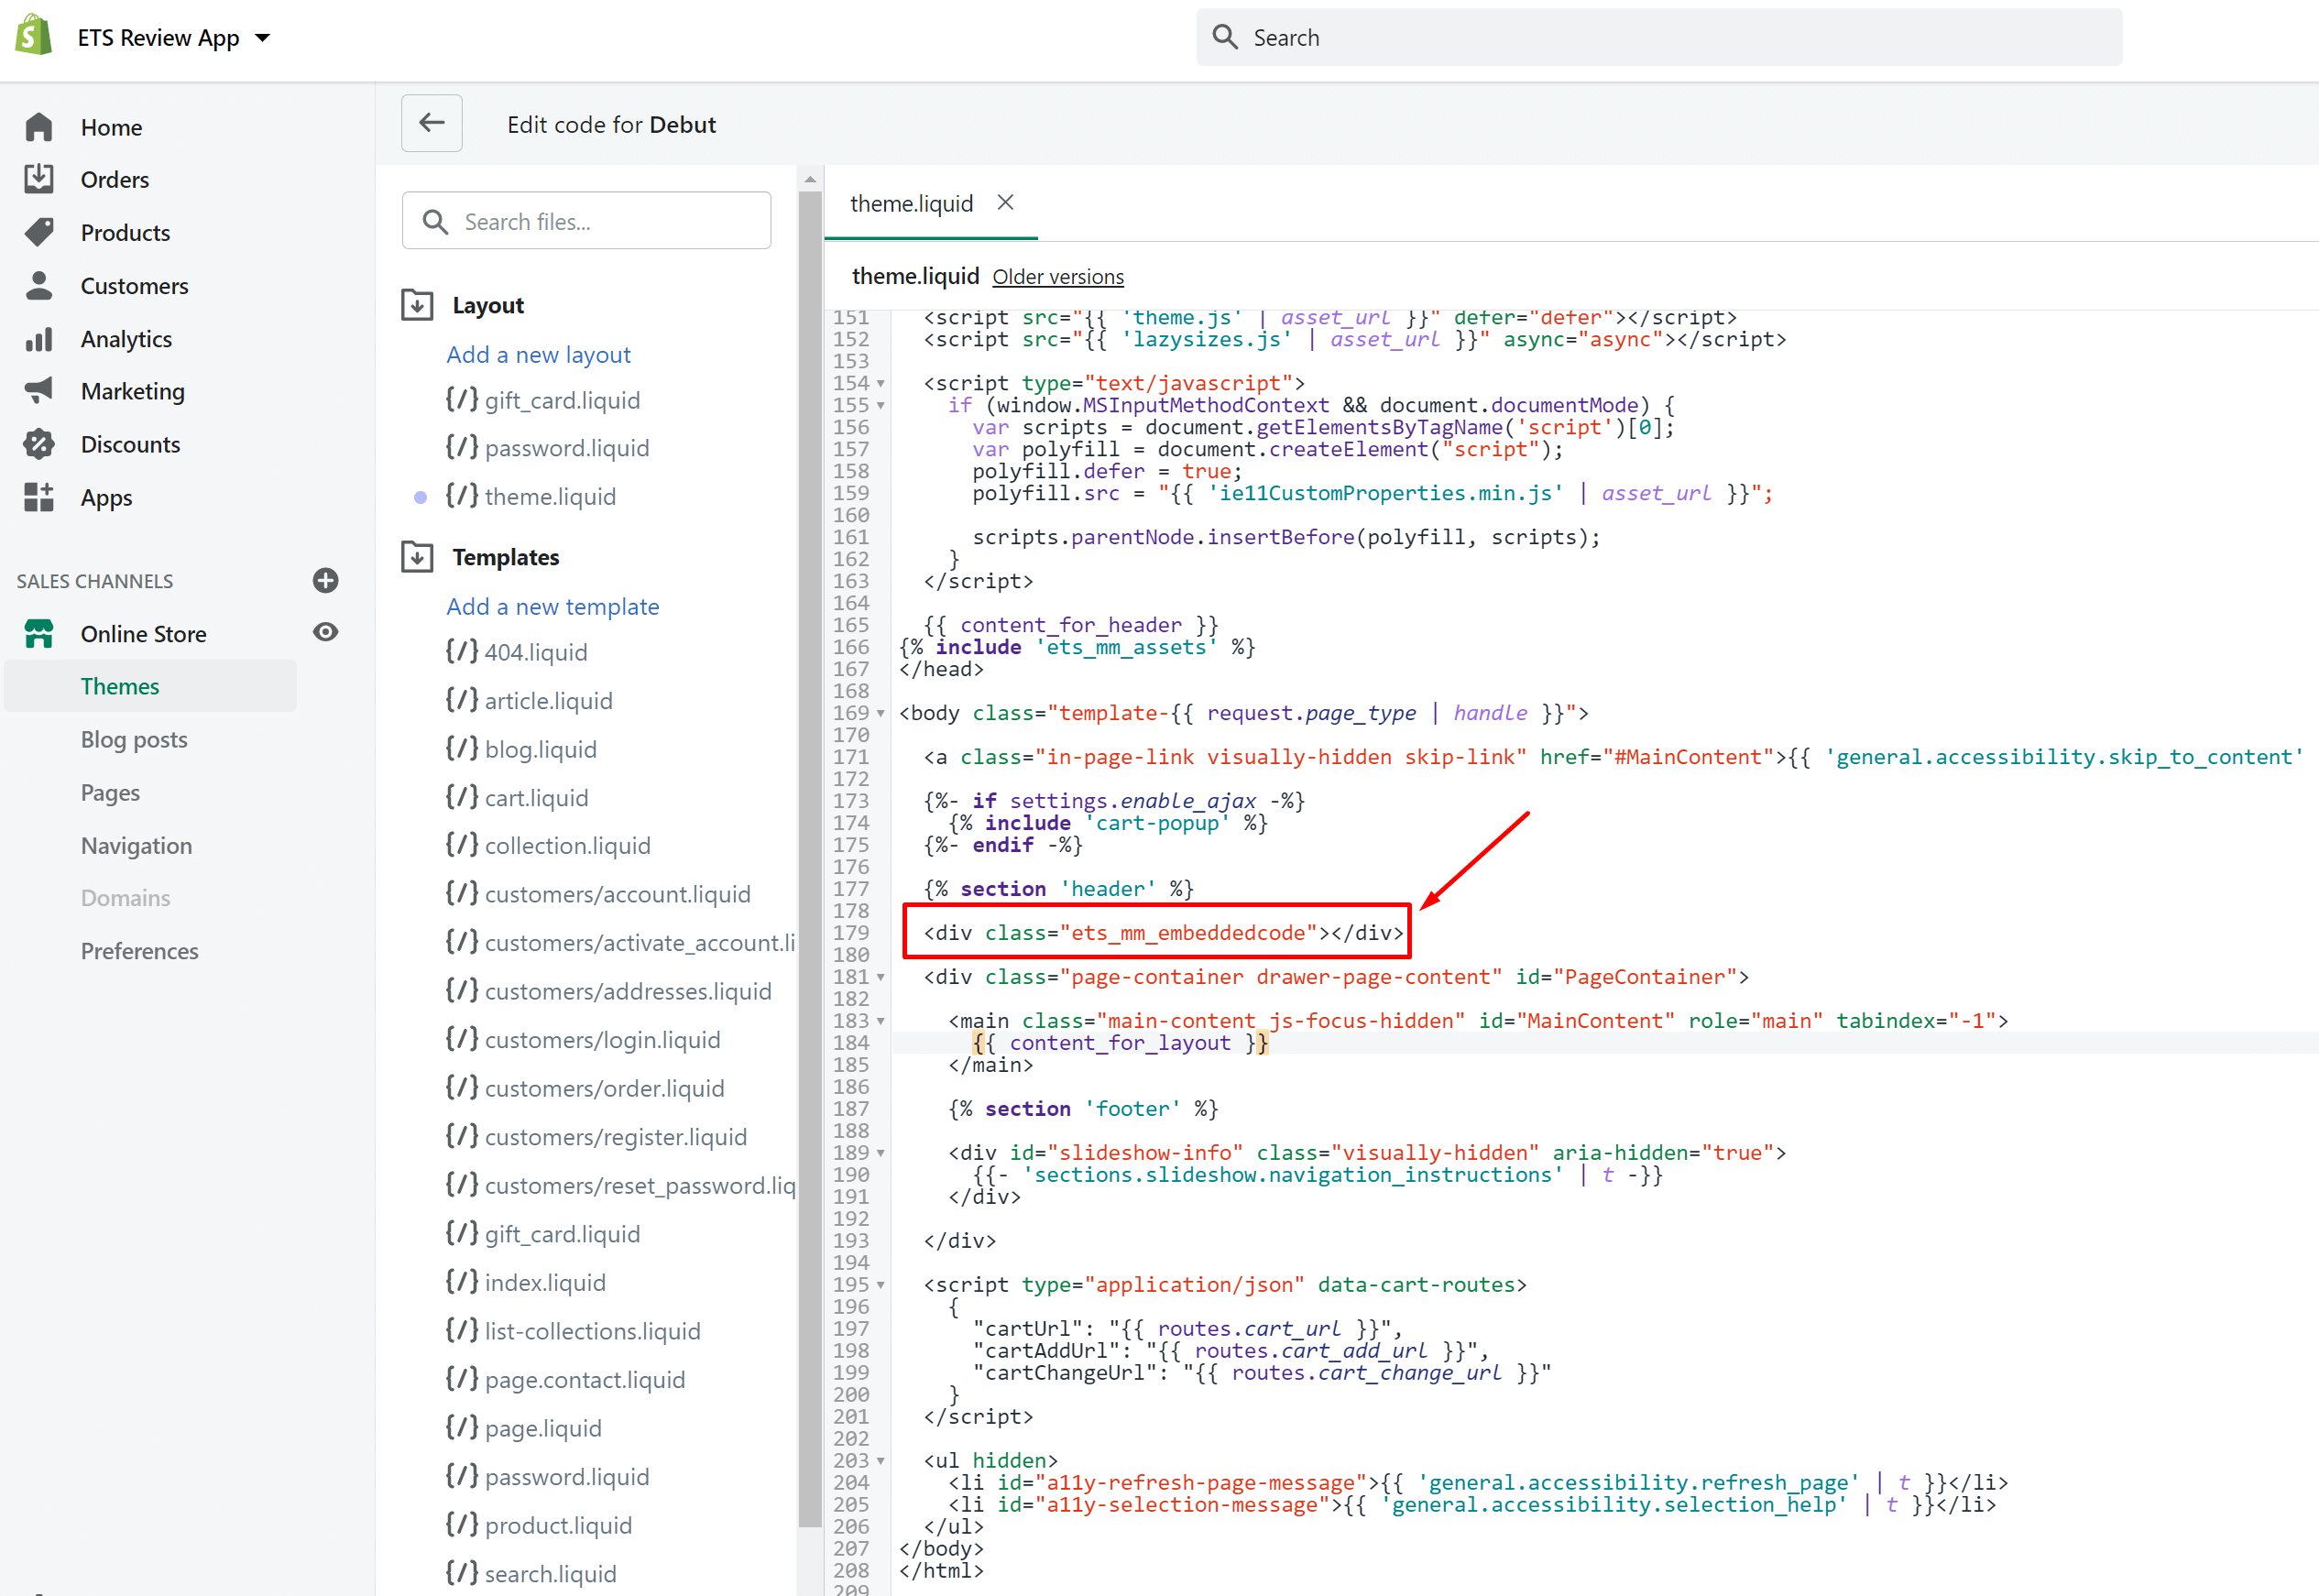
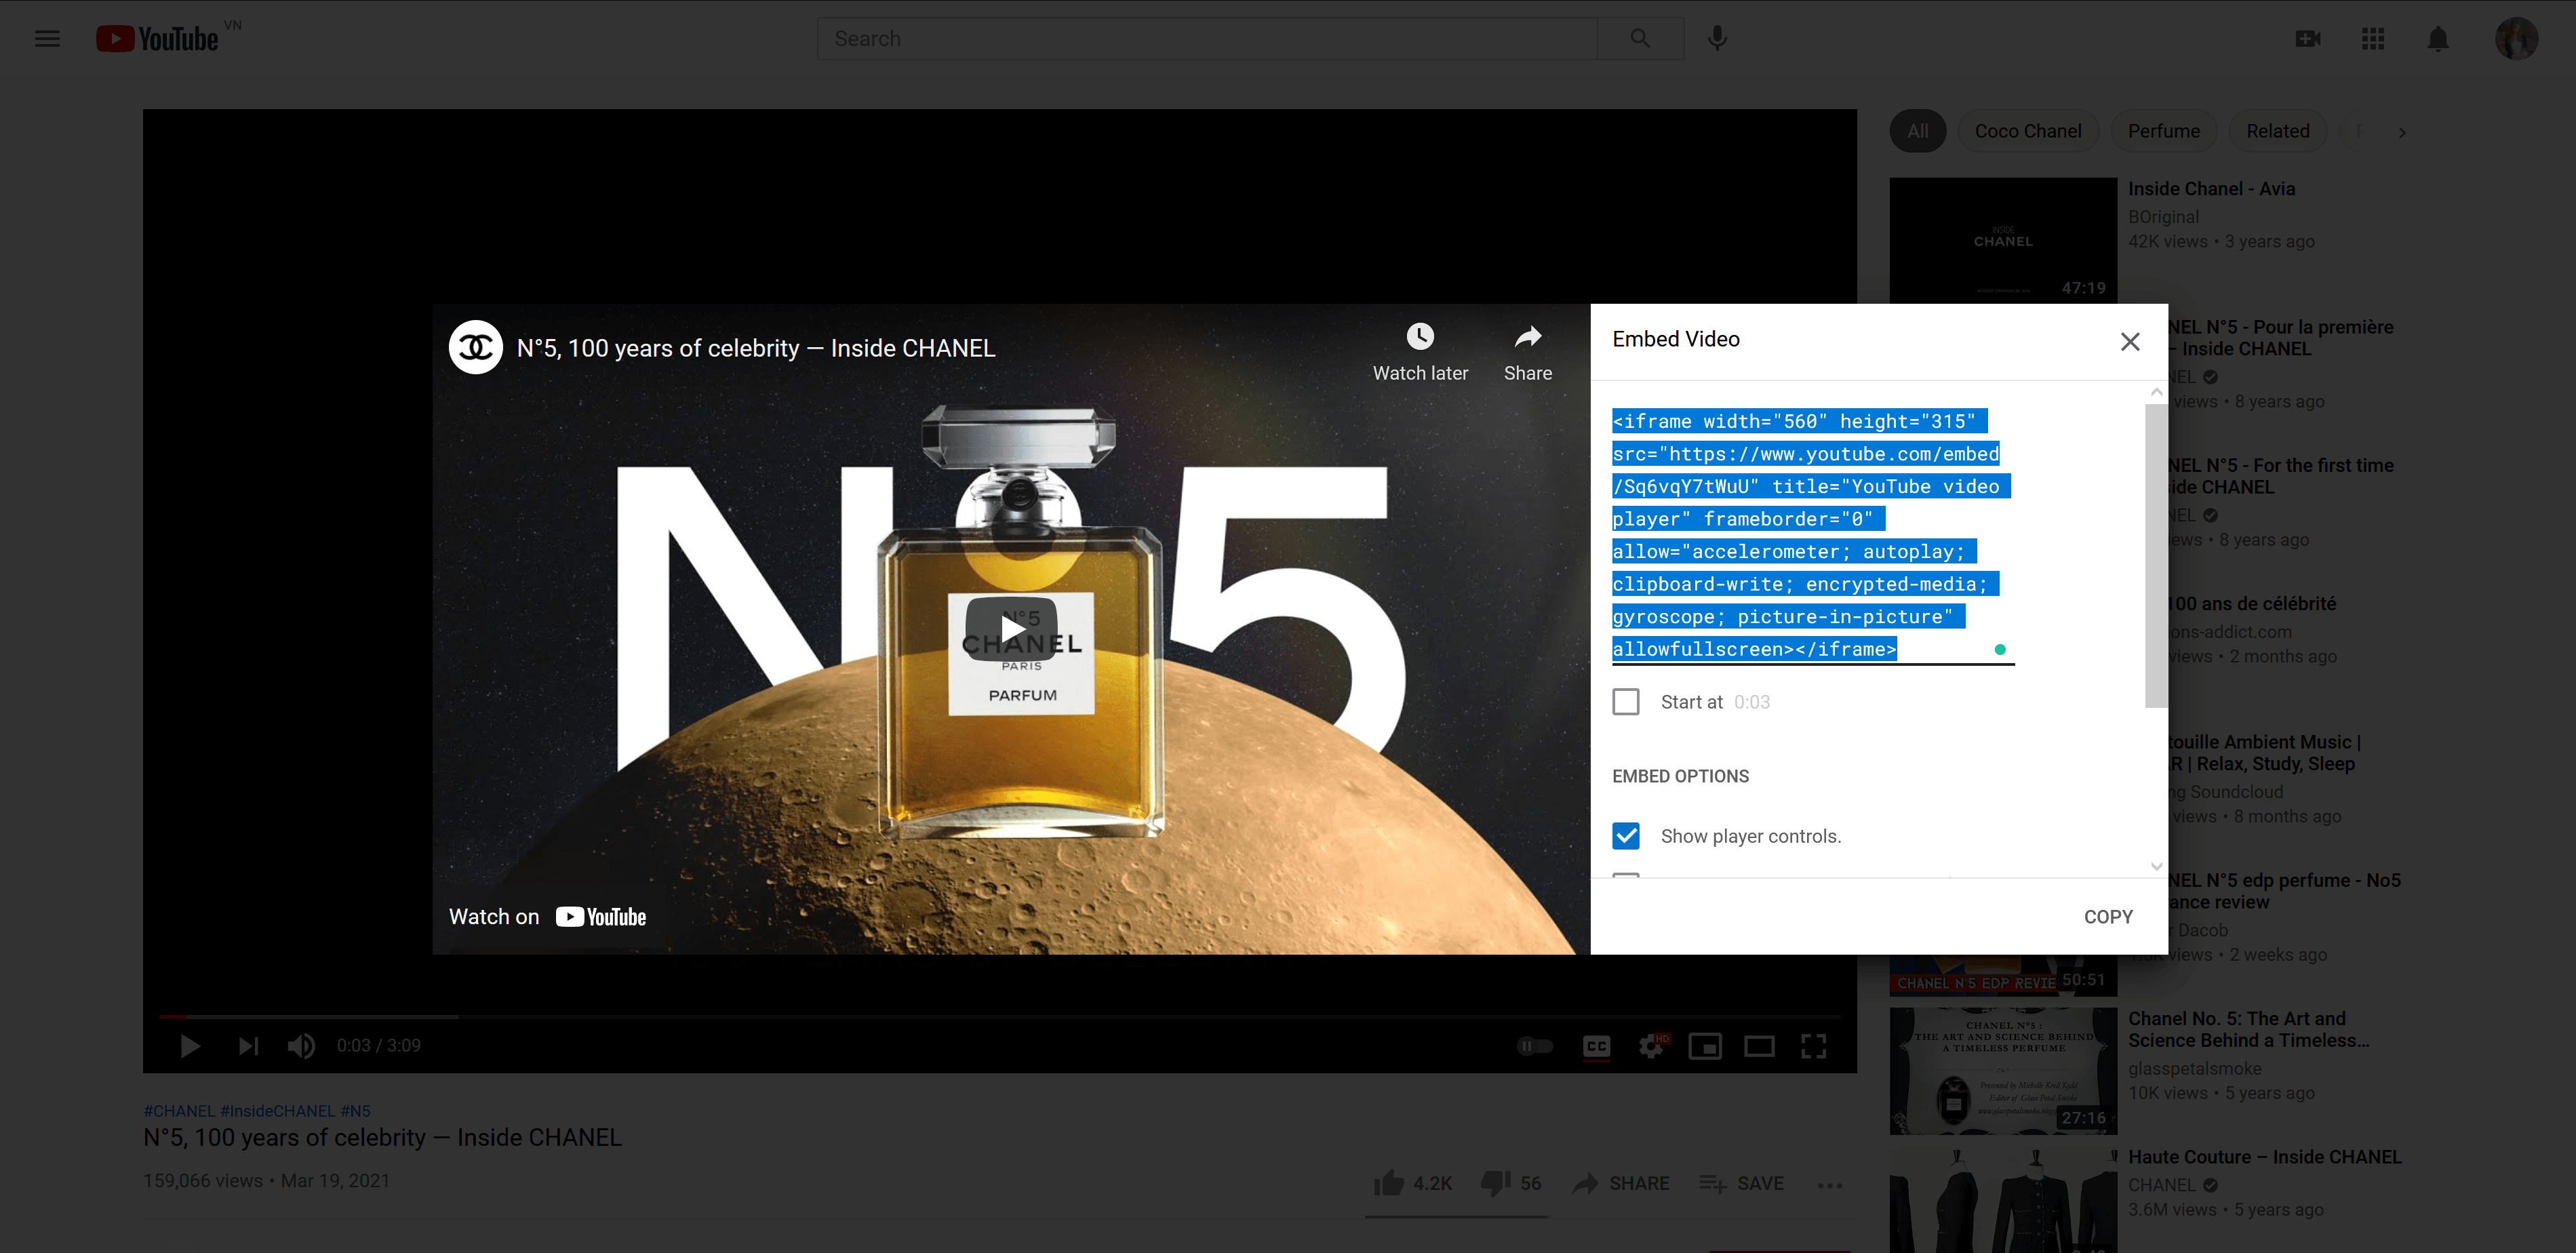
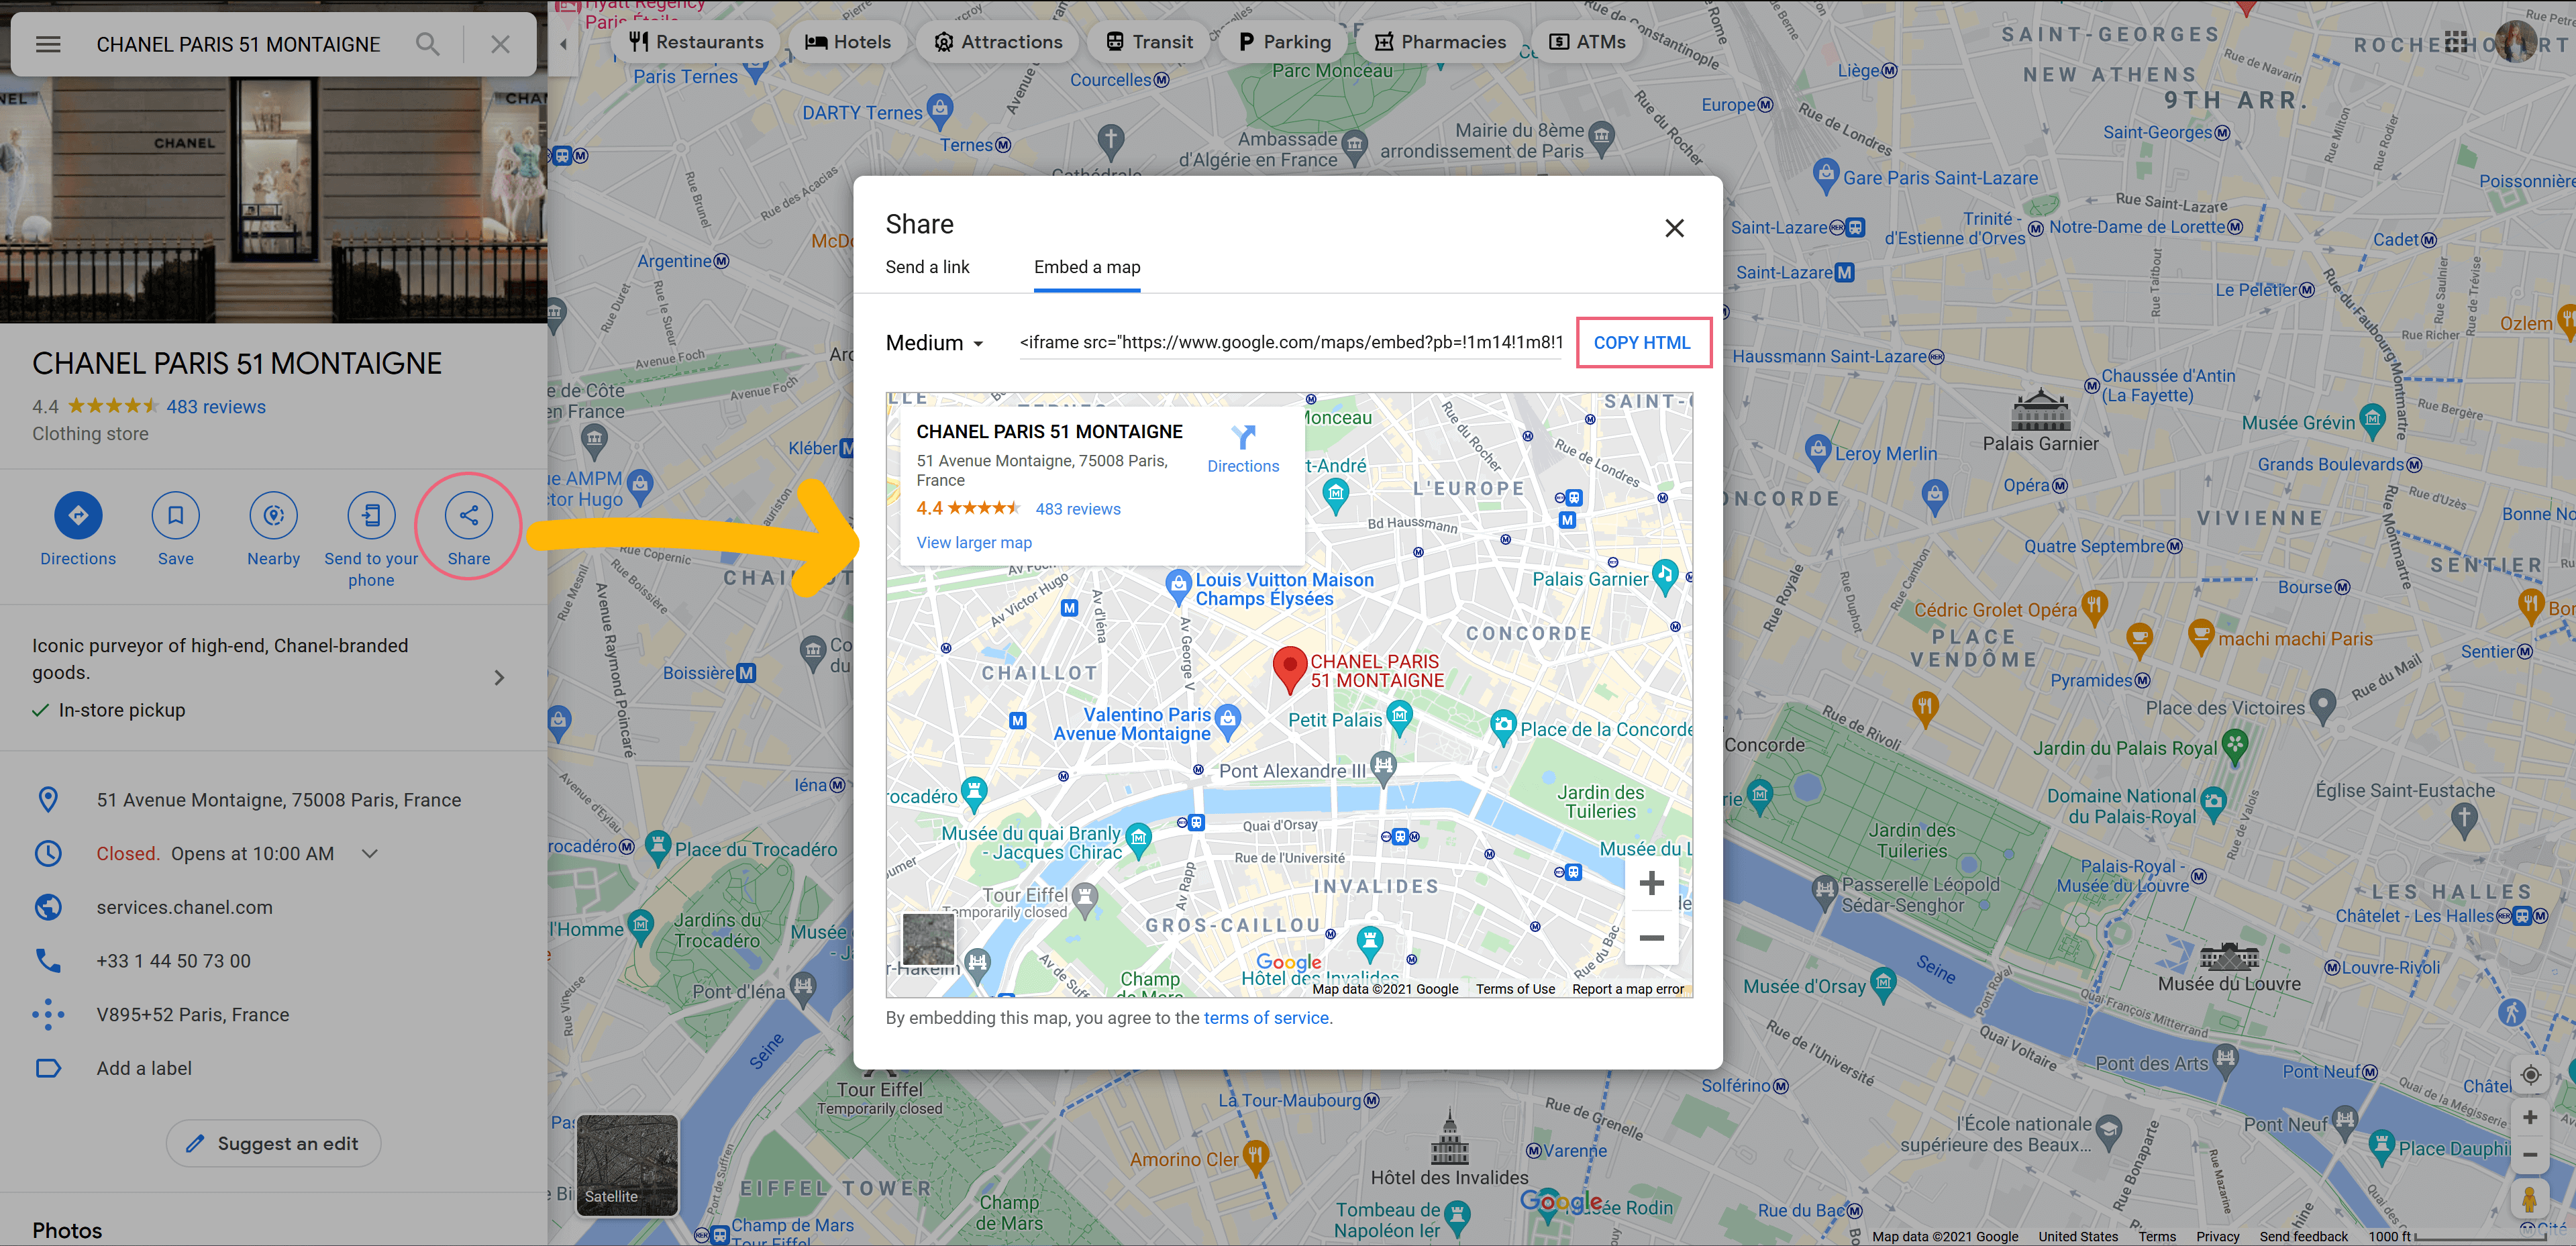
By using this block type, you can add a text paragraph using HTML tags, embed a video or Google map using iframe.

How to get video iframe code from YouTube: Click on “Share” button below each video > Select “Embed” > Copy the iframe code.

How to get iframe code from Google map: Click on “Share” button > Open “Embed a map” tab > Copy iframe code
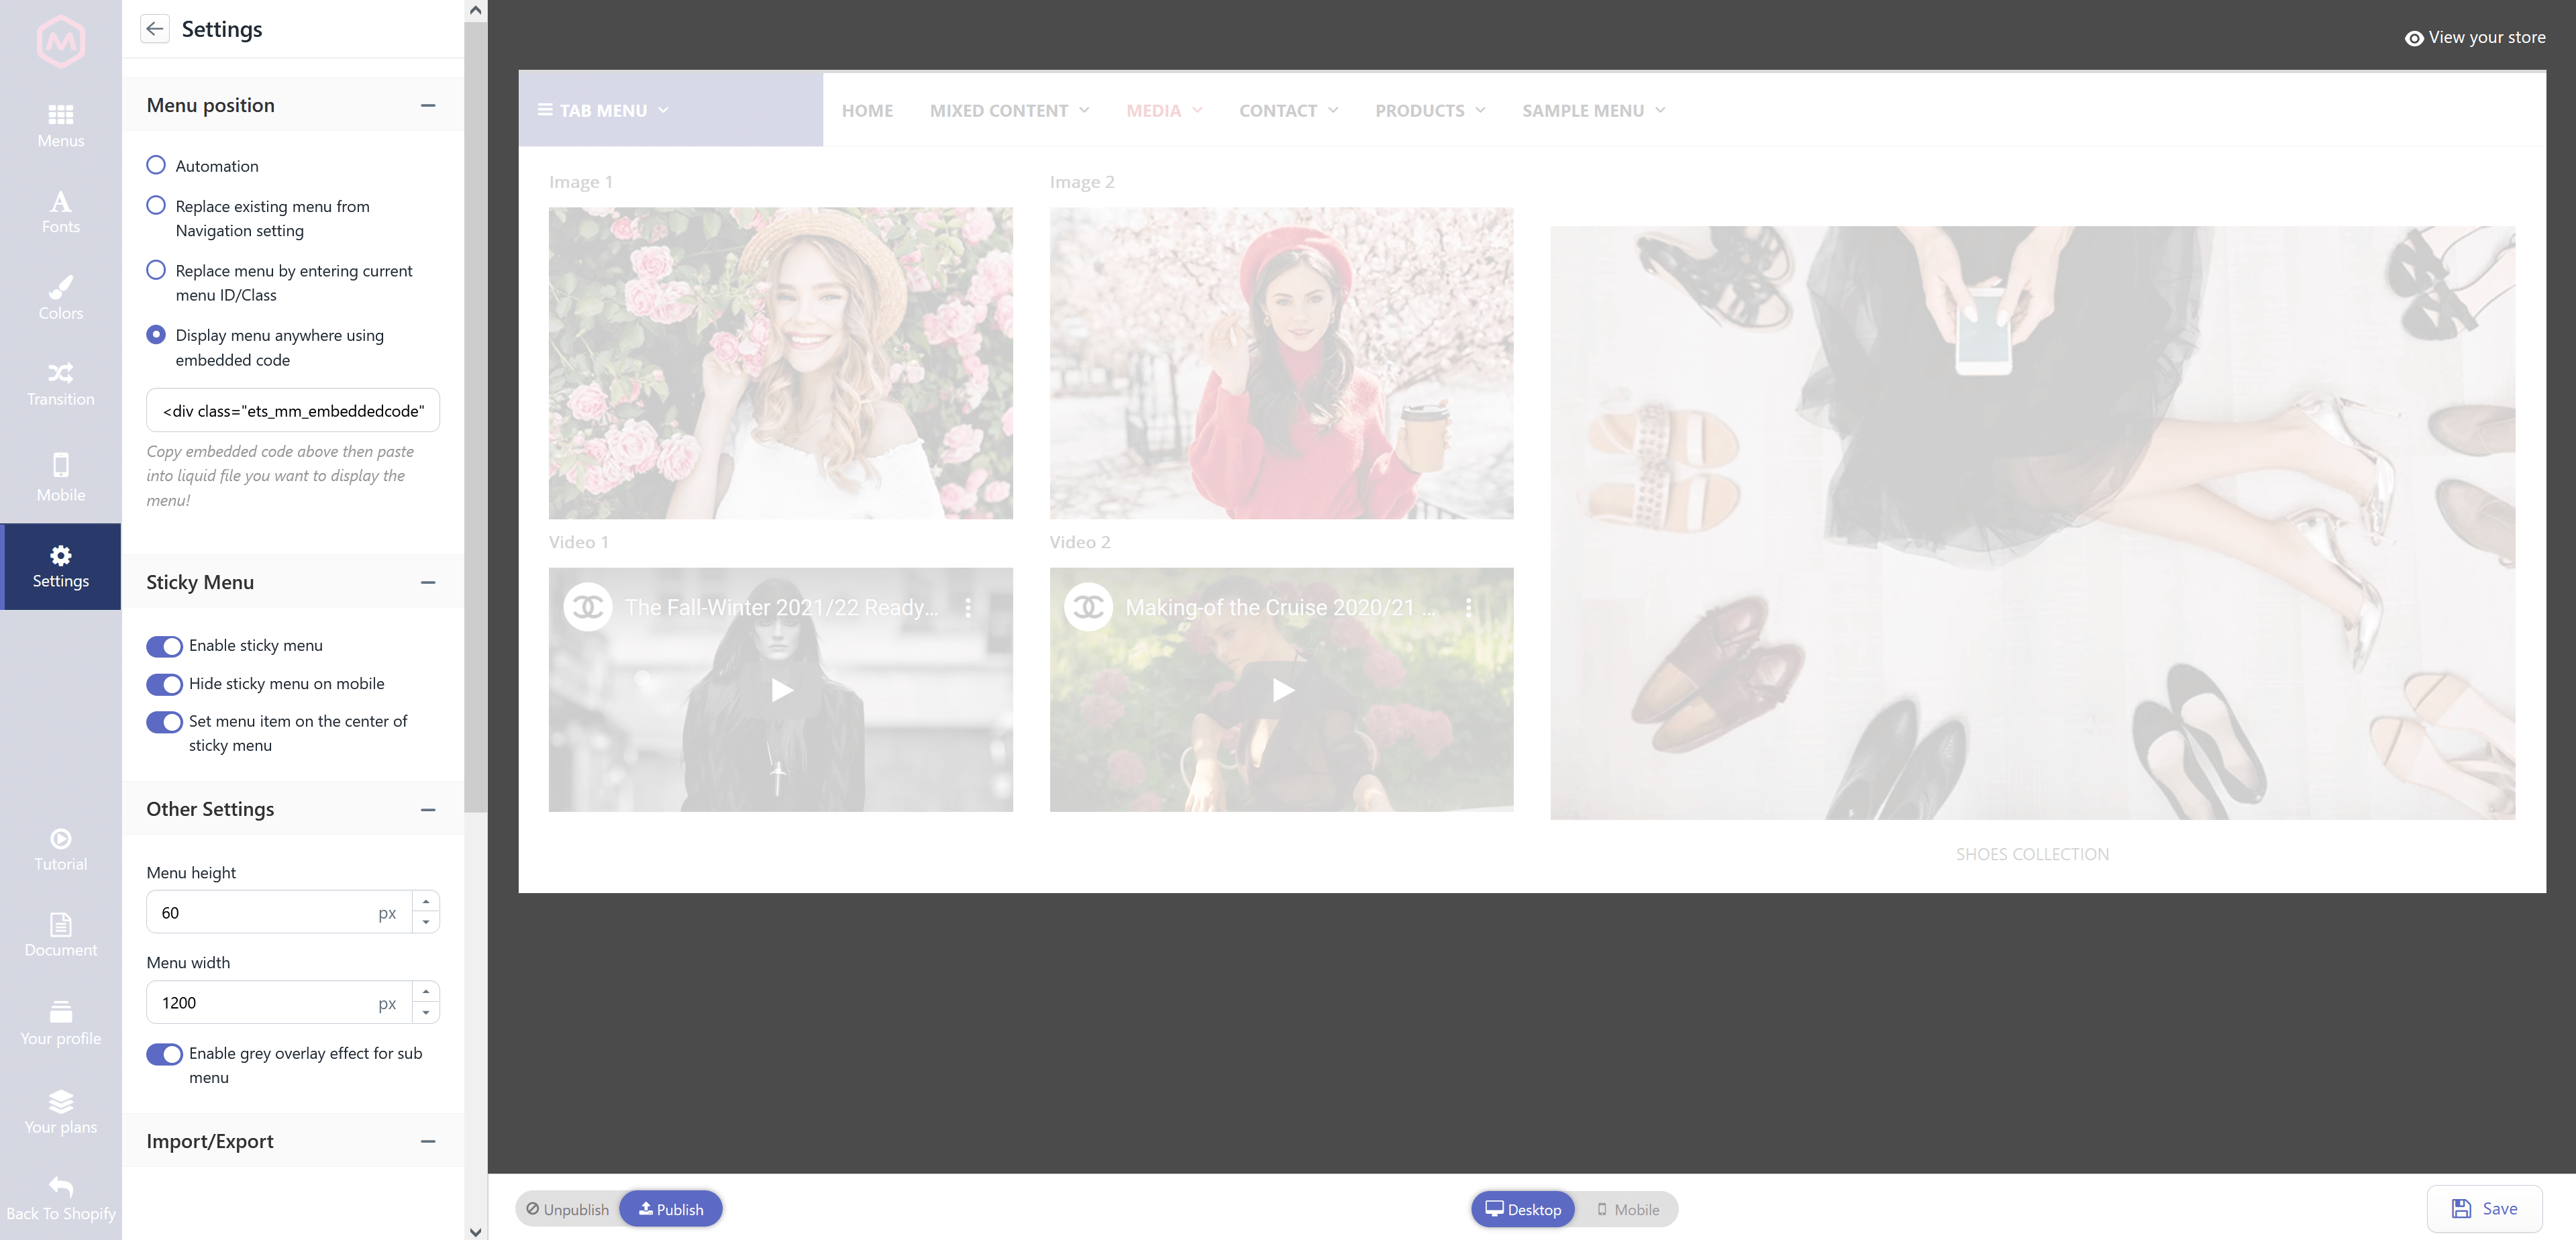
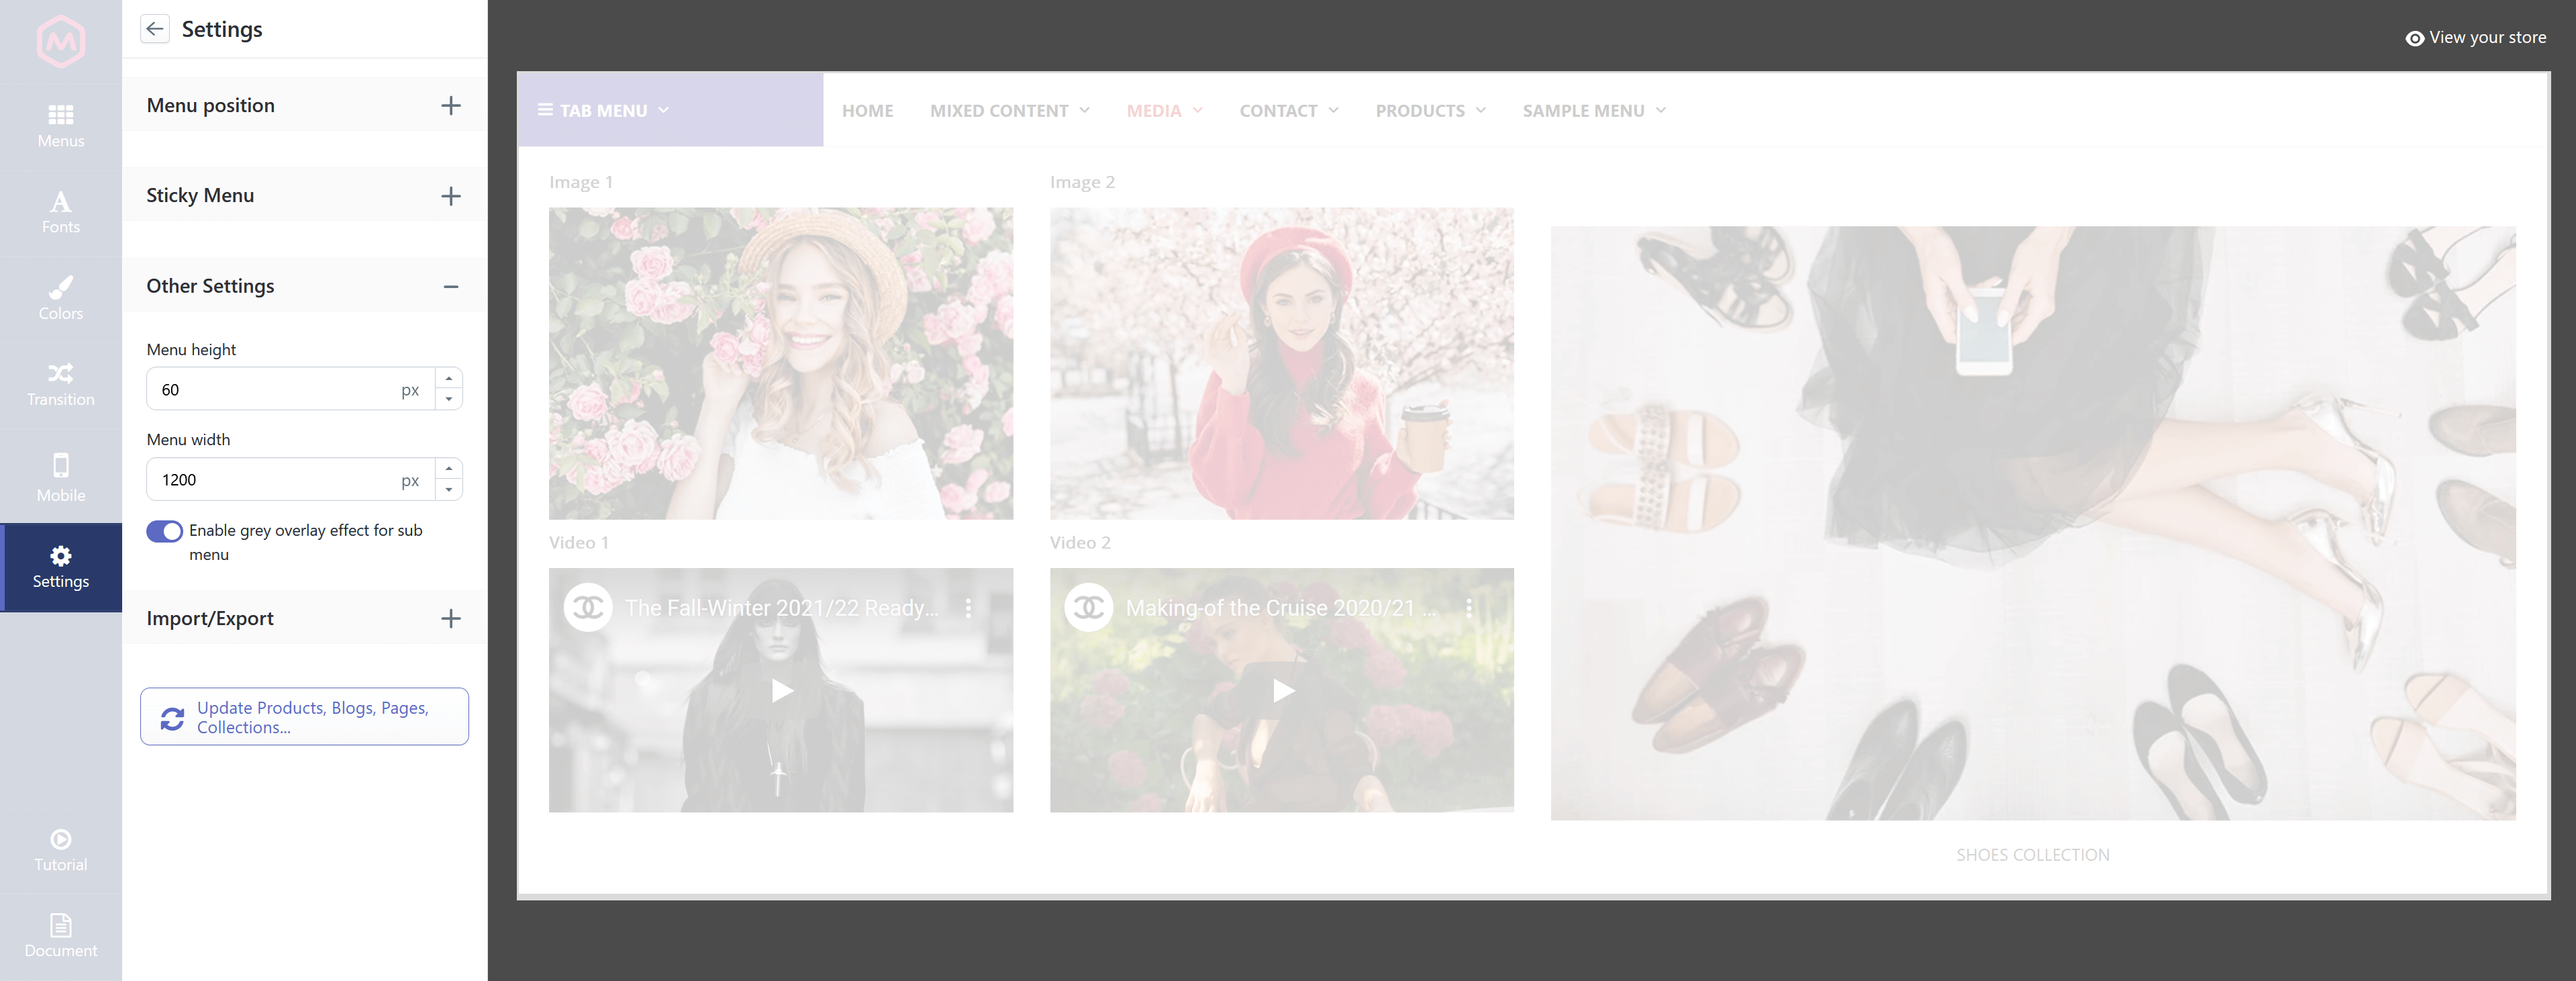
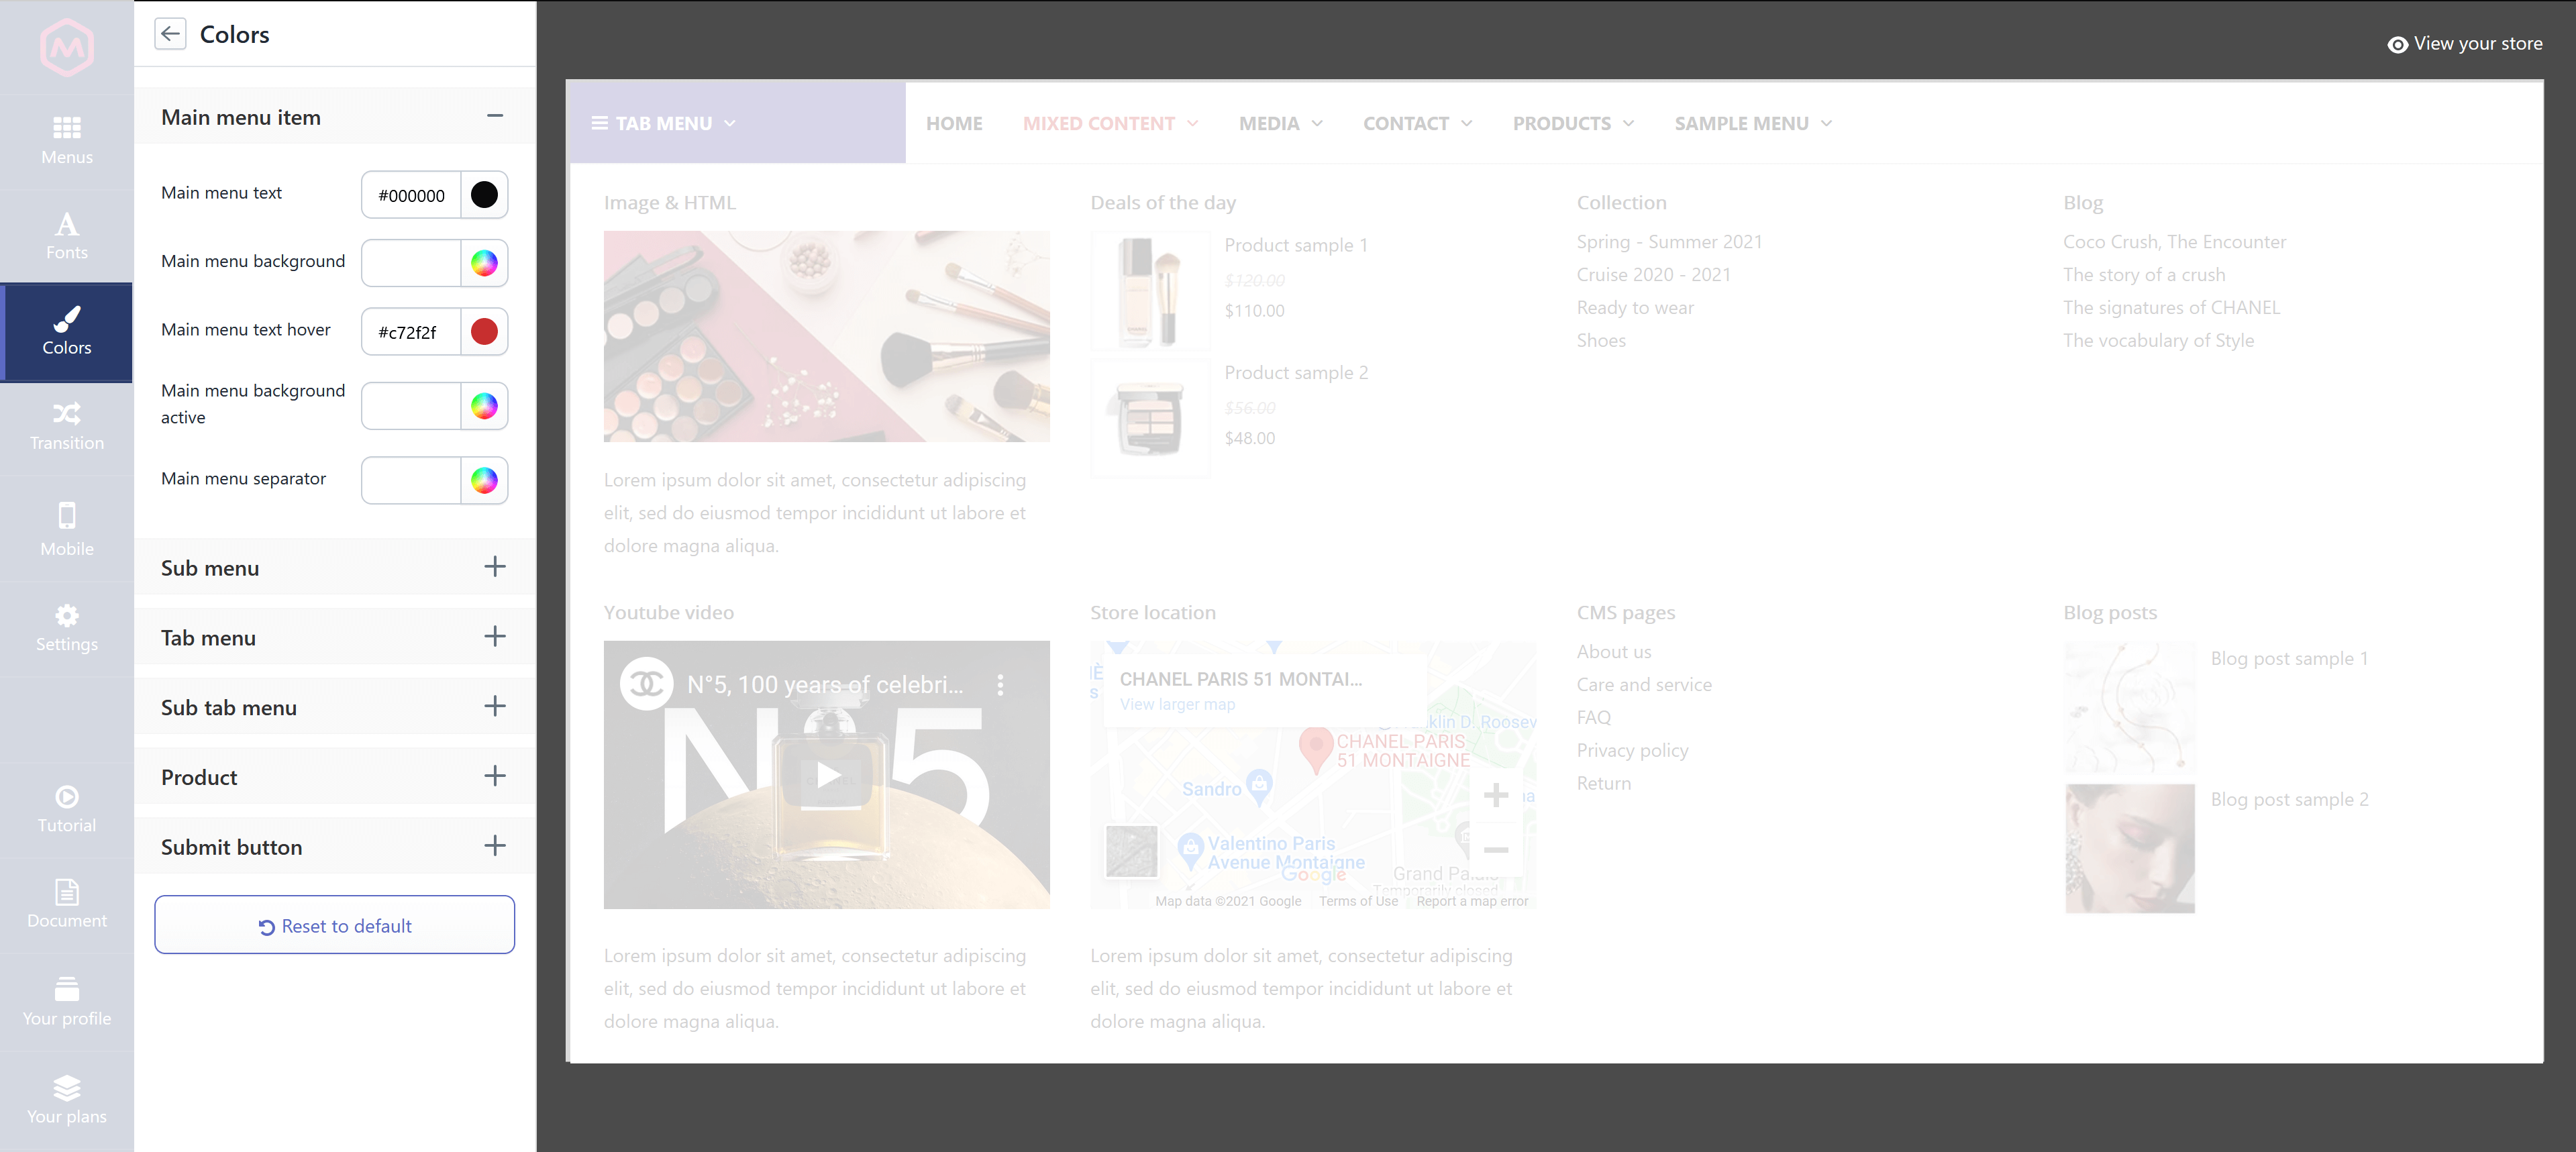
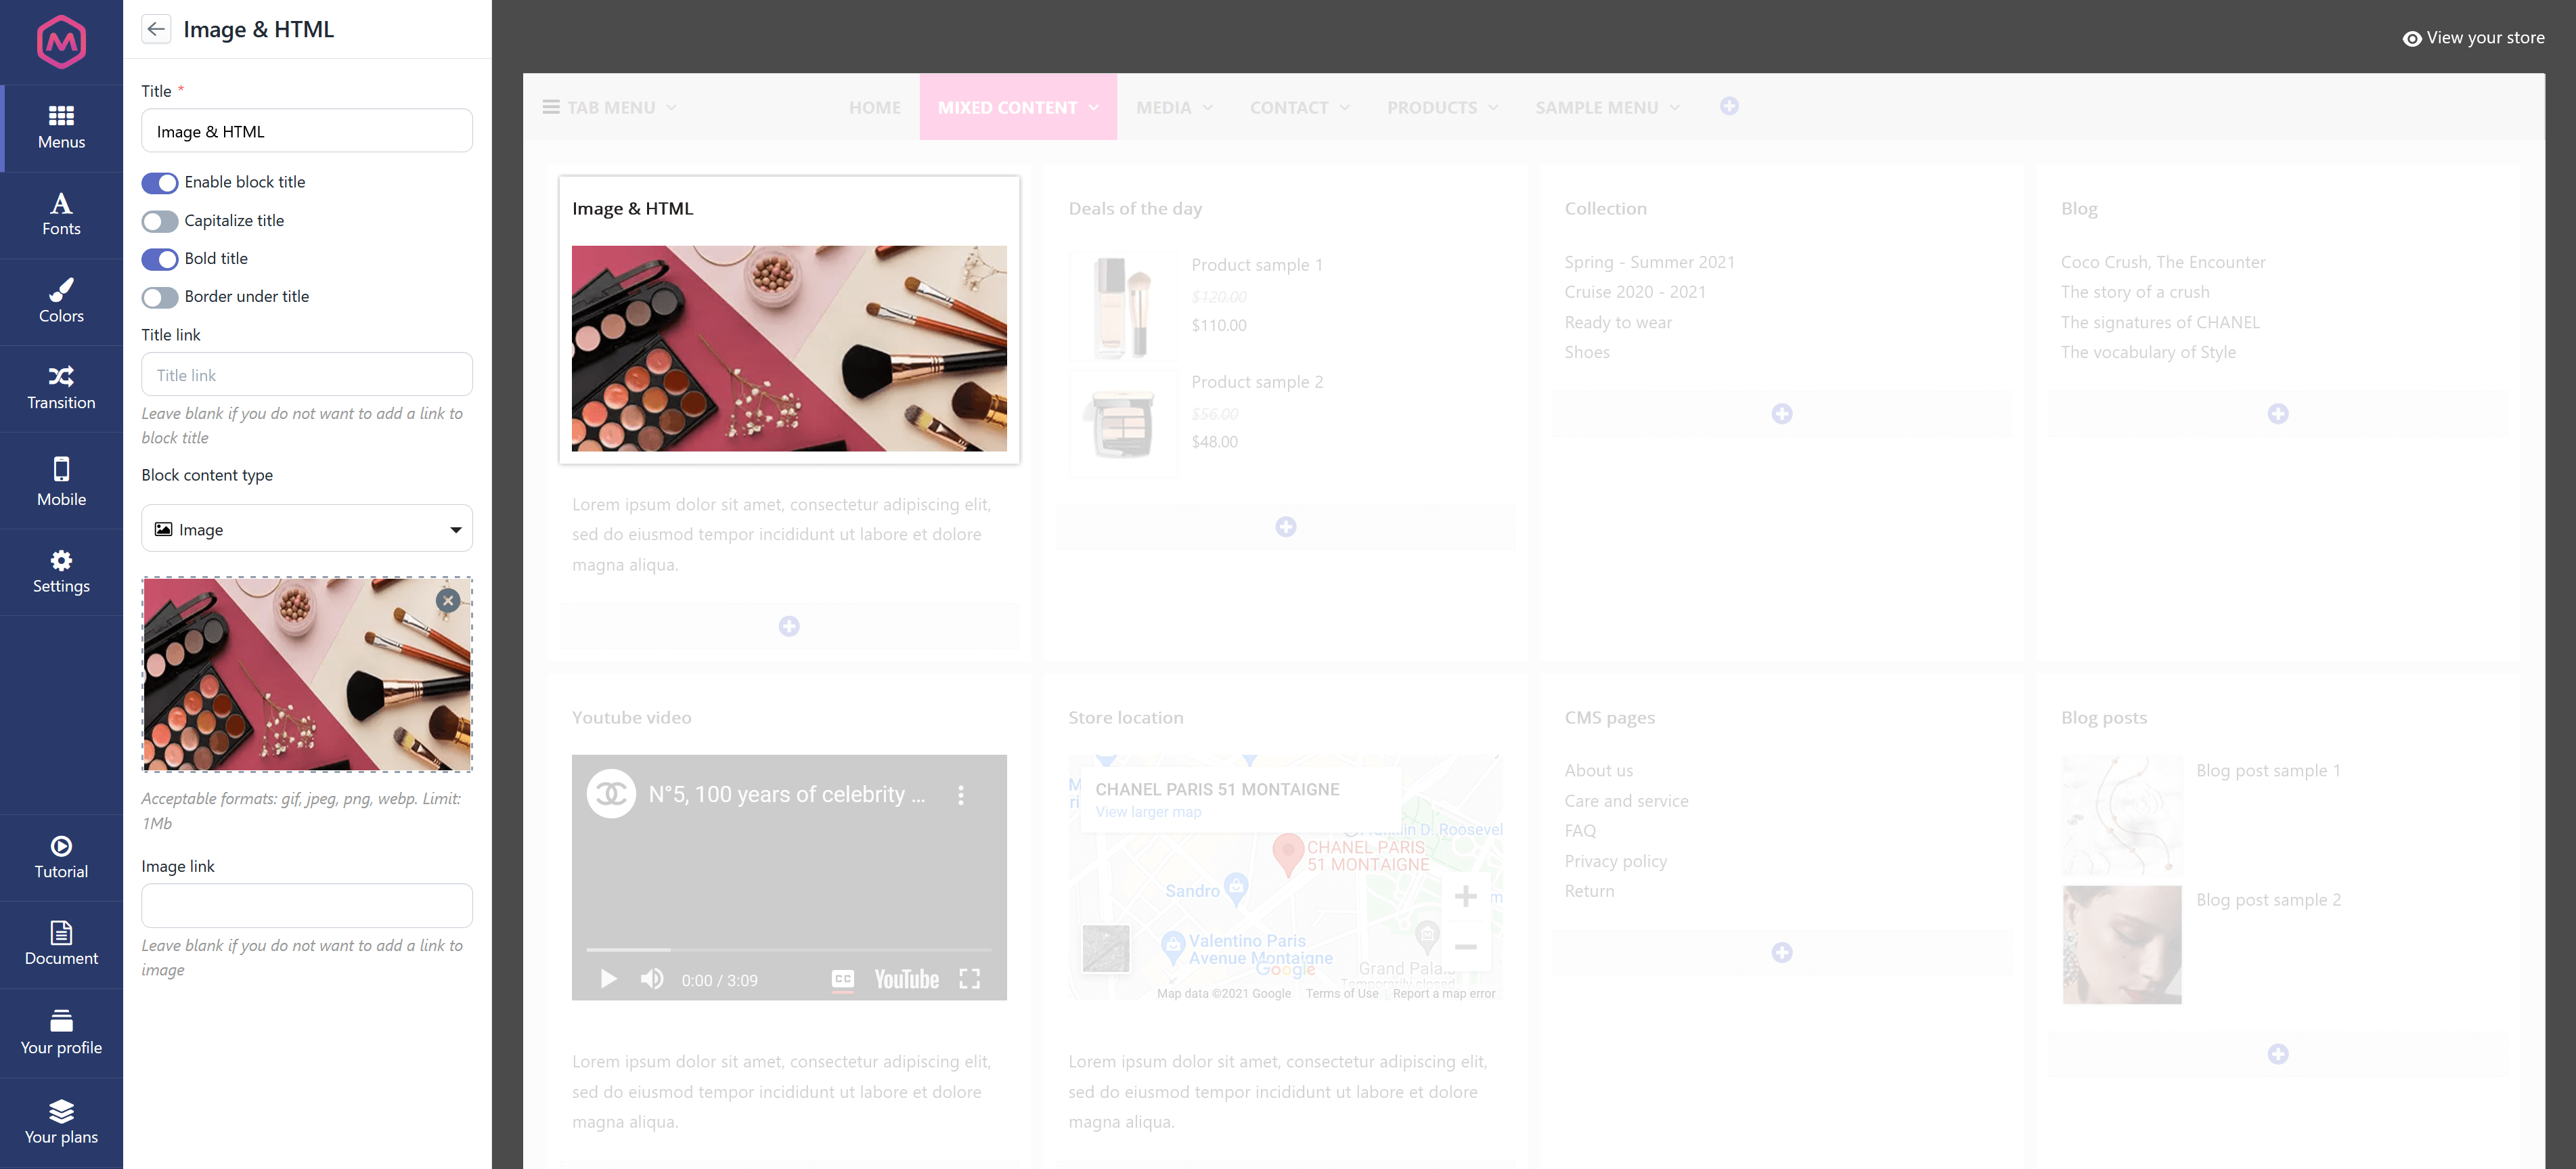
2. Image

Image block type allows you to display any image on your mega menu. You can upload images with the following formats: gif, jpeg, png, webp. Limit: 1Mb
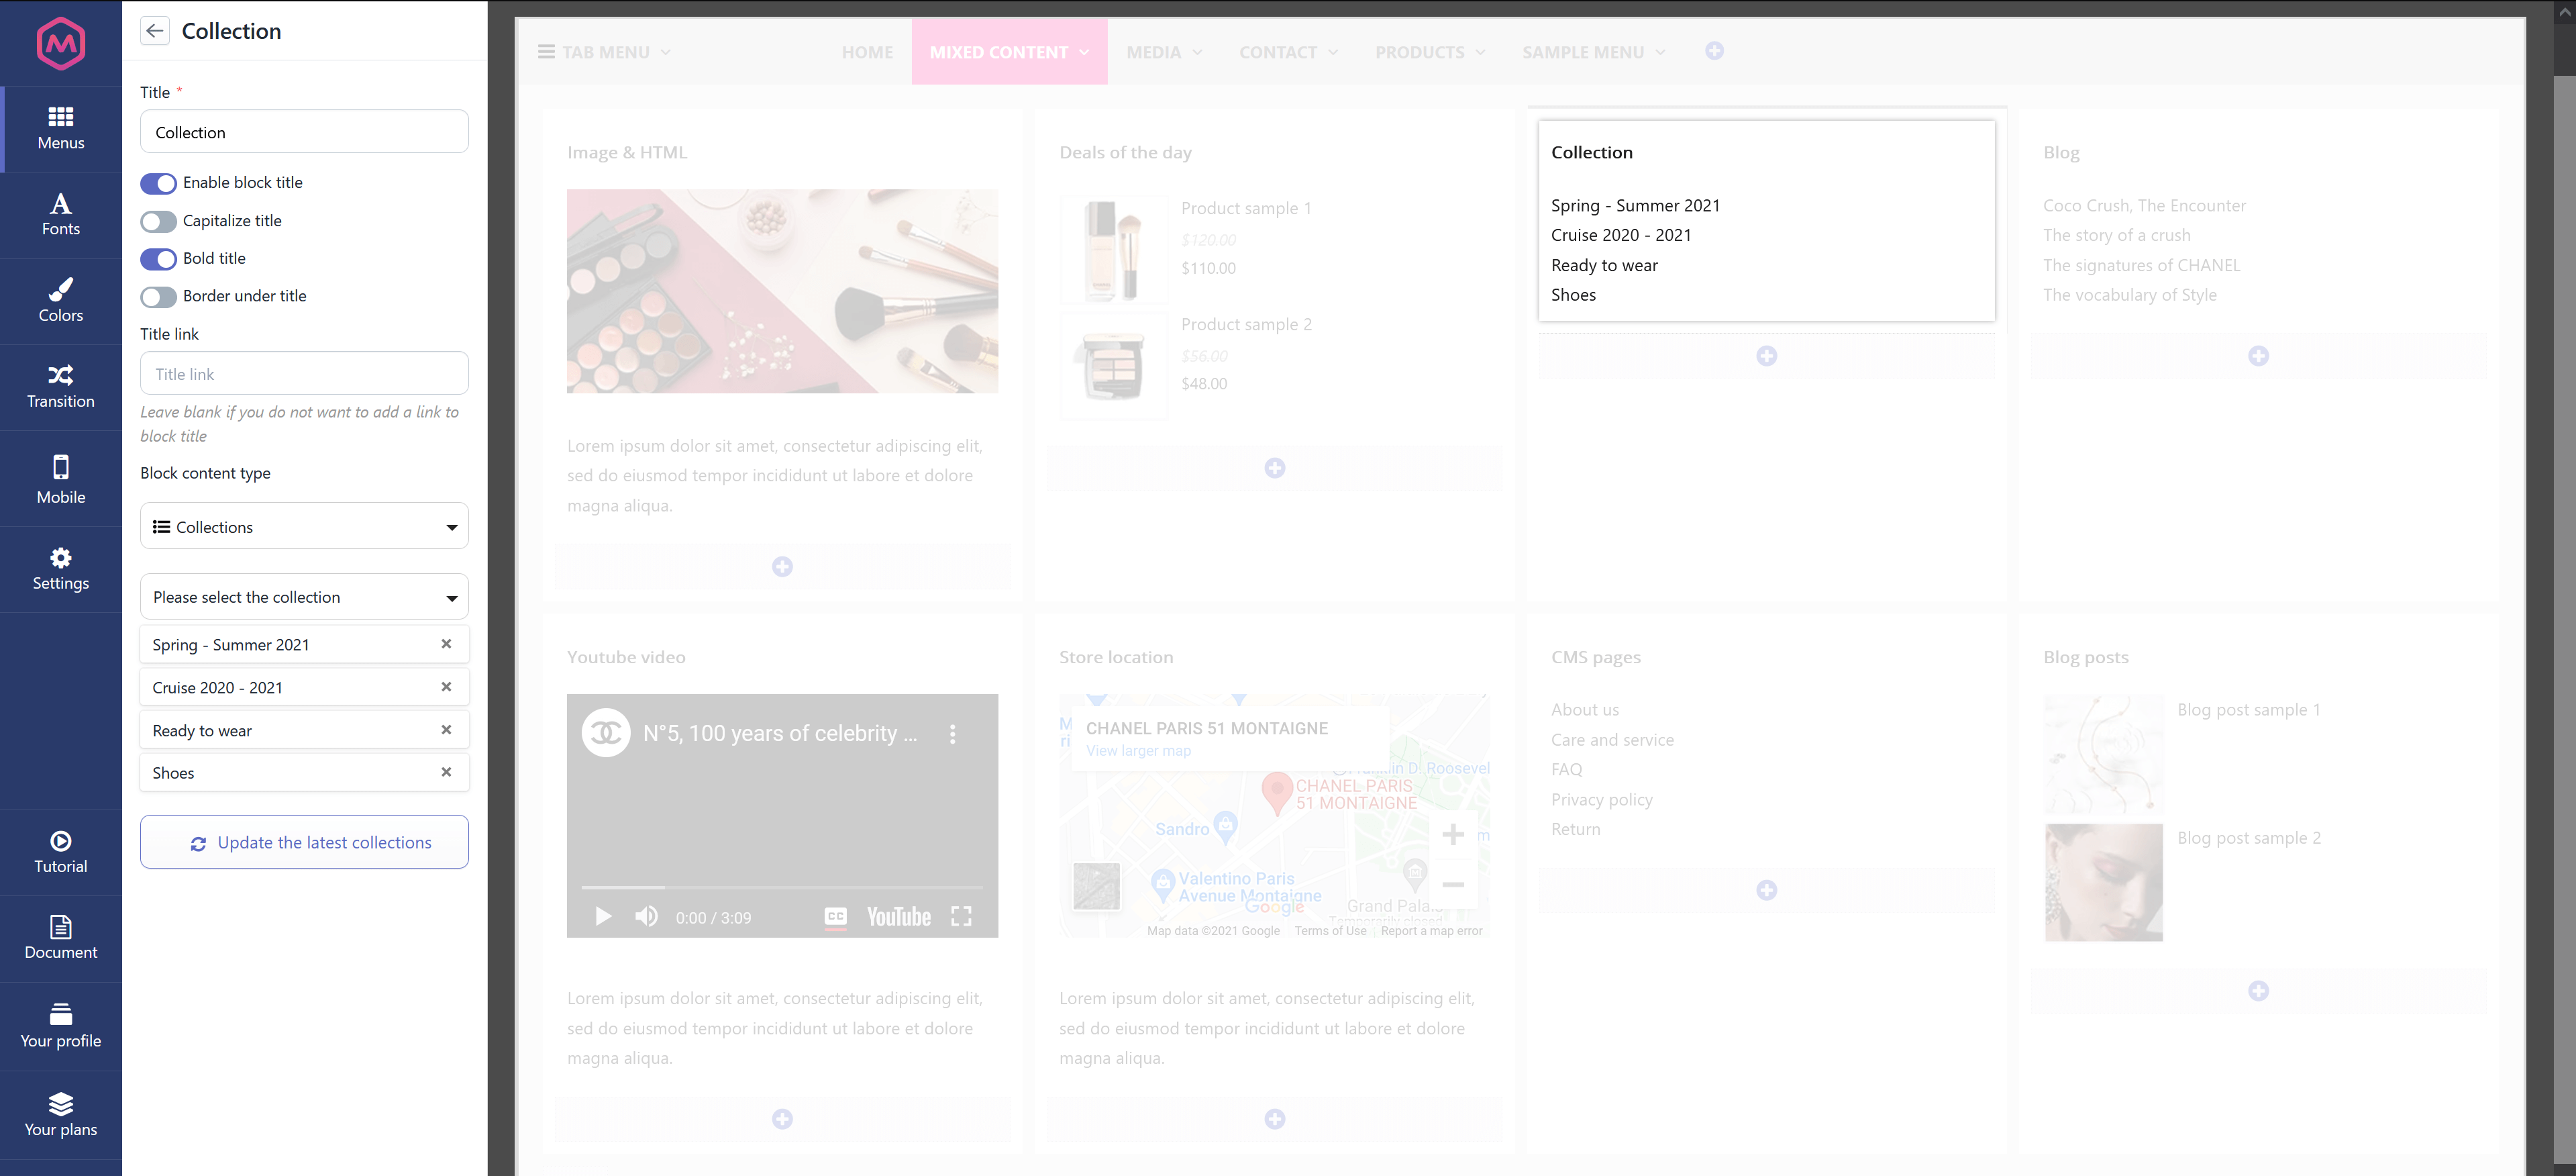
3. Collections

Collections block type allows you to display the collection list on your mega menu.
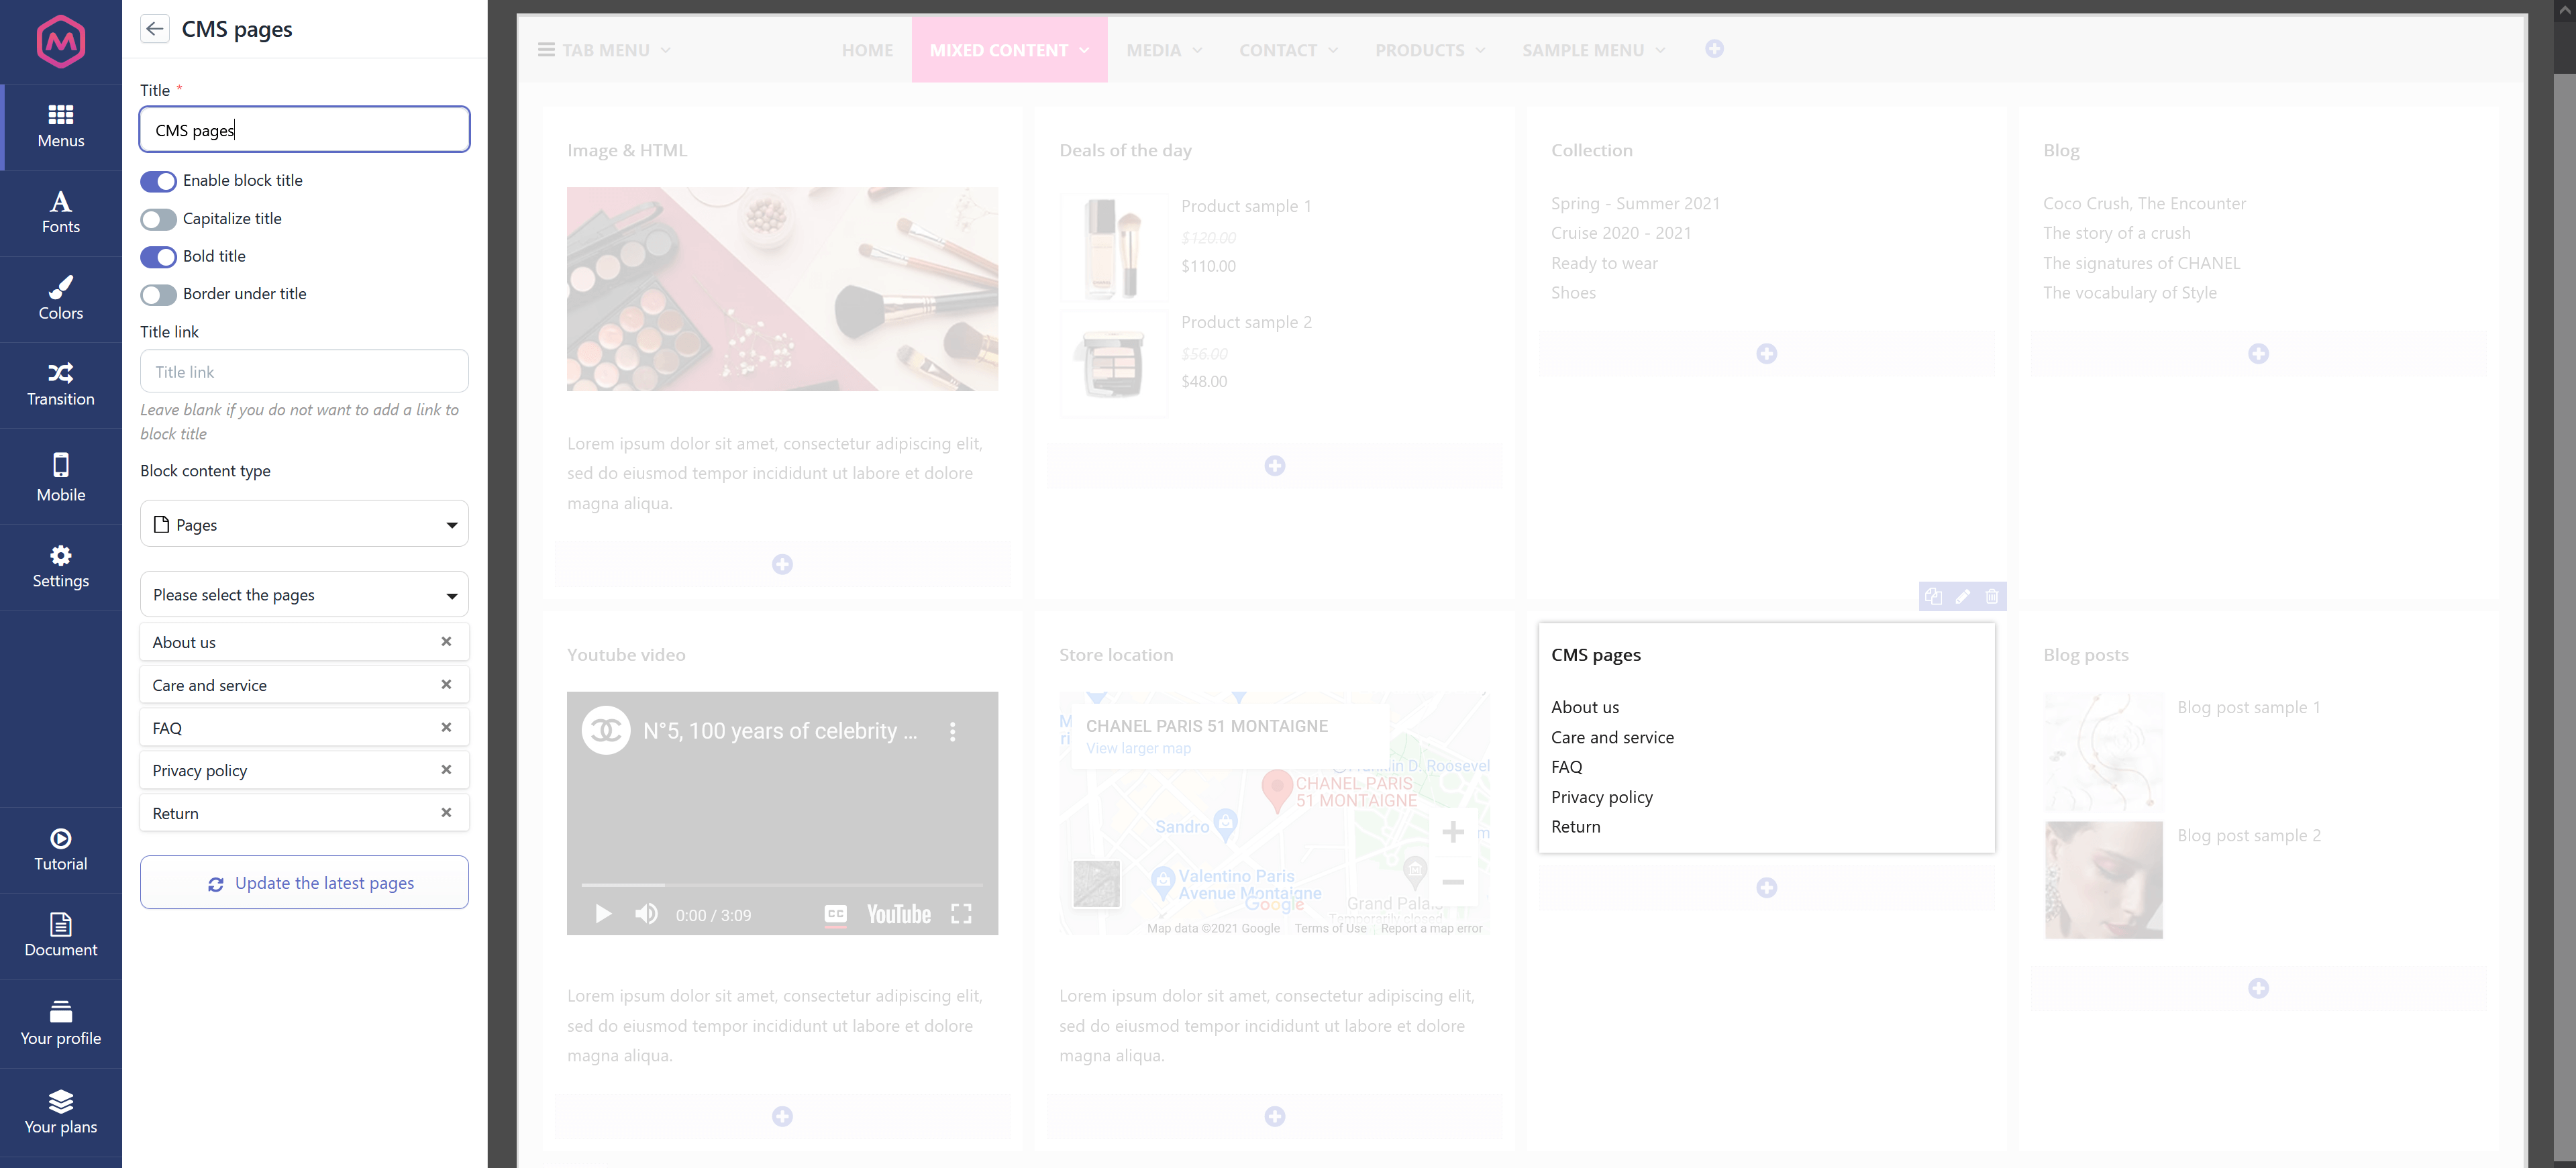
4. Pages

Pages block type allows you to display a list of CMS pages on your mega menu.
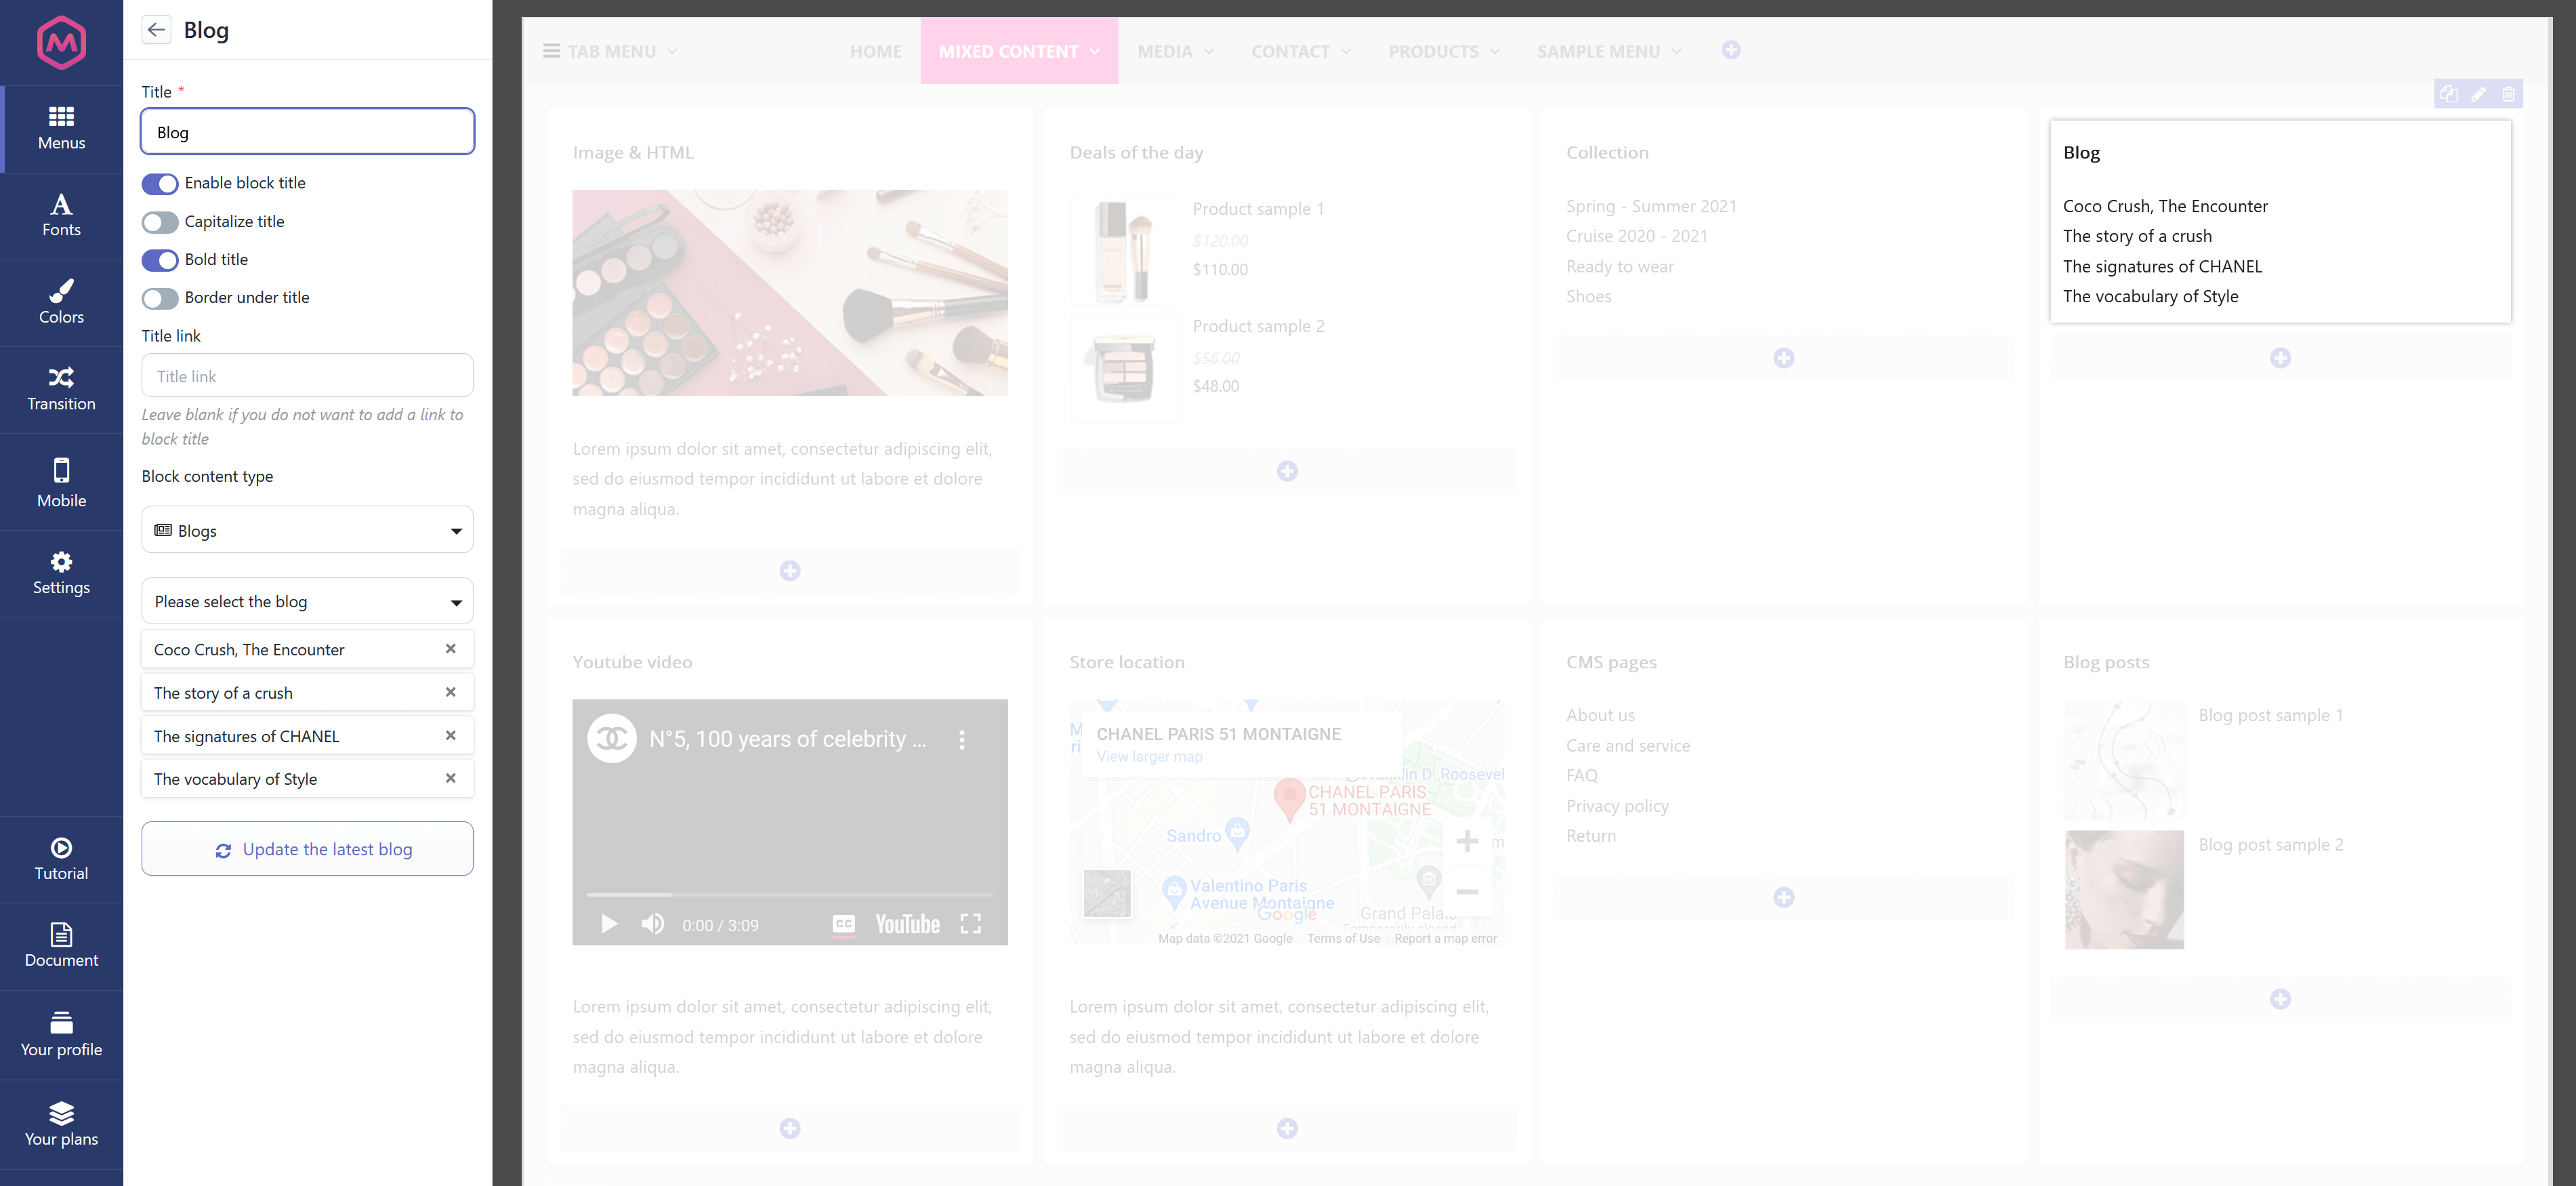
5. Blog

Blog block type allows you to display a list of blog categories on your mega menu.

6. Blog posts

Blog post block type allows you to display blog posts on your mega menu.

7. Product

Product block type allows you to display products on your mega menu

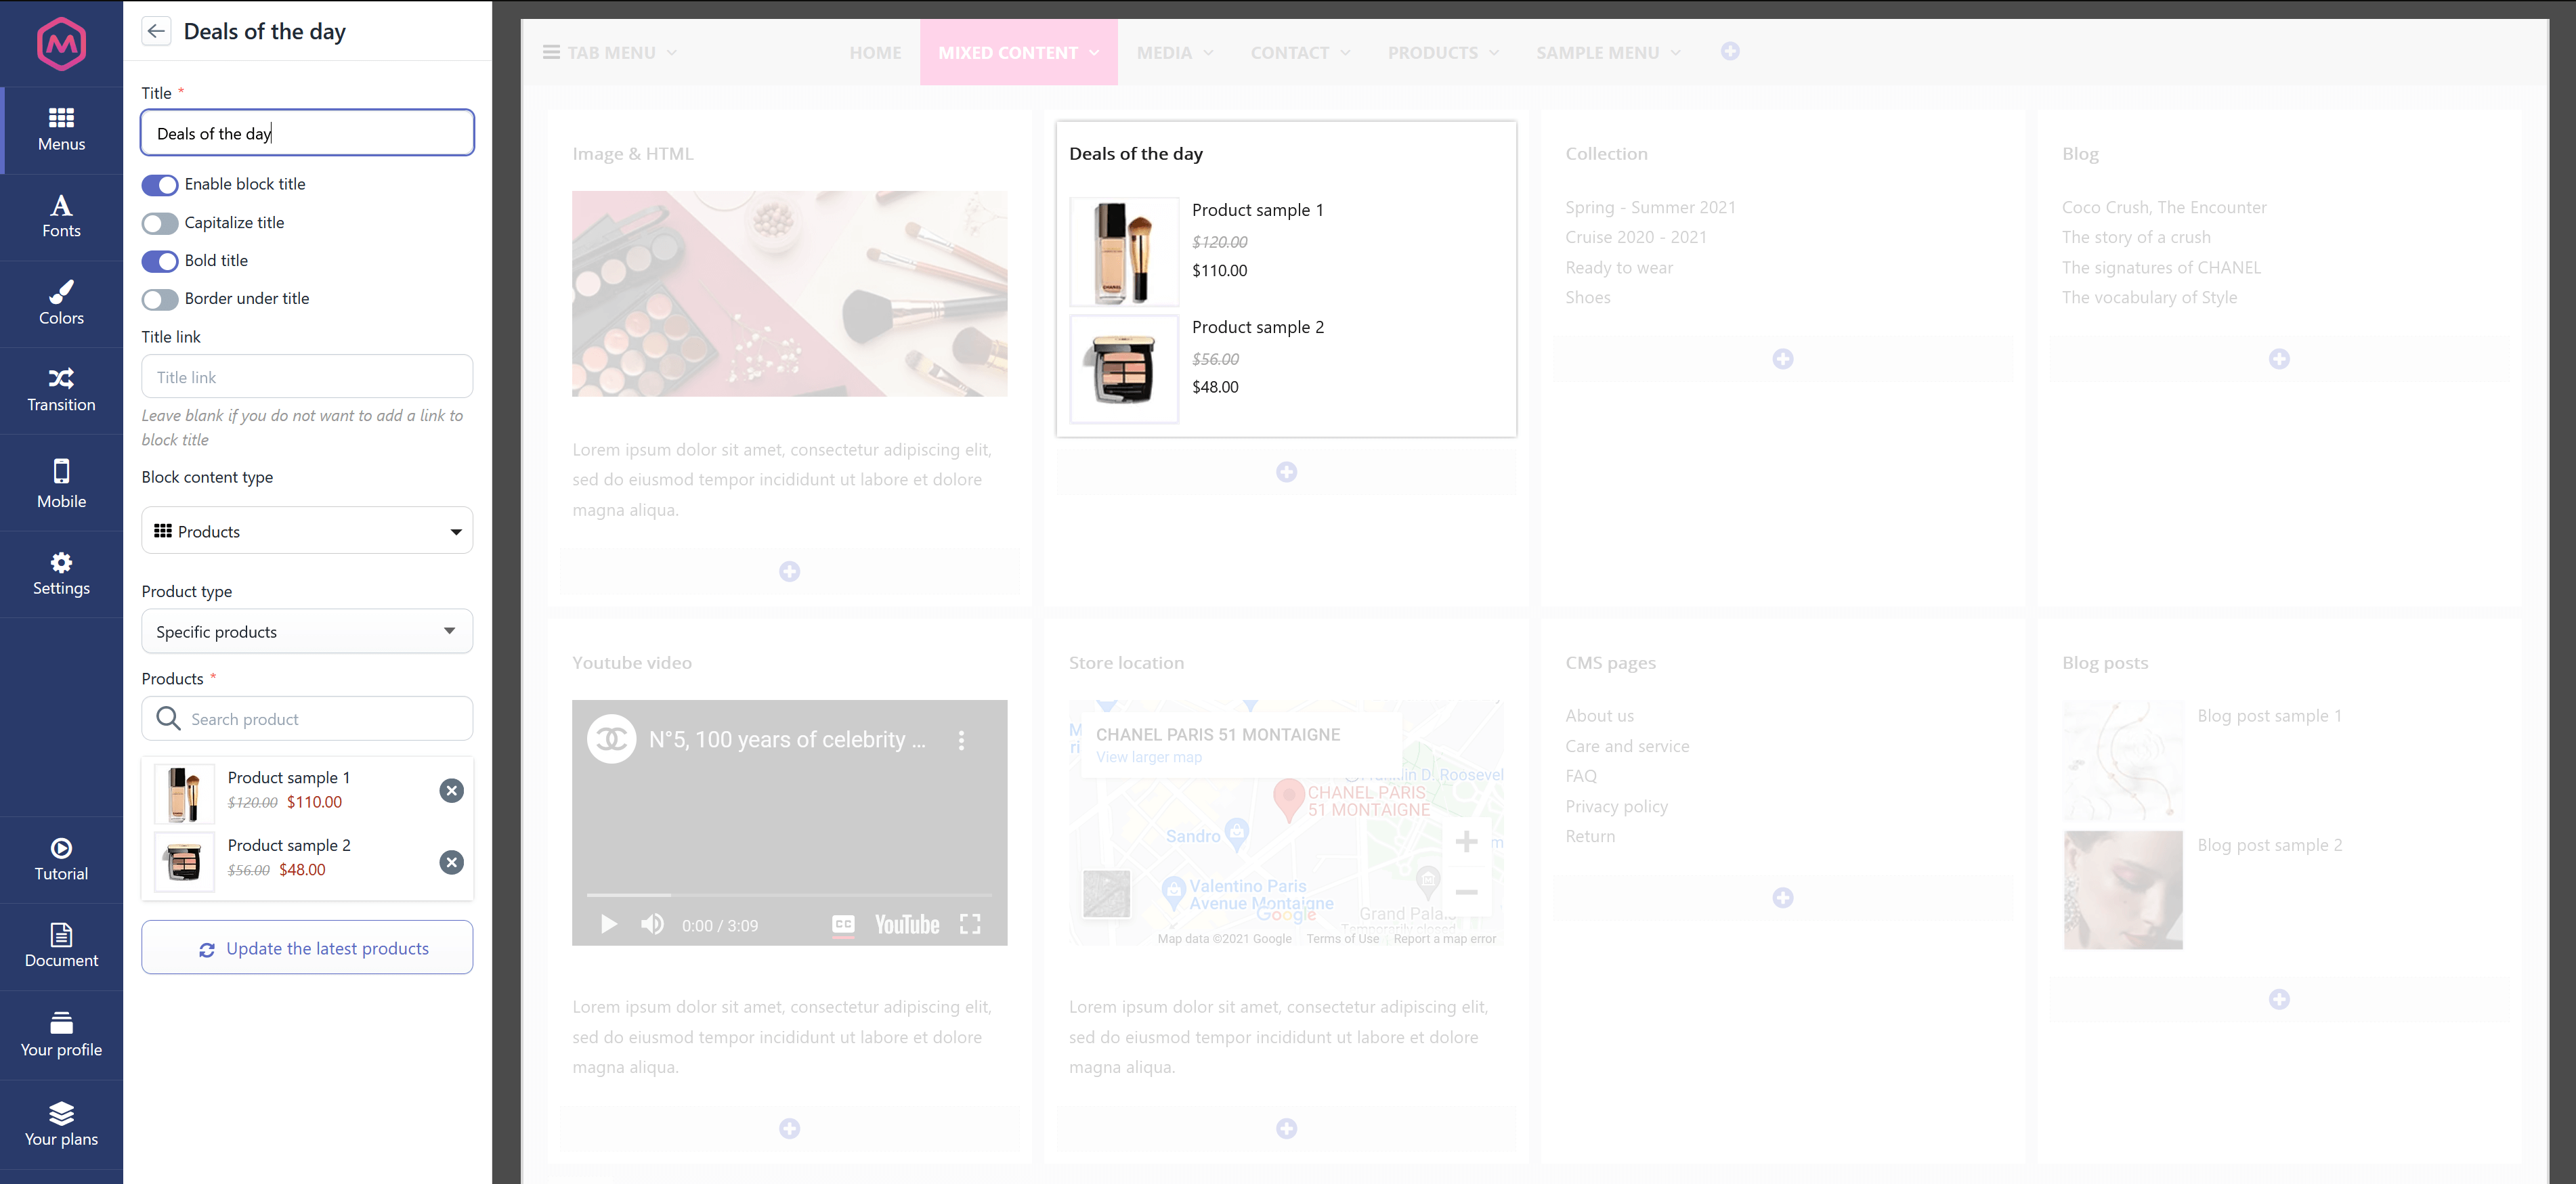
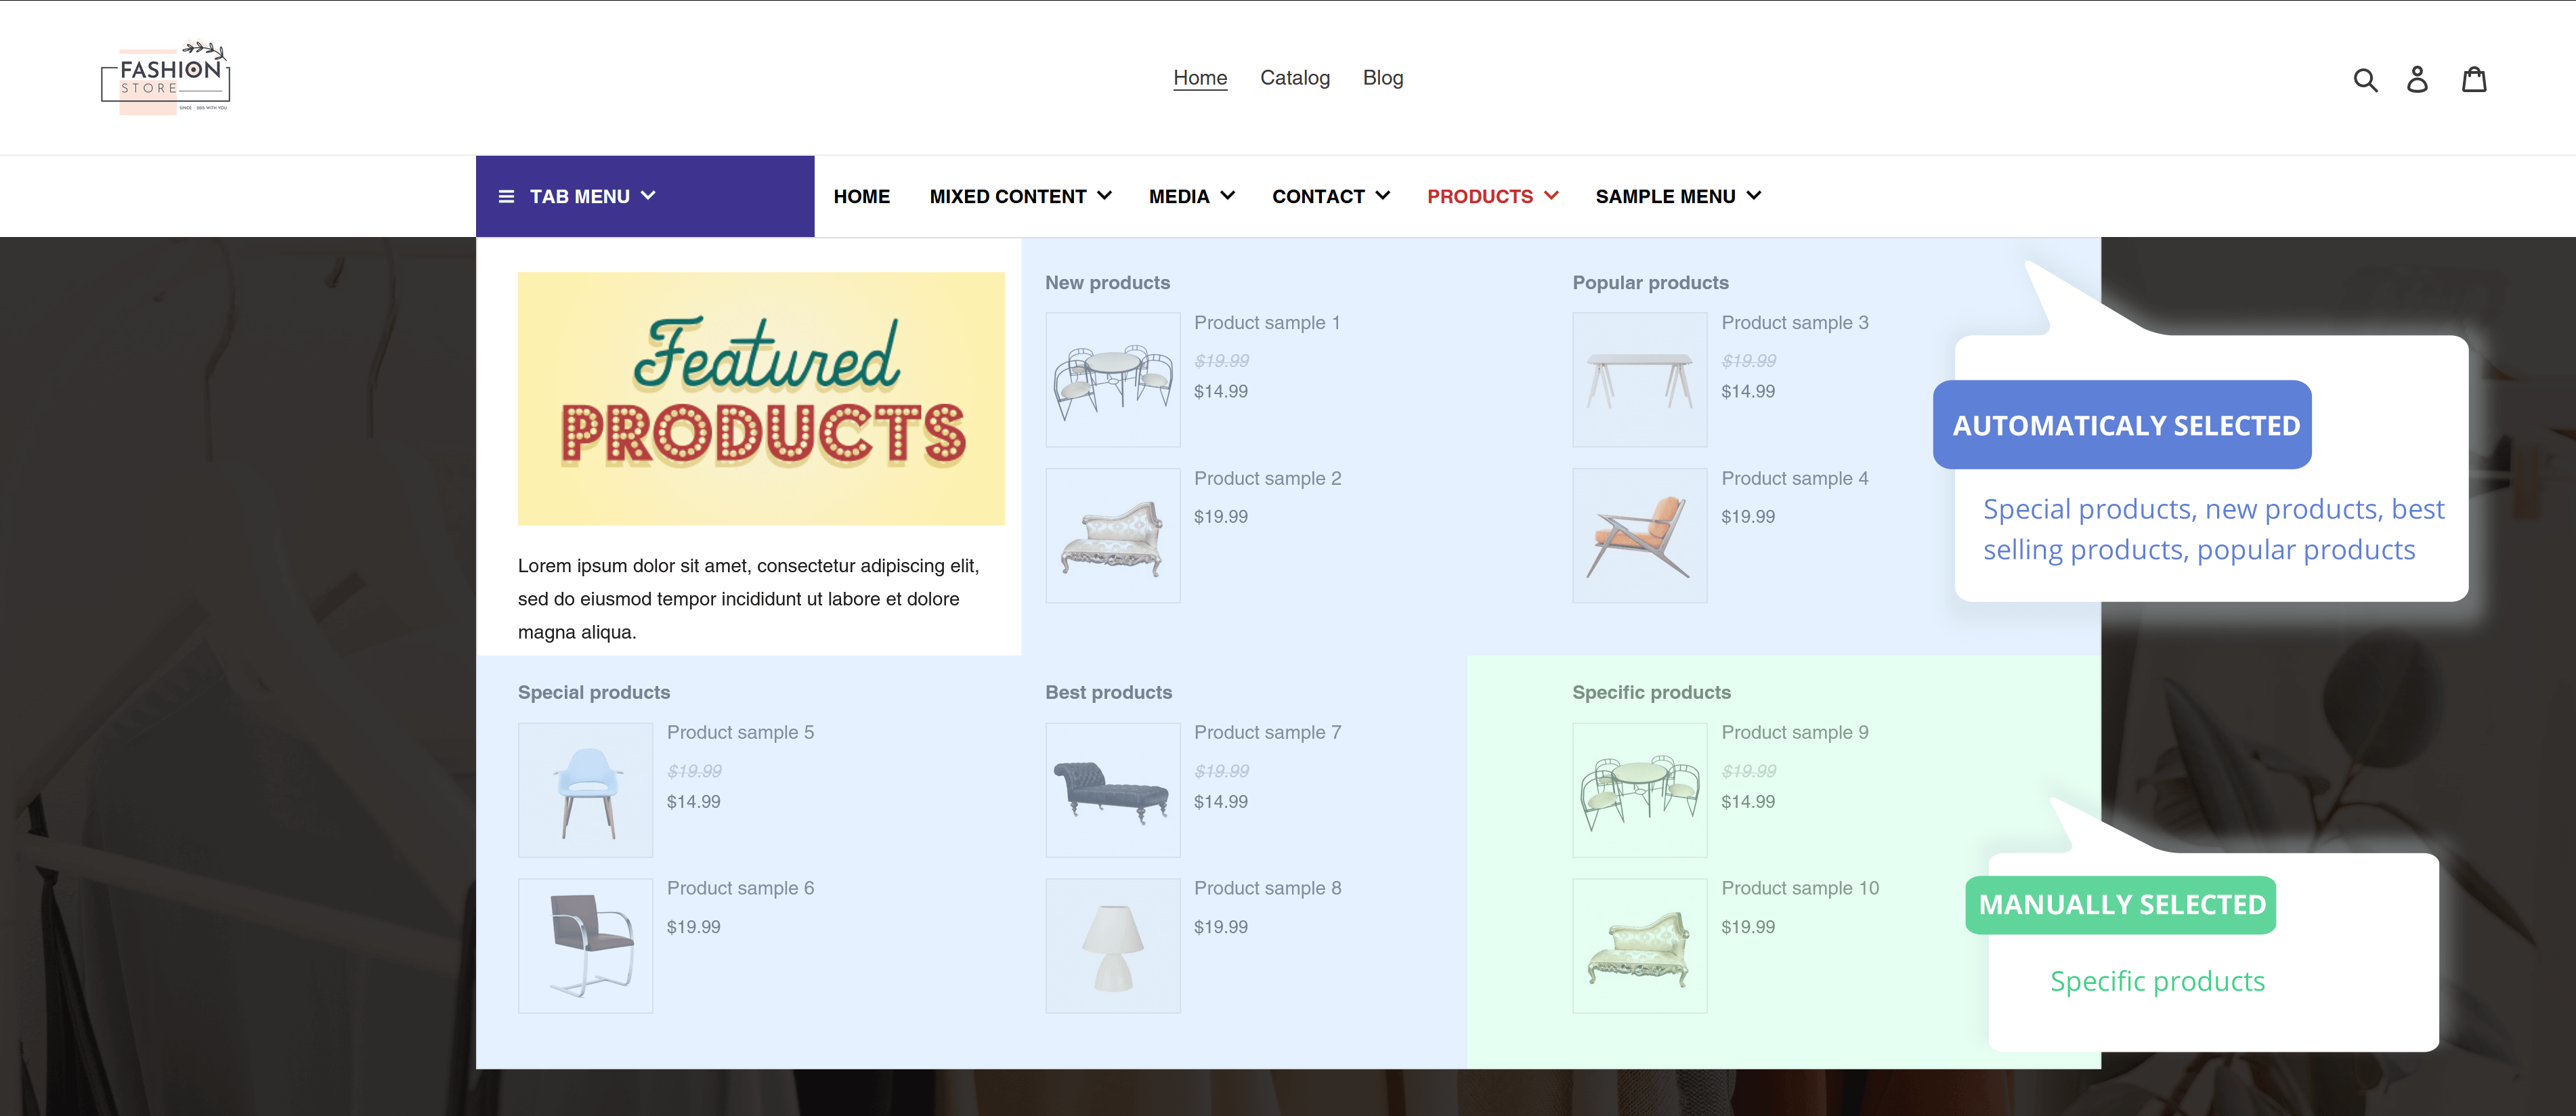
If you select one of the featured product types (new, popular, special, best sellers), Mega Menu Pro will automatically get the items that belong to these categories and display them. For “Specific products”, you can search for a product by entering its ID or name.

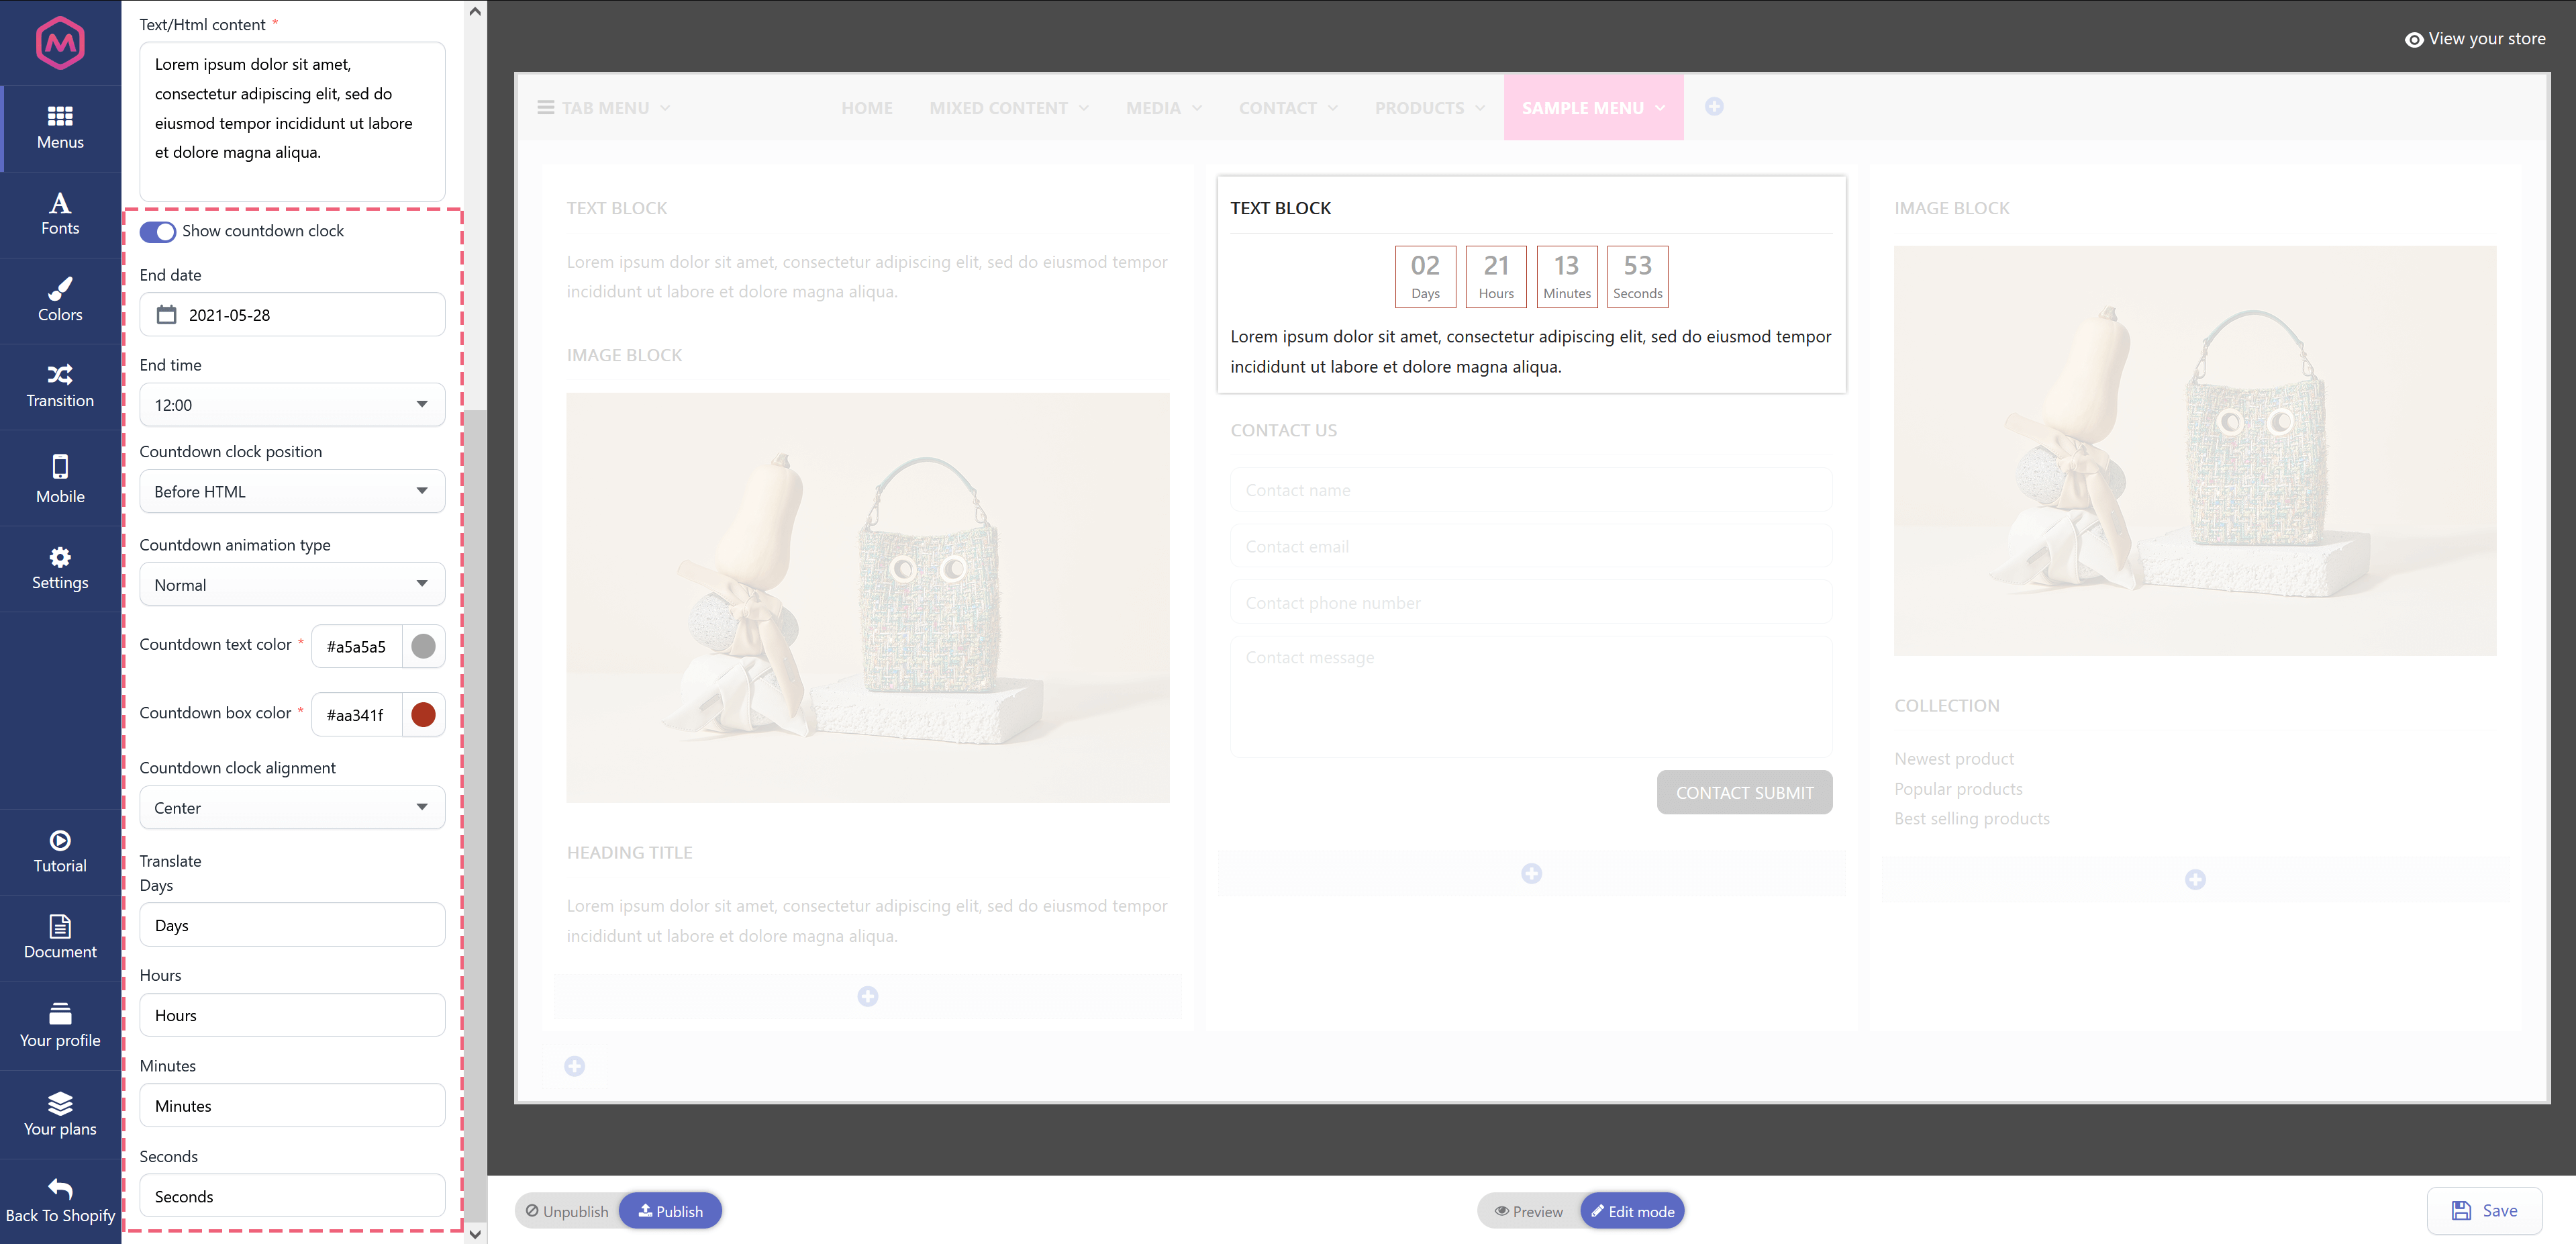
In addition, you can add a countdown clock onto the mega menu to promote your sale events or product discount time. To add a countdown clock, select “Text/HTML” block type and enable the “Show countdown clock” option.
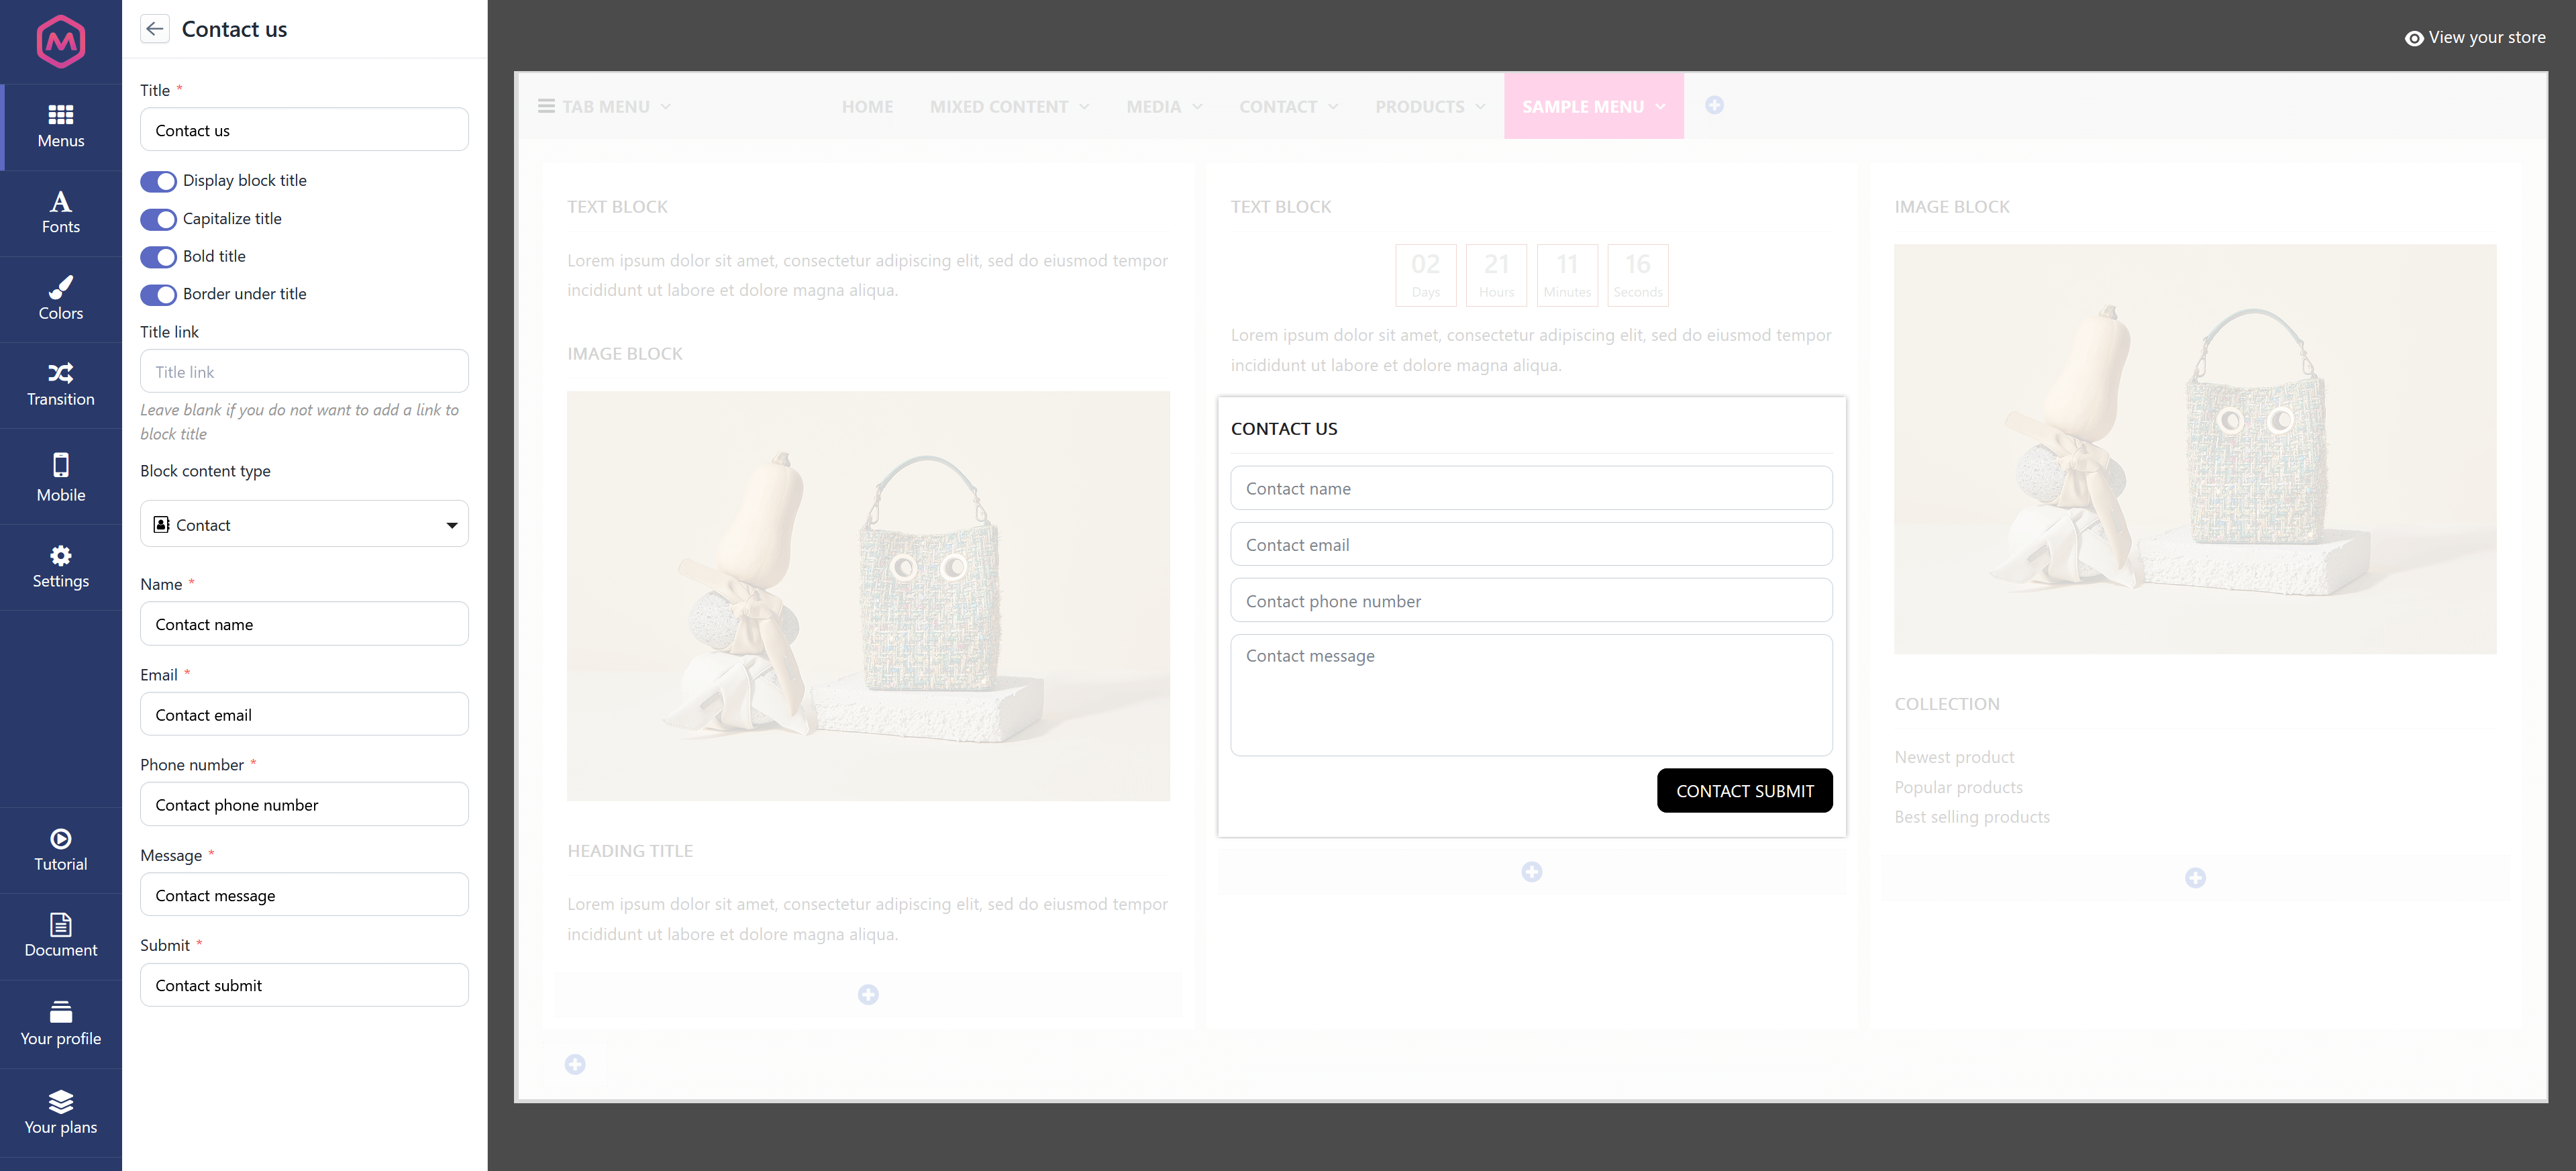
8. Contact form

You can add a contact form directly onto the menu and help your viewers to contact your store with ease.


General settings

In this section, we will instruct you on how to configure the general settings for your mega menu.

From Mega Menu Pro configuration page, click on “Settings” tab on the sidebar:


Menu position

Select a position to display your mega menu on store font.

  • Automation: the mega menu you created will replace the default menu of your current theme. We have tested this option on all the Shopify free themes and many paid themes, the menu displayed beautifully on those themes. If your menu is not displayed, please contact us for further help.
  • Replace existing menu from “Navigation” setting: if you select this option, all settings from “Navigation” section of your Shopify Admin will be replaced with a mega menu created by Mega Menu Pro.

If your store is protected with a password, please remove the password to allow our app to replace your existing menu with a mega menu.

How to remove your password:

  1. From your Shopify admin, go to Online Store > Preferences.
  2. Go to the Password protection area.
  3. Uncheck Enable password.
  4. Click Save.

If your website is in development, you will not be able to remove password. Please select another option.

  • Replace menu by entering current menu ID/Class: if you want to replace a specific menu of the current theme, enter the menu class or ID here.

  • Display menu anywhere using embedded code: if you want to display the mega menu on a specific position, copy the embedded code and paste it into the “.liquid” file of the position you want to display.

https://www.youtube.com/watch?v=sNj9xMZezSA

Step 1: Go to “Online store” in your Shopify Admin Panel > On your “Current theme” select “Actions” -> “Edit Code

Step 2: Open the “.liquid” file you want to paste embedded code into. For example, in the screenshot below we pasted embedded code into the “theme.liquid” file:

Click “Save” to complete.

Sticky menu

A sticky menu is a fixed navigation menu on a webpage that remains visible and in the same position as the user scrolls down and moves about a site. Persistent navigation bars – or sticky menu – are now a web design standard. You can find all setting options related to the sticky menu here:

Other settings

You can customize mega menu height, width or enable overlay effect for the submenu.

Import/export

Mega Menu Pro allows you to import/export your entire mega menu content in one click. This is an advanced, unique feature in Mega Menu Pro which helps you to easily backup or transfer menu content when required.

To import/export your mega menu content, click on “Import” / “Export” image.

Update data

When your store has the new update of products, blog posts, CMS pages, collections, etc. and you want to apply these updates to your mega menu, navigate to “Settings” tab, scroll down and click on “Update Products, Blogs, Pages, Collections, …” button.

IMPORTANT NOTE:

You need to enable the Mega Menu Pro app to display it on the storefront. Here are the instructions to enable the app:

  • Go to “Online Store” in your Shopify Admin Panel > On your “Current theme” select “Customize”.

  • In the bottom left corner of the screen select “Theme settings” > click “App embeds” > Enable “Mega Menu Pro” and “Save“.

Customize your mega menu

Mega Menu Pro app provides a lot of design options to enable you to customize your mega menu and make it compatible with your current theme.

Fonts

On this tab, you can select a different font and font size for a specific menu element:

  • Main menu
  • Tab menu
  • Submenu: submenu heading, submenu text
  • Product: product name, product price, product selling price, product old price

Colors

Similar to Fonts, you can also pick a color for different menu elements:

  • Main menu item: main menu text color, main menu background, main menu text color when hover, main menu background when active, main menu separator color.
  • Submenu: submenu heading text color, sub menu heading bottom line, submenu heading text color when hover, submenu text color, sub menu link color, sub menu link color when hover, submenu background.
  • Tab menu: tab menu text color, tab menu background, tab menu text color when hover, tab menu background color when hover
  • Sub tab menu: sub tab menu text color, sub tab menu background, sub tab menu text color when hover, sub tab menu separator color.
  • Product: product name color, product name color when hover, product selling price color, product old price color.
  • Submit button

Transition

Select a transition effect you want to apply to your mega menu. Mega Menu Pro app supports 4 types of transition effect: default (none), slide down, scale down, zoom in.

Mobile

Mega Menu Pro app provides 4 mobile menu types to display your mega menu on mobile devices.


Extra tabs

Tutorial

The quick tutorial video to help you quickly create a new menu.

Document

Link to the full user guide of Mega Menu Pro app.

Your profile

Basic information of the Shopify store installed our app and basic Mega Menu Pro app information.


Uninstall app

How to delete all the Mega Menu Pro code

Installation of our Mega Menu Pro app automatically injects certain code snippets into your Shopify theme in order to make the installation process fully automatic and make our app work fast and smoothly. Moreover, during your usage, some embedded code may be pasted into the “.liquid” file to display mega menu on specific positions.

Unfortunately, when you uninstall Mega Menu Pro, we lose programmatic access to your store, thus we cannot remove the code snippets that we injected automatically and the embedded code you pasted into “.liquid” file.

Although these code snippets that we add do not harm your store even after the uninstallation process, you might want to remove them anyway, the following guide will walk you through this process.

Step 1: Go to “Online store” in your Shopify Admin Panel > On your “Current theme” select “Actions” -> “Edit Code


REMOVE CODE SNIPPETS

Step 2: In the “Assets” folder: delete any file that has “ets_” prefix.

REMOVE EMBEDDED CODE

Step 3: In the “Templates” folder:

– Open the “.liquid” file which contains embedded code you used to add

– Remove the embedded code