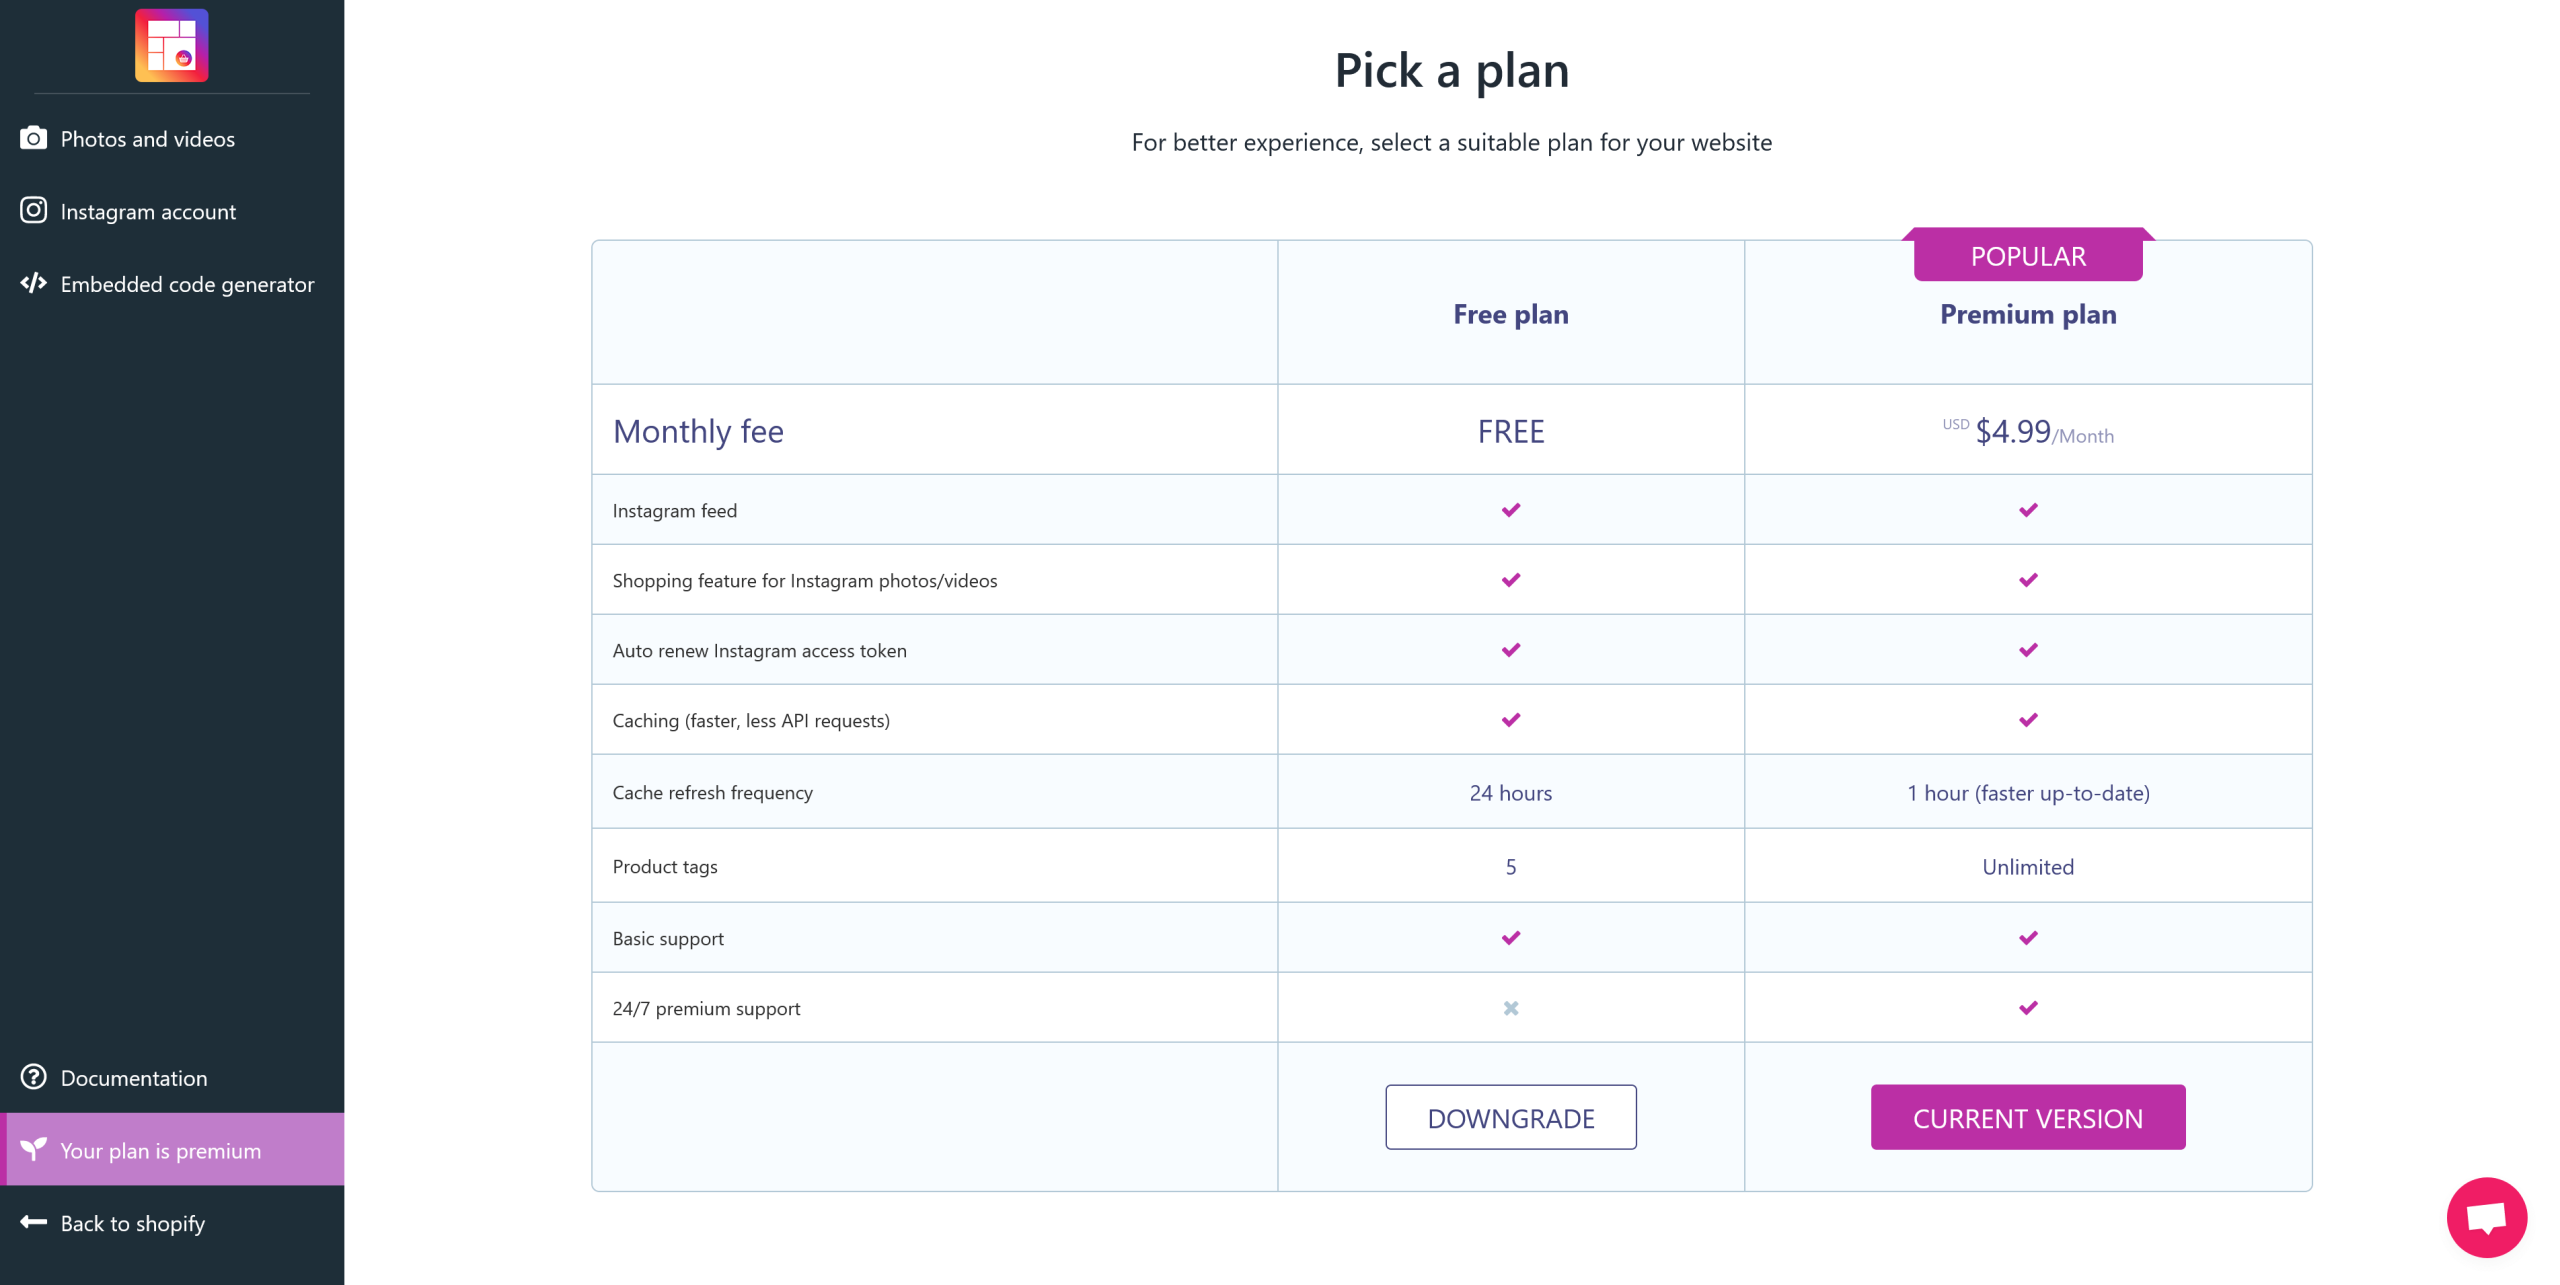
Welcome to VA: Instagram Slider & Feed app

Congratulations on your installation of VA: Instagram Slider & Feed! This documentation consists of several parts and describes the installation, creation, and setting up of the VA: Instagram Slider & Feed app process.

We did our greatest to create this manual info to be presented in a very straightforward, simple manner. But if you have any questions that are beyond the scope of this documentation, please feel free to contact us via our email address: [email protected]

What is VA: Instagram Slider & Feed?

VA: Instagram Slider & Feed is a simple but effective solution to showcase all your Instagram photos and videos on your Shopify store. No coding knowledge is required, super easy to set up, this app can help you increase social engagement, therefore, raise your brand awareness.

Discover our app features through this introduction video:

VA: Instagram Slider & Feed gives your online store a stylist and modern Instagram section for people to explore your best products. With the shopping feature, you can tag featured products on your photos and videos and let people discover your items from everywhere on your Shopify store.

Our app can also help you effortlessly integrate your Instagram account into Shopify store. Within a few clicks, you can display an eye-catching Instagram photo and video block on your store to inspire your visitors and turn them into customers with your stunning Instagram photos & videos.

Get started

The first thing you need to do is connecting your Instagram account with your Shopify online store. You will need to enter a string of Instagram Access Token.

Move to the next step to learn how to get your Instagram Access Token.

After getting and entering your Instagram Access Token, please enter your Instagram display name and Instagram profile URL. Click “Save” to finish.

That’s all! Your Instagram account is now successfully connected with the Shopify store.

How to get Instagram Access Token

Starting on December 4th 2024, the Instagram Basic Display API will no longer be available. After December 4th, 2024, please generate an access token using an Instagram Business account. For more details, please visit this link: https://developers.facebook.com/blog/post/2024/09/04/update-on-instagram-basic-display-api/

If you change your Instagram password, your current token will no longer be valid.

Follow these step-by-step instructions to generate and retrieve an Instagram access token for your business account.

***Note: Ensure you have a business Instagram account linked to a Facebook page. If you’re using a personal Instagram account, you’ll need to convert it to a business account.

Step 1: Connect Your Instagram Account to Your Facebook Page

Log in to your Facebook account and navigate to the page you want to link with your Instagram account. Click the “Switch Now” button to switch to that page.

On the left-hand sidebar, look for the option “Boost Instagram post”. Click it to proceed.

You’ll find a “Connect account” button on the next page. Click it, and a series of permission requests will appear. Confirm each by clicking “Connect” and “Confirm”. A new window will appear asking for your Instagram login details. Enter your credentials and log in.

After logging in, you’ll be asked to choose between a “Creator” or “Business” account. Select the “Business” option, then click “Next”.

Instagram will prompt you with several permission requests. Continue clicking “Next” until you reach a page where you can enter your business profile details.

Once all information is completed, click “Done”. Your Instagram account is now successfully connected to your Facebook page.

STEP 2: Create An App For Business On Facebook For Developers

To get the access token from Instagram, you’ll need to create an app on Facebook Developers. Log in to your Facebook account, then go to your Facebook Developers Account. Select “Apps” in the menu and click the “Create App” button.

A popup will appear asking you to specify what your app will do. Choose the “Other” option, then click “Next”.

On the following screen, select the “Business” option to ensure you can connect relevant permissions and consumer products.

Fill in the required fields: “Display name”, “App contact email”, and “Business Account”. Then, click “Create app”.

STEP 3: Configure Instagram Graph API & Facebook Login for Your Business App

After successfully creating your app, you’ll be taken to a configuration page. Click “Set up” under the “Instagram Graph API” section.

Note that these API permissions are for Instagram business accounts, not personal profiles. For more information, check Instagram’s documentation on business profiles here.

Next, go to the Dashboard (in the left sidebar) and scroll down to find the option “Add products to your app”. Find “Facebook Login for Business” app and click “Set up”.

Review the permissions you want to grant, and once you’re satisfied, click “Save Changes”. Your Instagram Graph API and Facebook Login for Business app have been created.

Go to Tools → Graph API Explorer on the Meta for Developers dashboard or visit https://developers.facebook.com/tools/explorer/.

Choose the app you created from the “Meta App” field, and under the “Permission” section, grant the following permissions:

  • pages_show_list
  • business_management
  • instagram_basic
  • instagram_manage_comments
  • instagram_manage_insights
  • pages_read_engagement

STEP 4: Generate the Instagram Access Token

Click the “Generate Access Token” button. A popup will appear where you’ll need to follow the instructions. Switch the Facebook account and click on the “Continue” button. Then, select your Facebook business account, app name, and Instagram account, clicking on the blue buttons to proceed. Once your Instagram access token is generated, copy it.

Paste your Instagram Access Token on VA: Instagram Slider & Feed app configuration page.

Long-lived tokens are valid for 60 days and our app will refresh your token automatically before they expiring. You will not have to manually regenerate your access token.


Display Instagram photos and videos on online store

VA: Instagram Slider & Feed is a simple but effective solution to showcase all your Instagram photos and videos on your Shopify store. This app gives your storefront a stylist and modern Instagram section for people to explore your best products.

In order to display Instagram photos/videos to your online store, VA: Instagram Slider & Feed offers you 2 selections: Instagram section and embedded code.

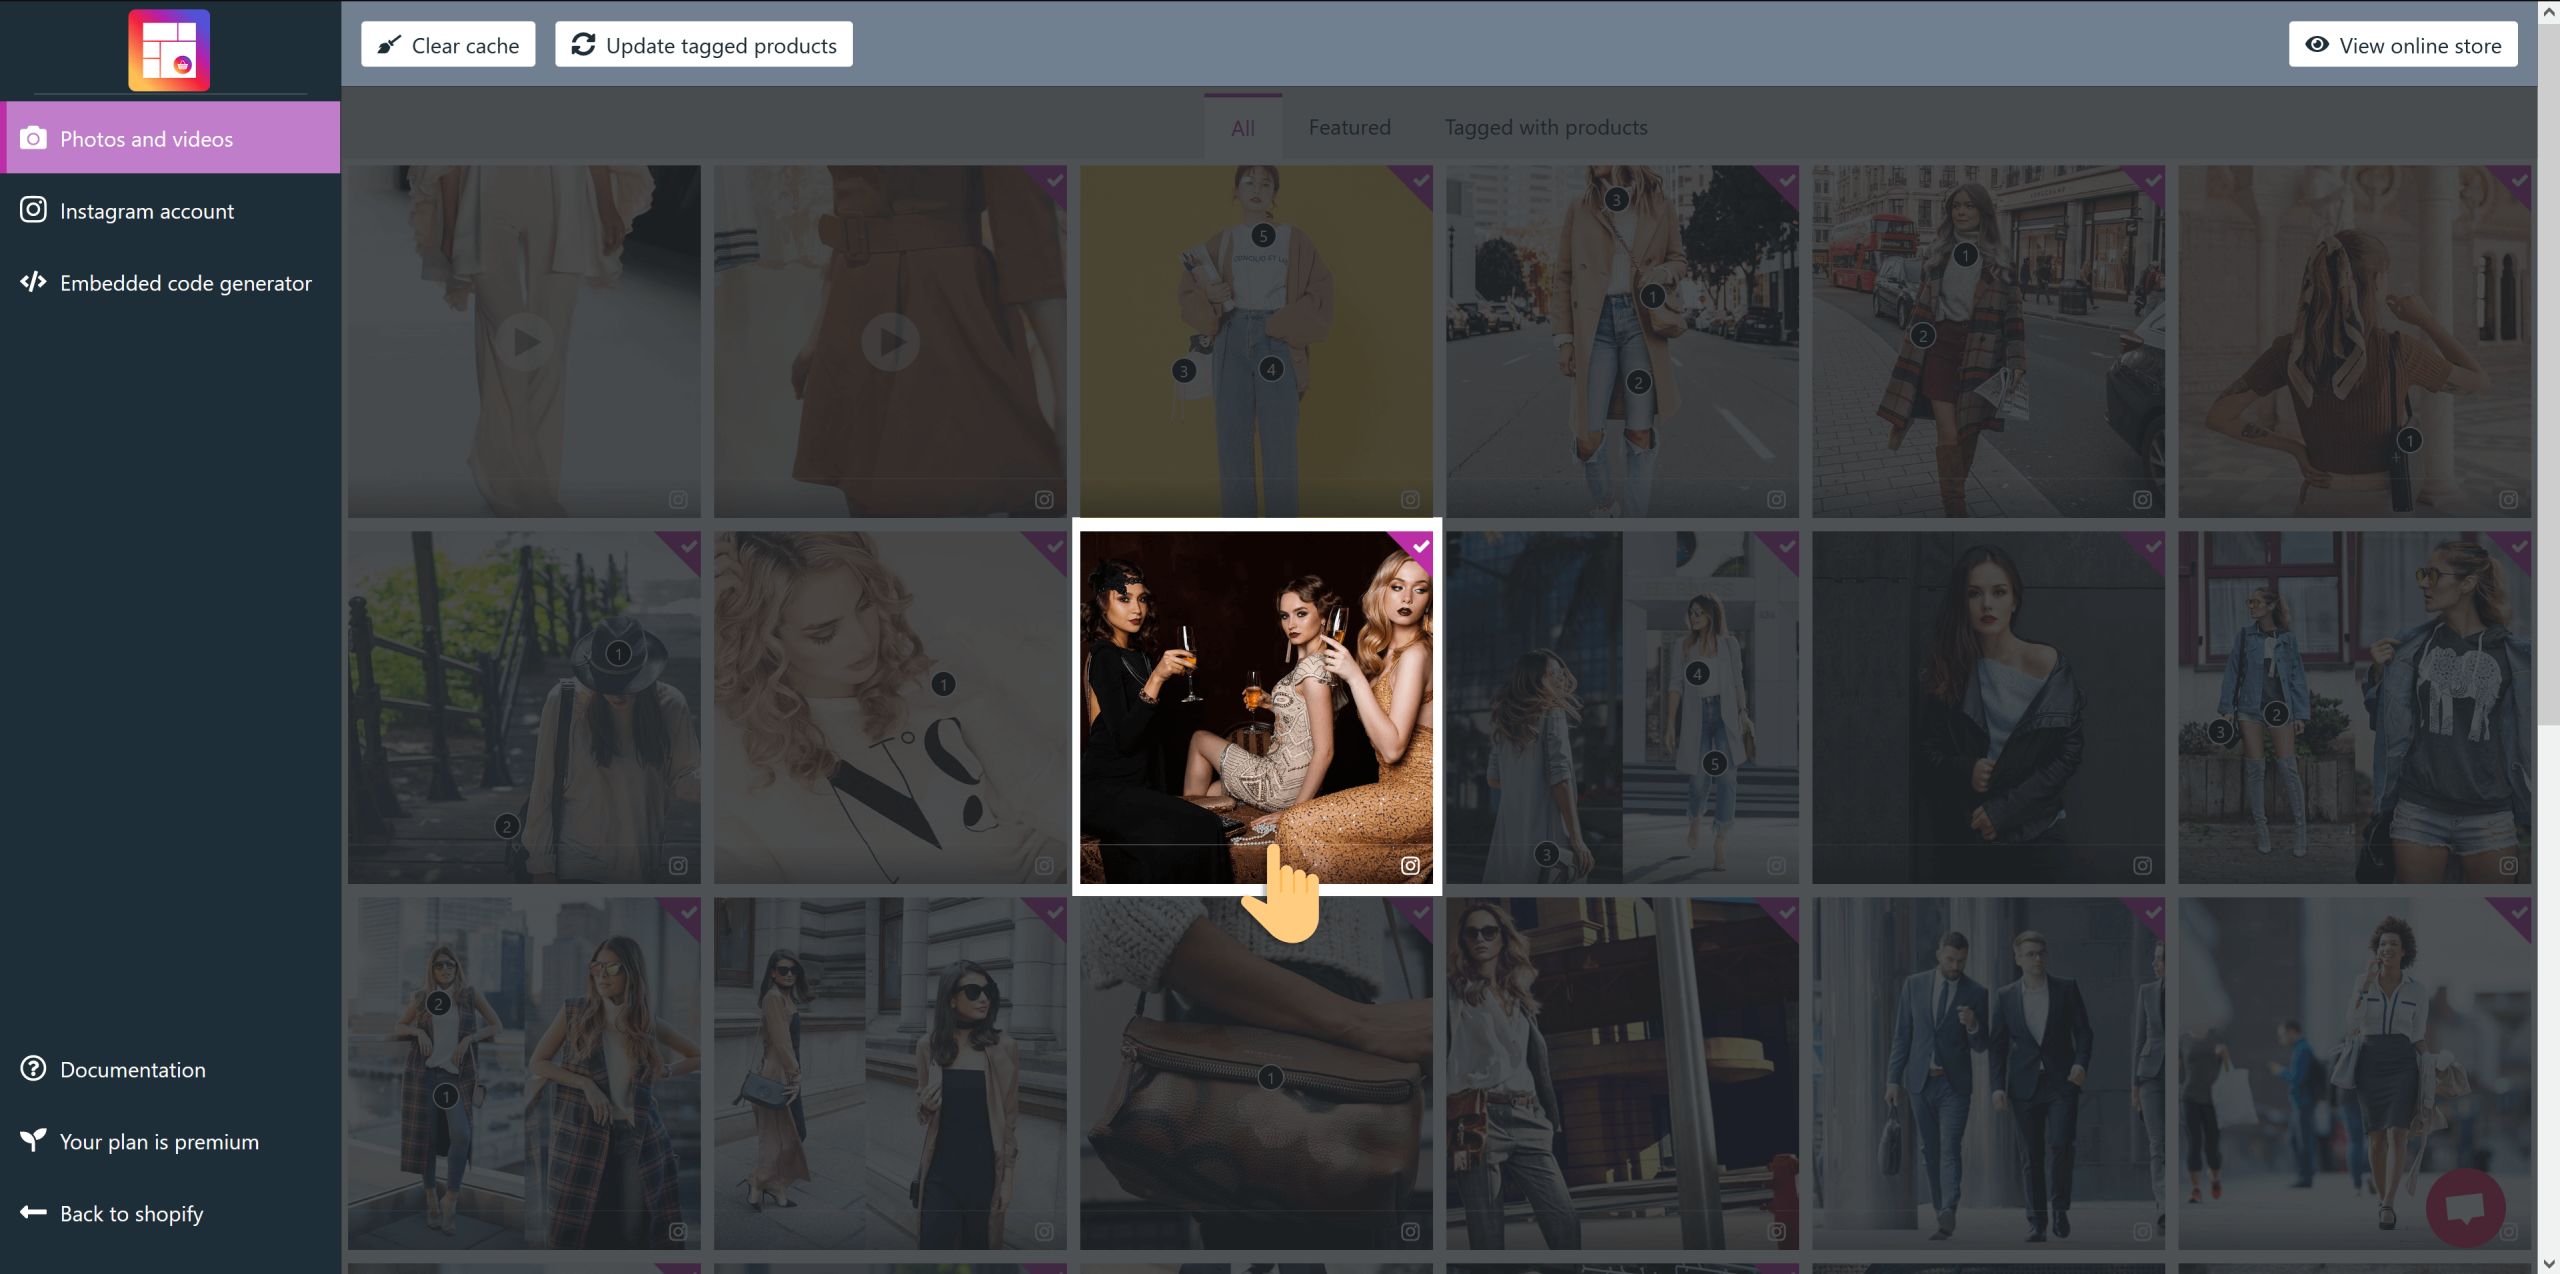
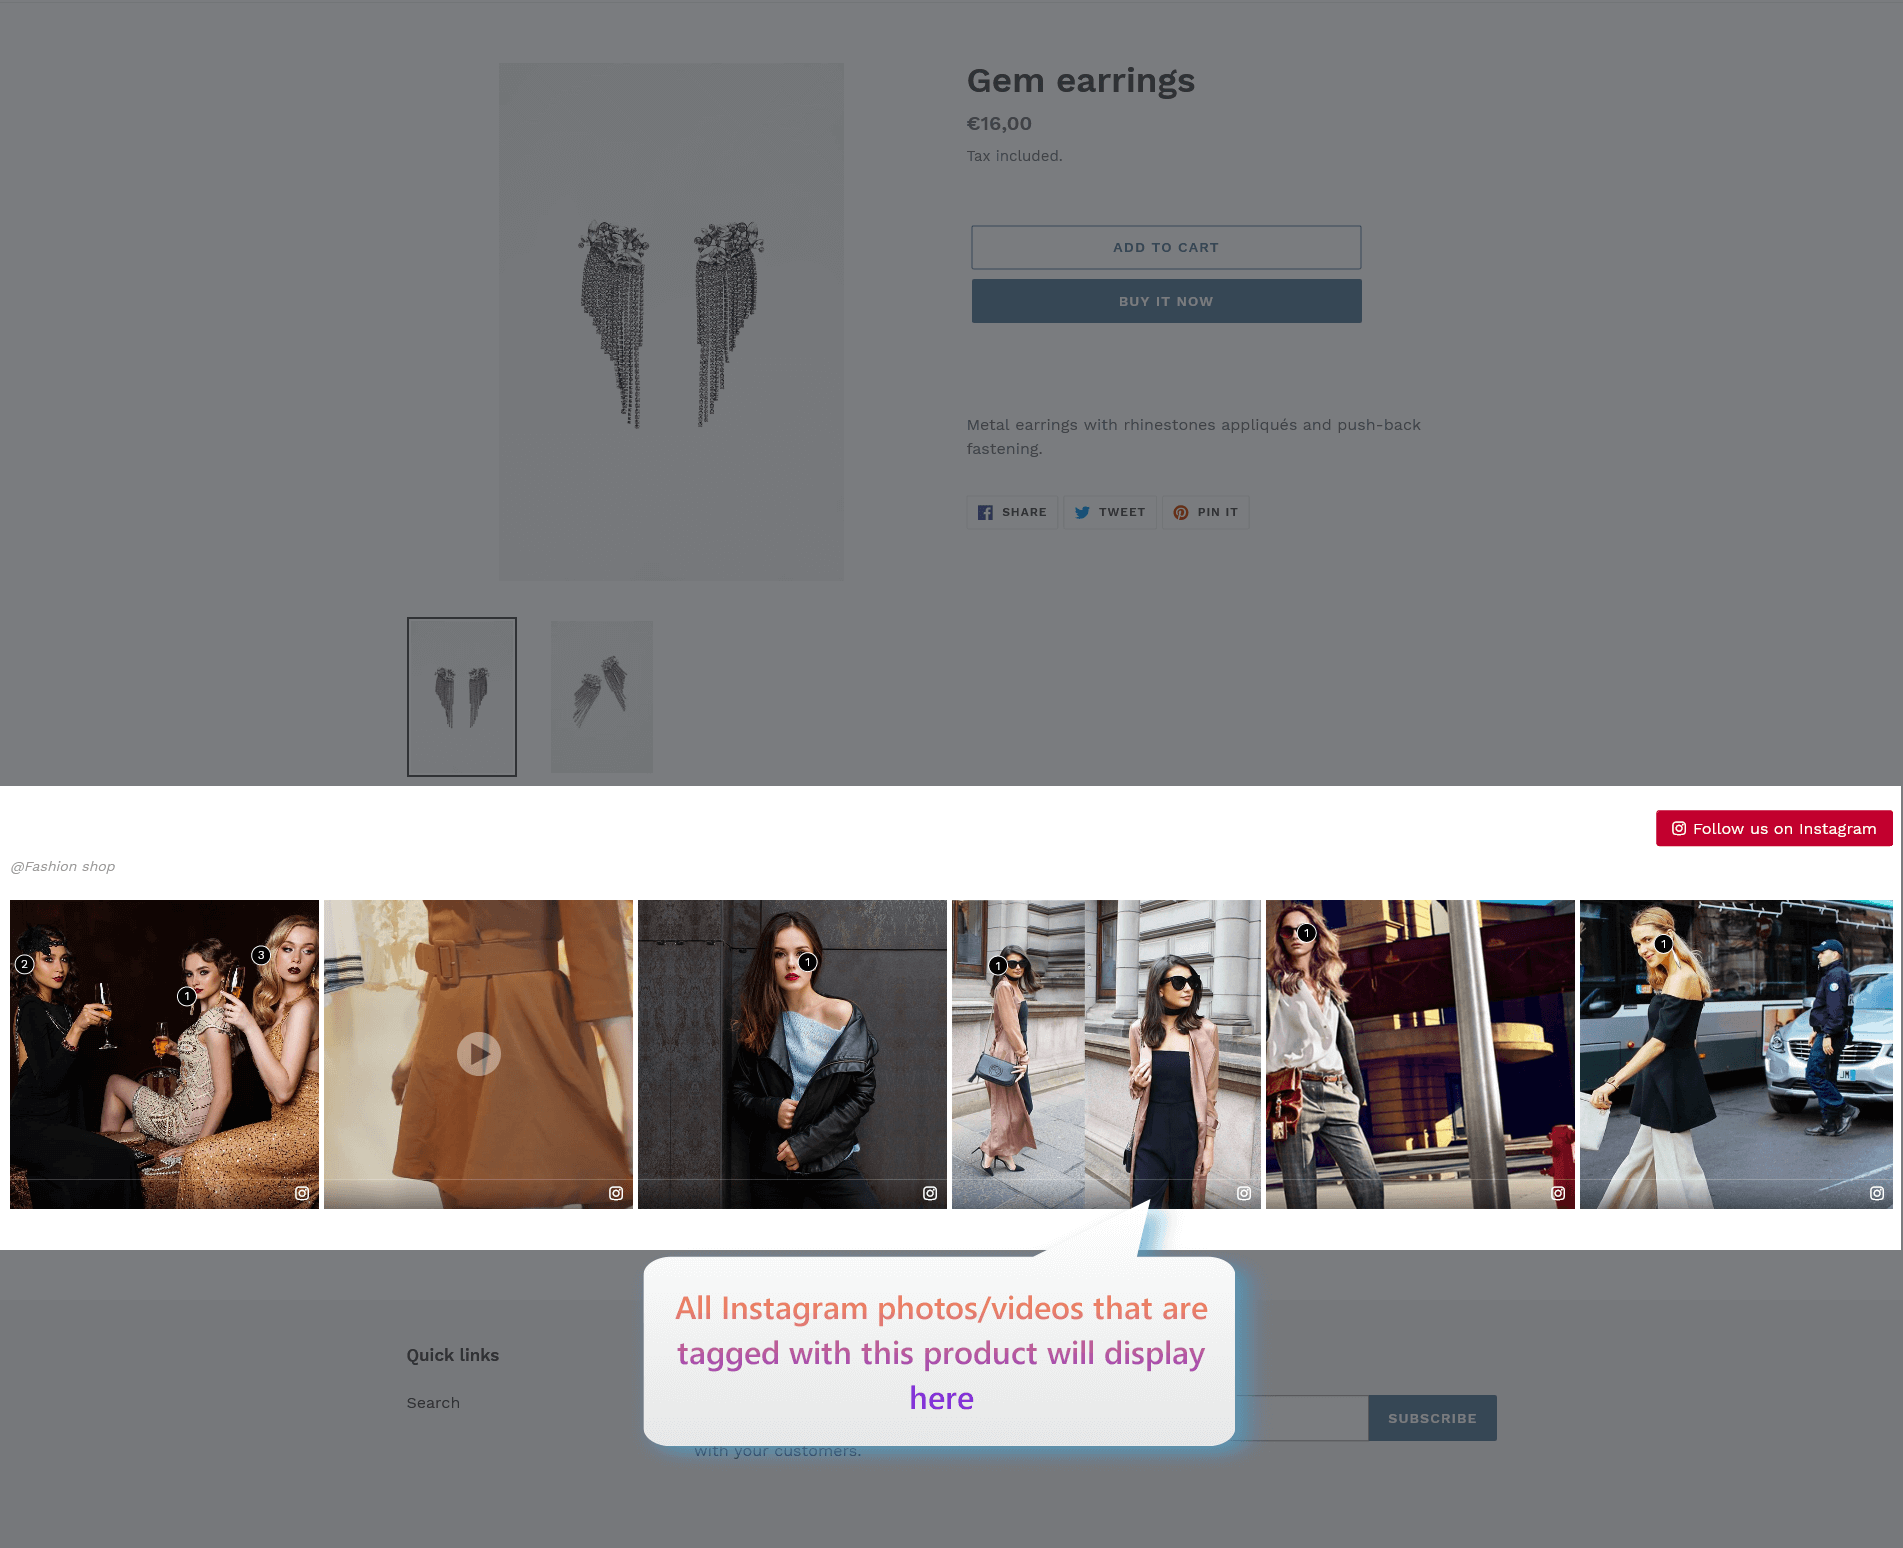
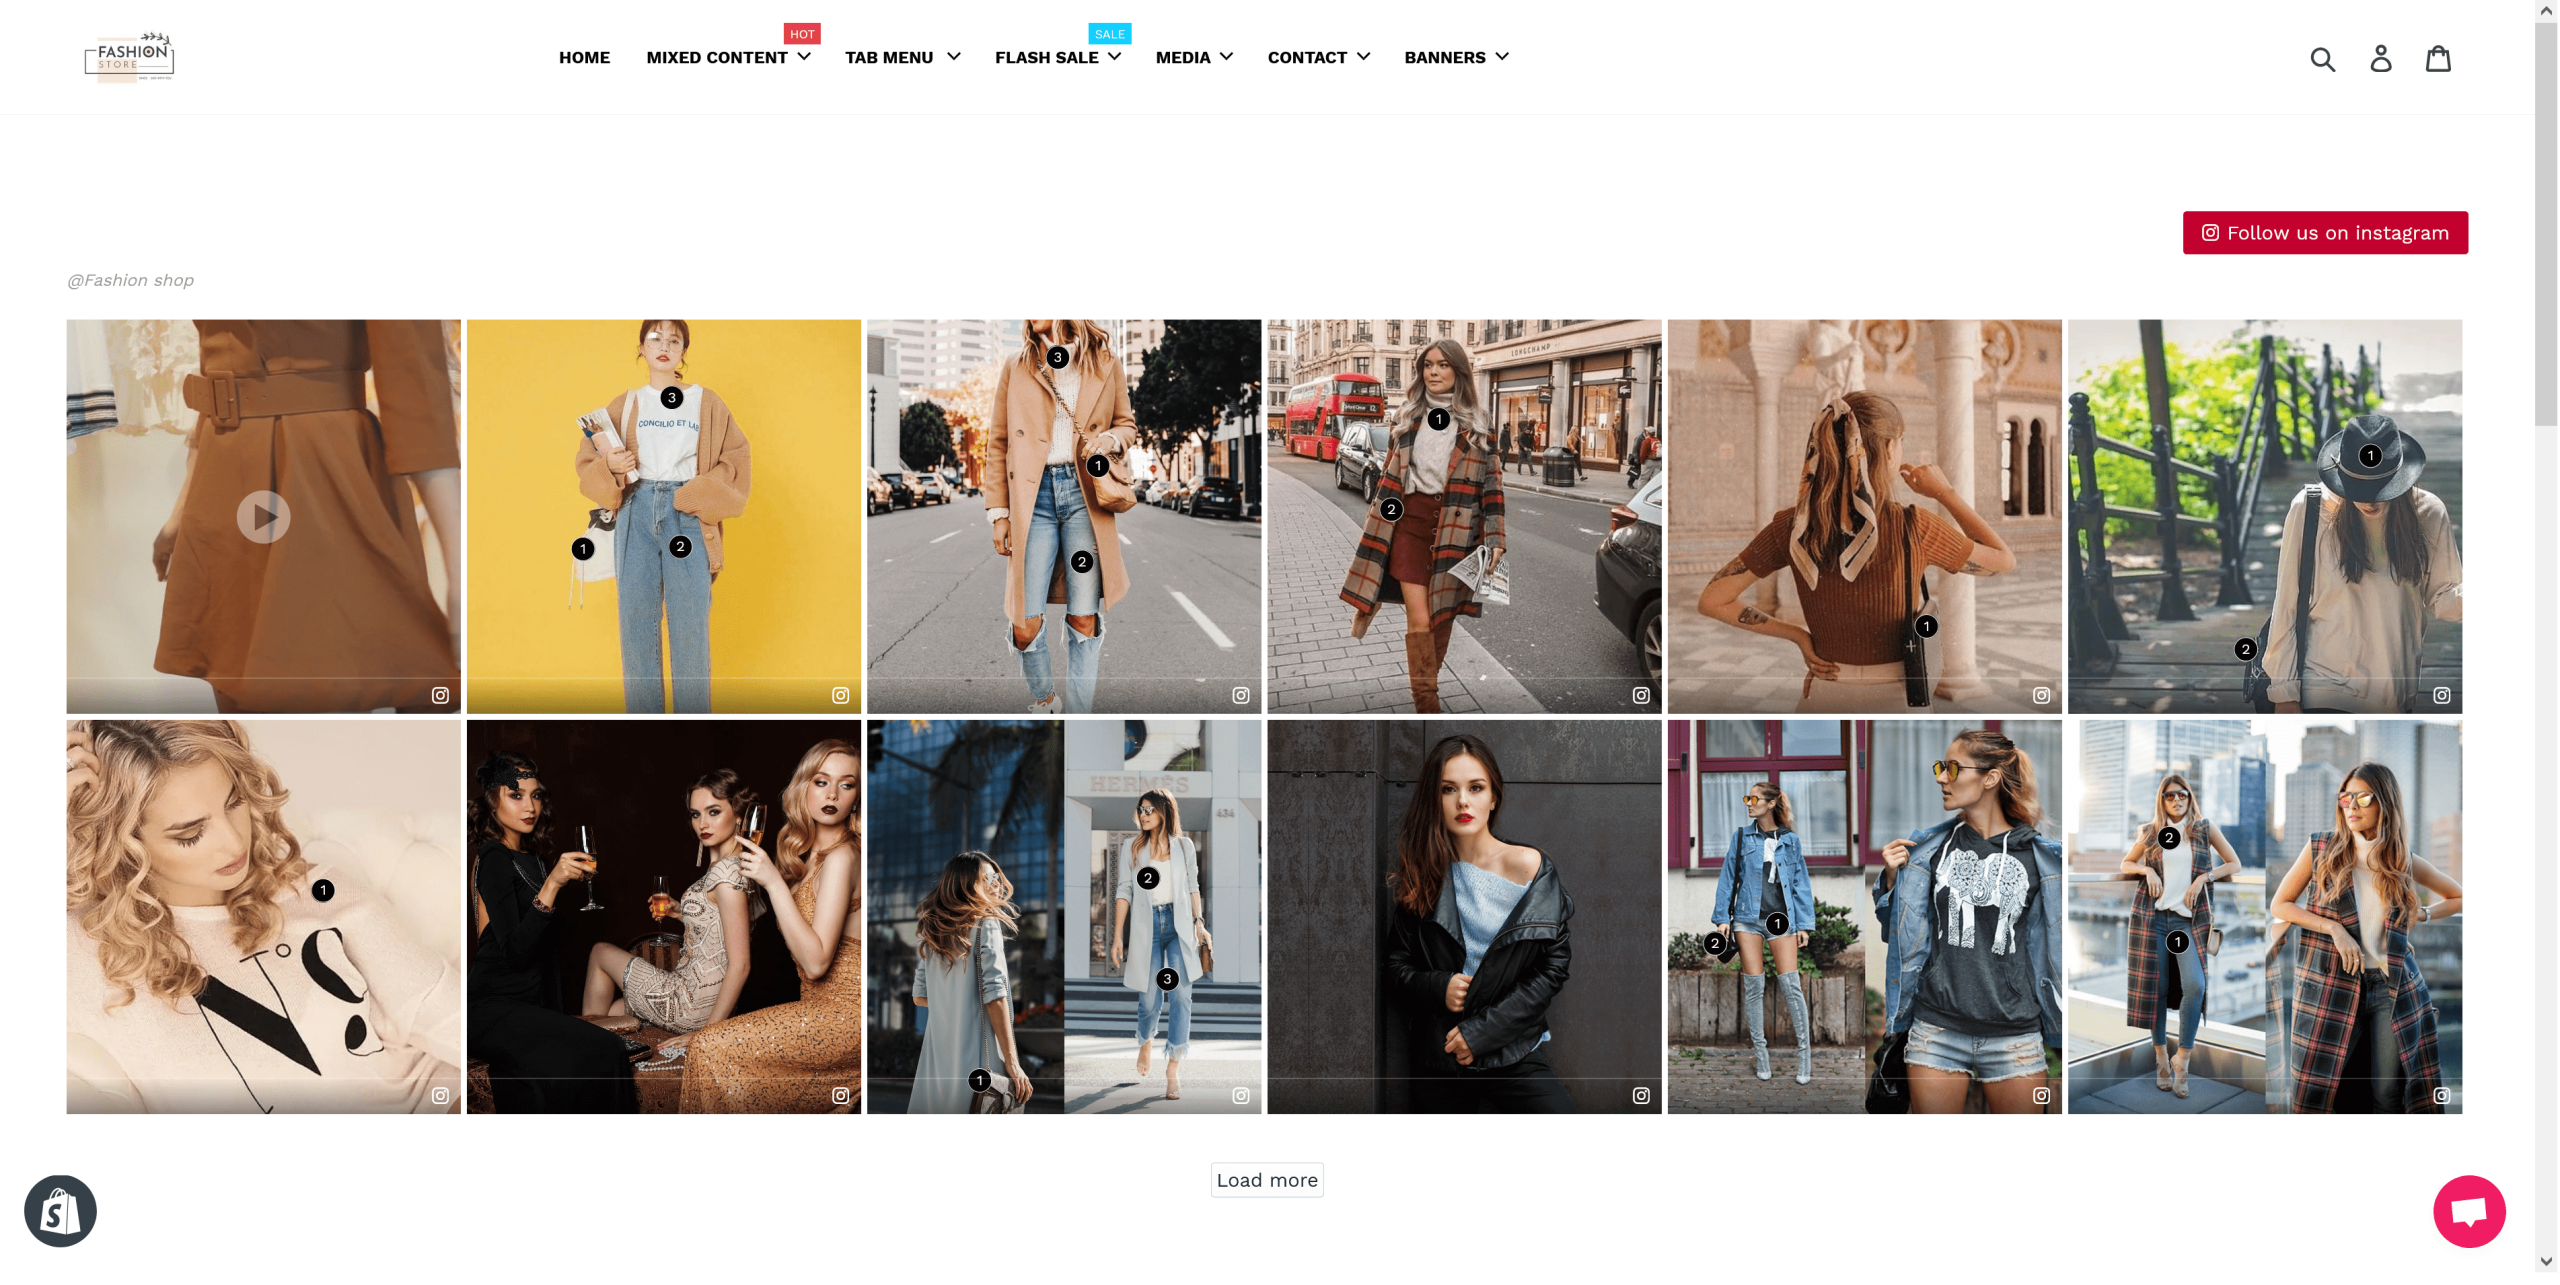
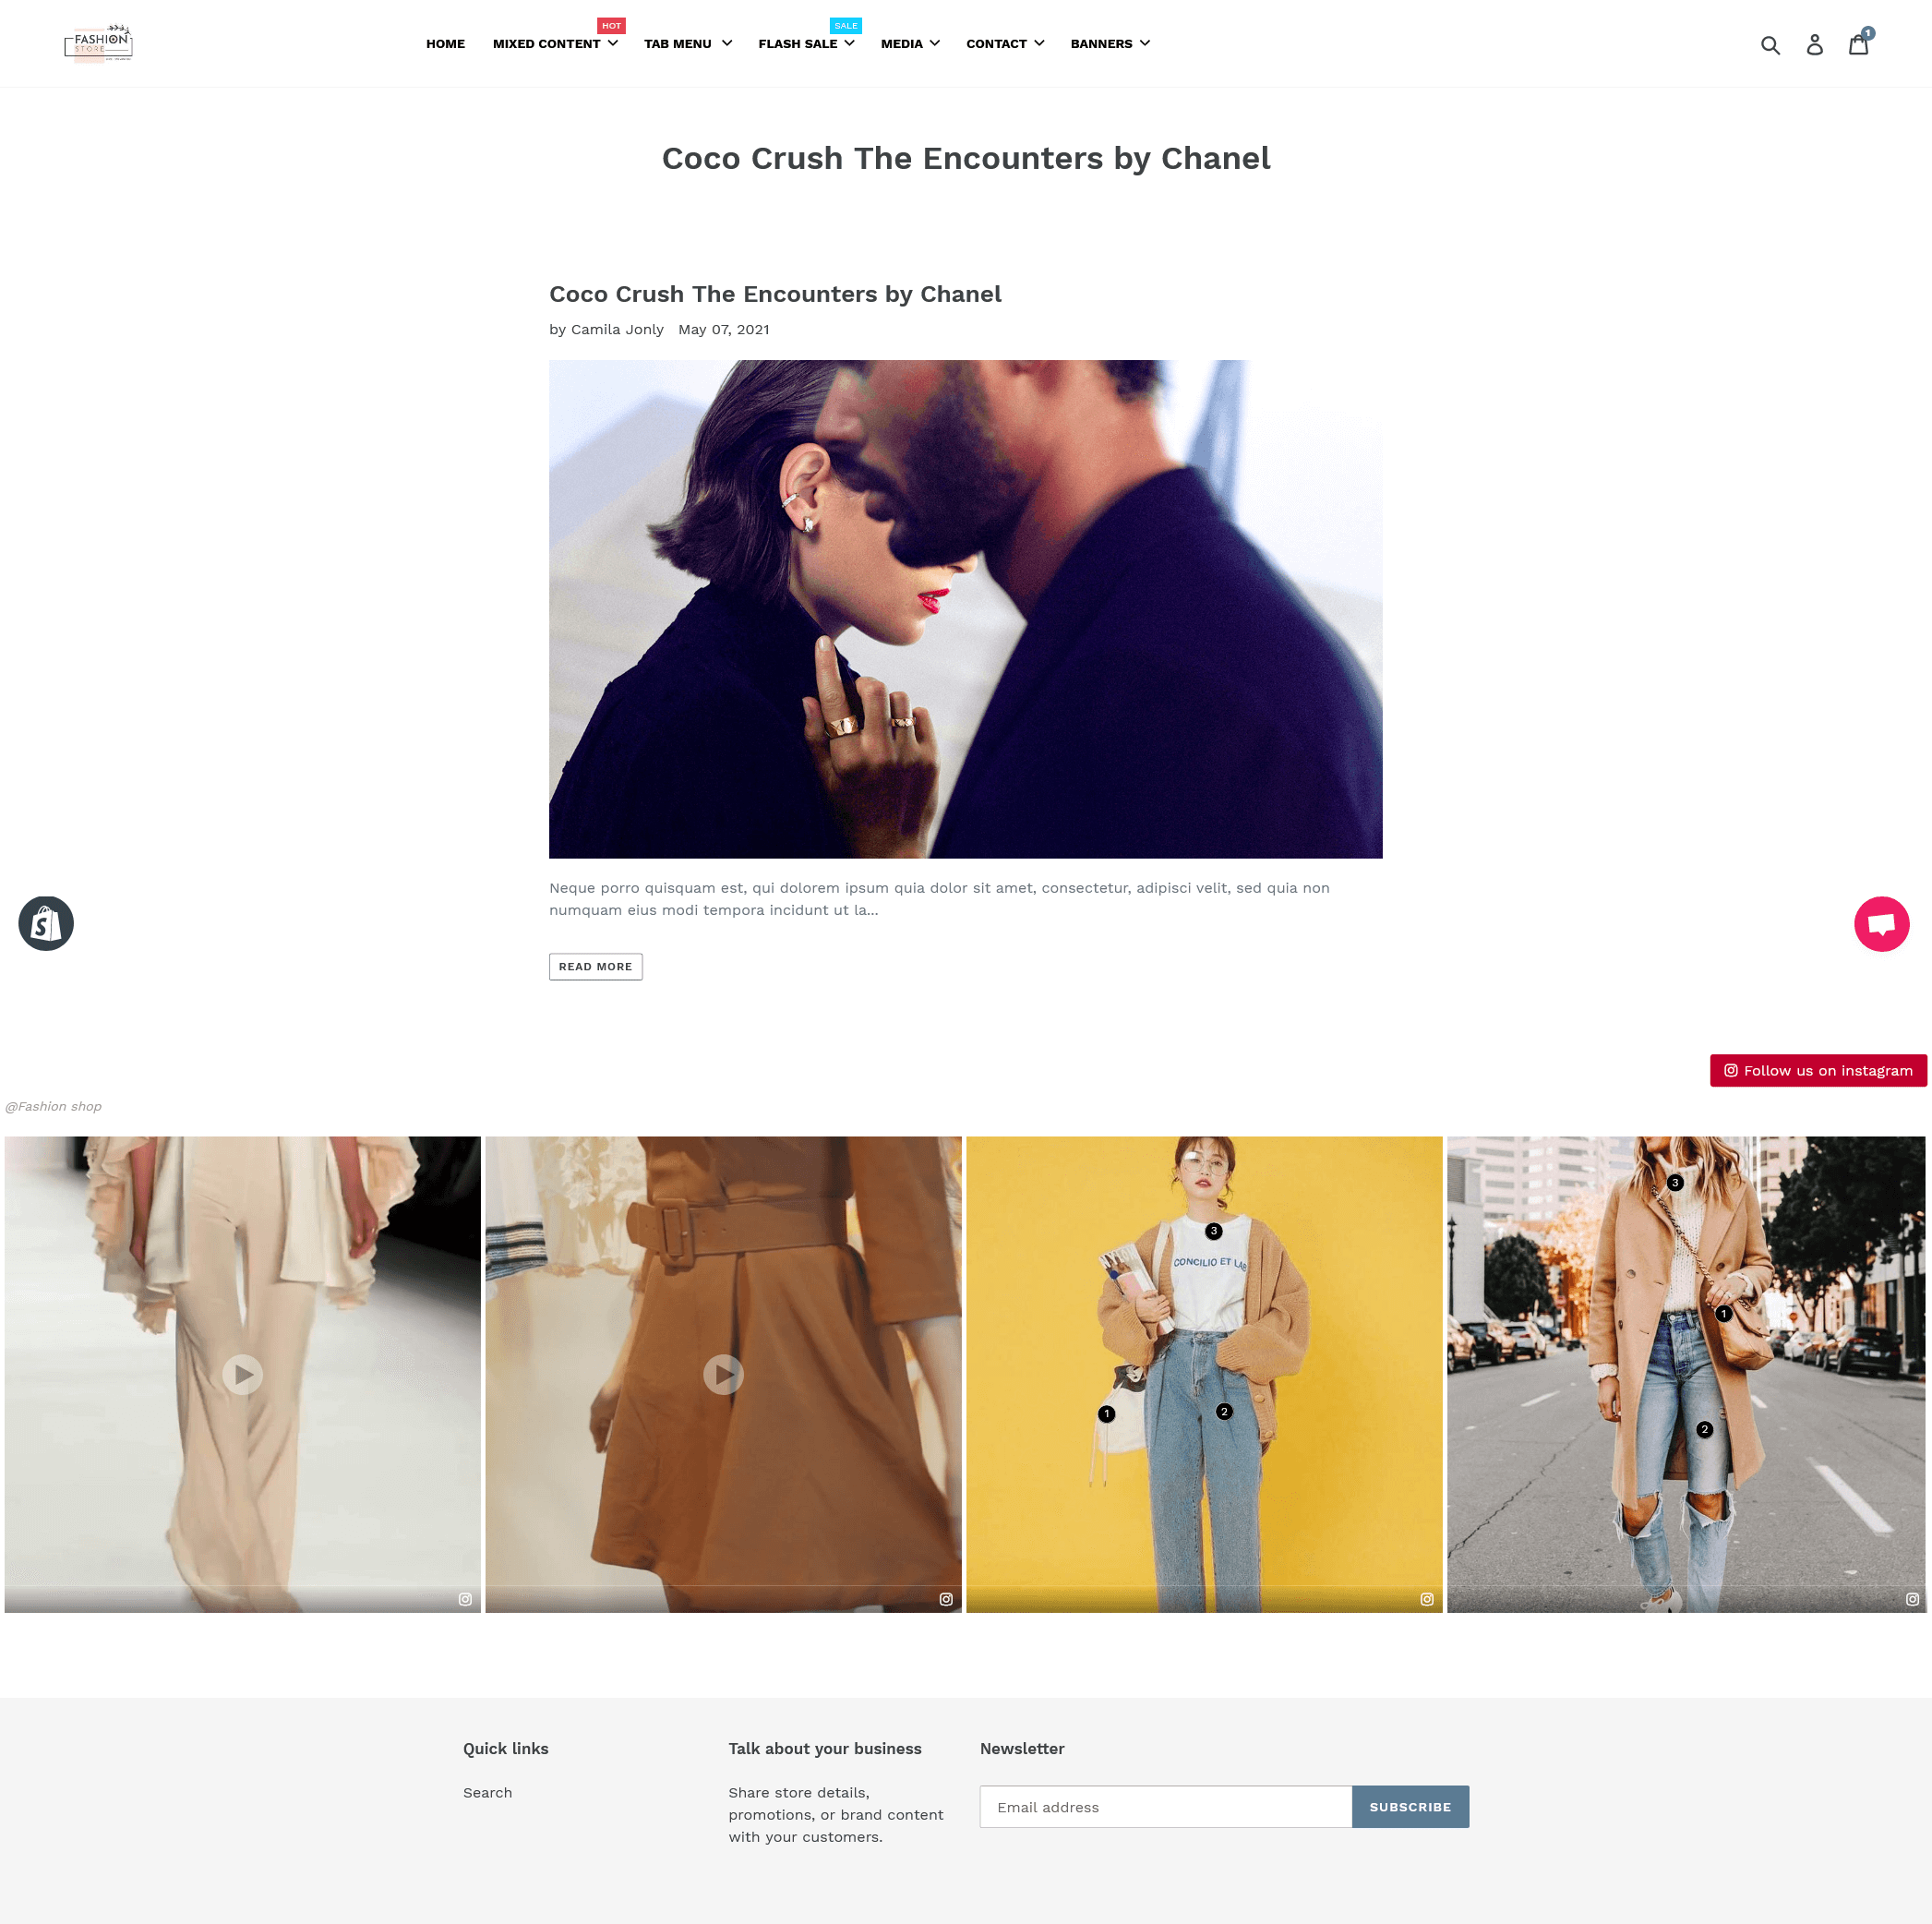
By default, this app will create an Instagram section on your online store homepage:

But if you want to display the photos/videos to a position on your online store but the position is not supported by the Instagram section, Embedded code is useful for you.

In this section, we will guide you on how to customize Instagram section and how to customize and use embedded code on your Shopify online store.

A. Customize Instagram section
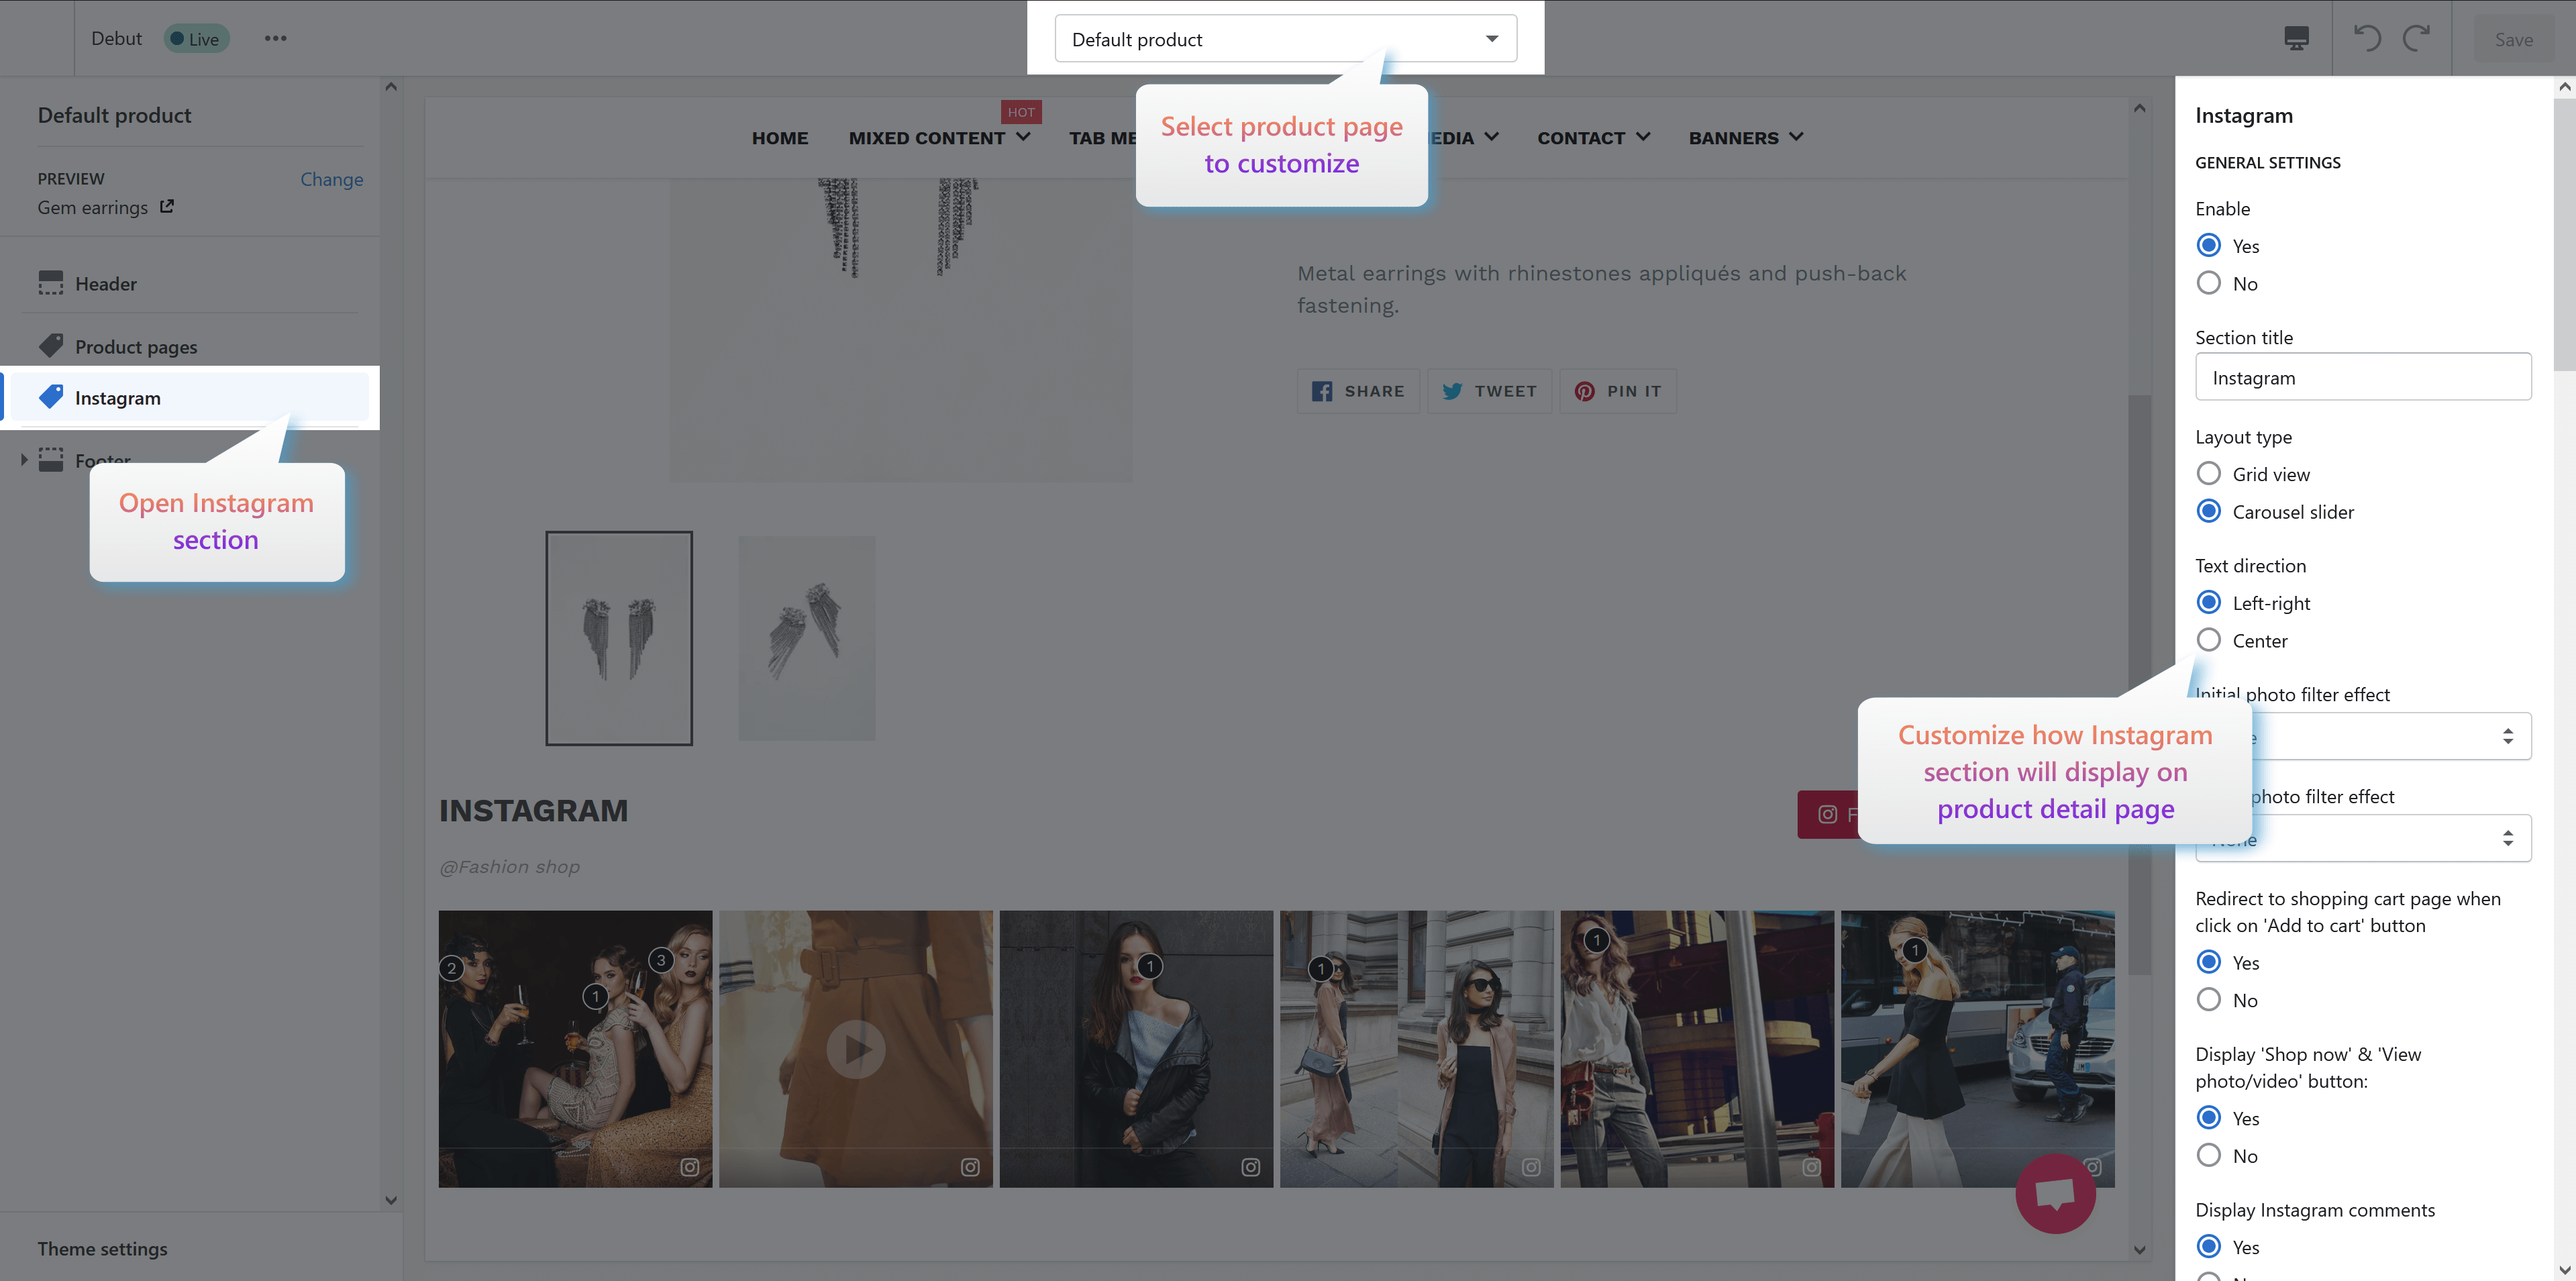
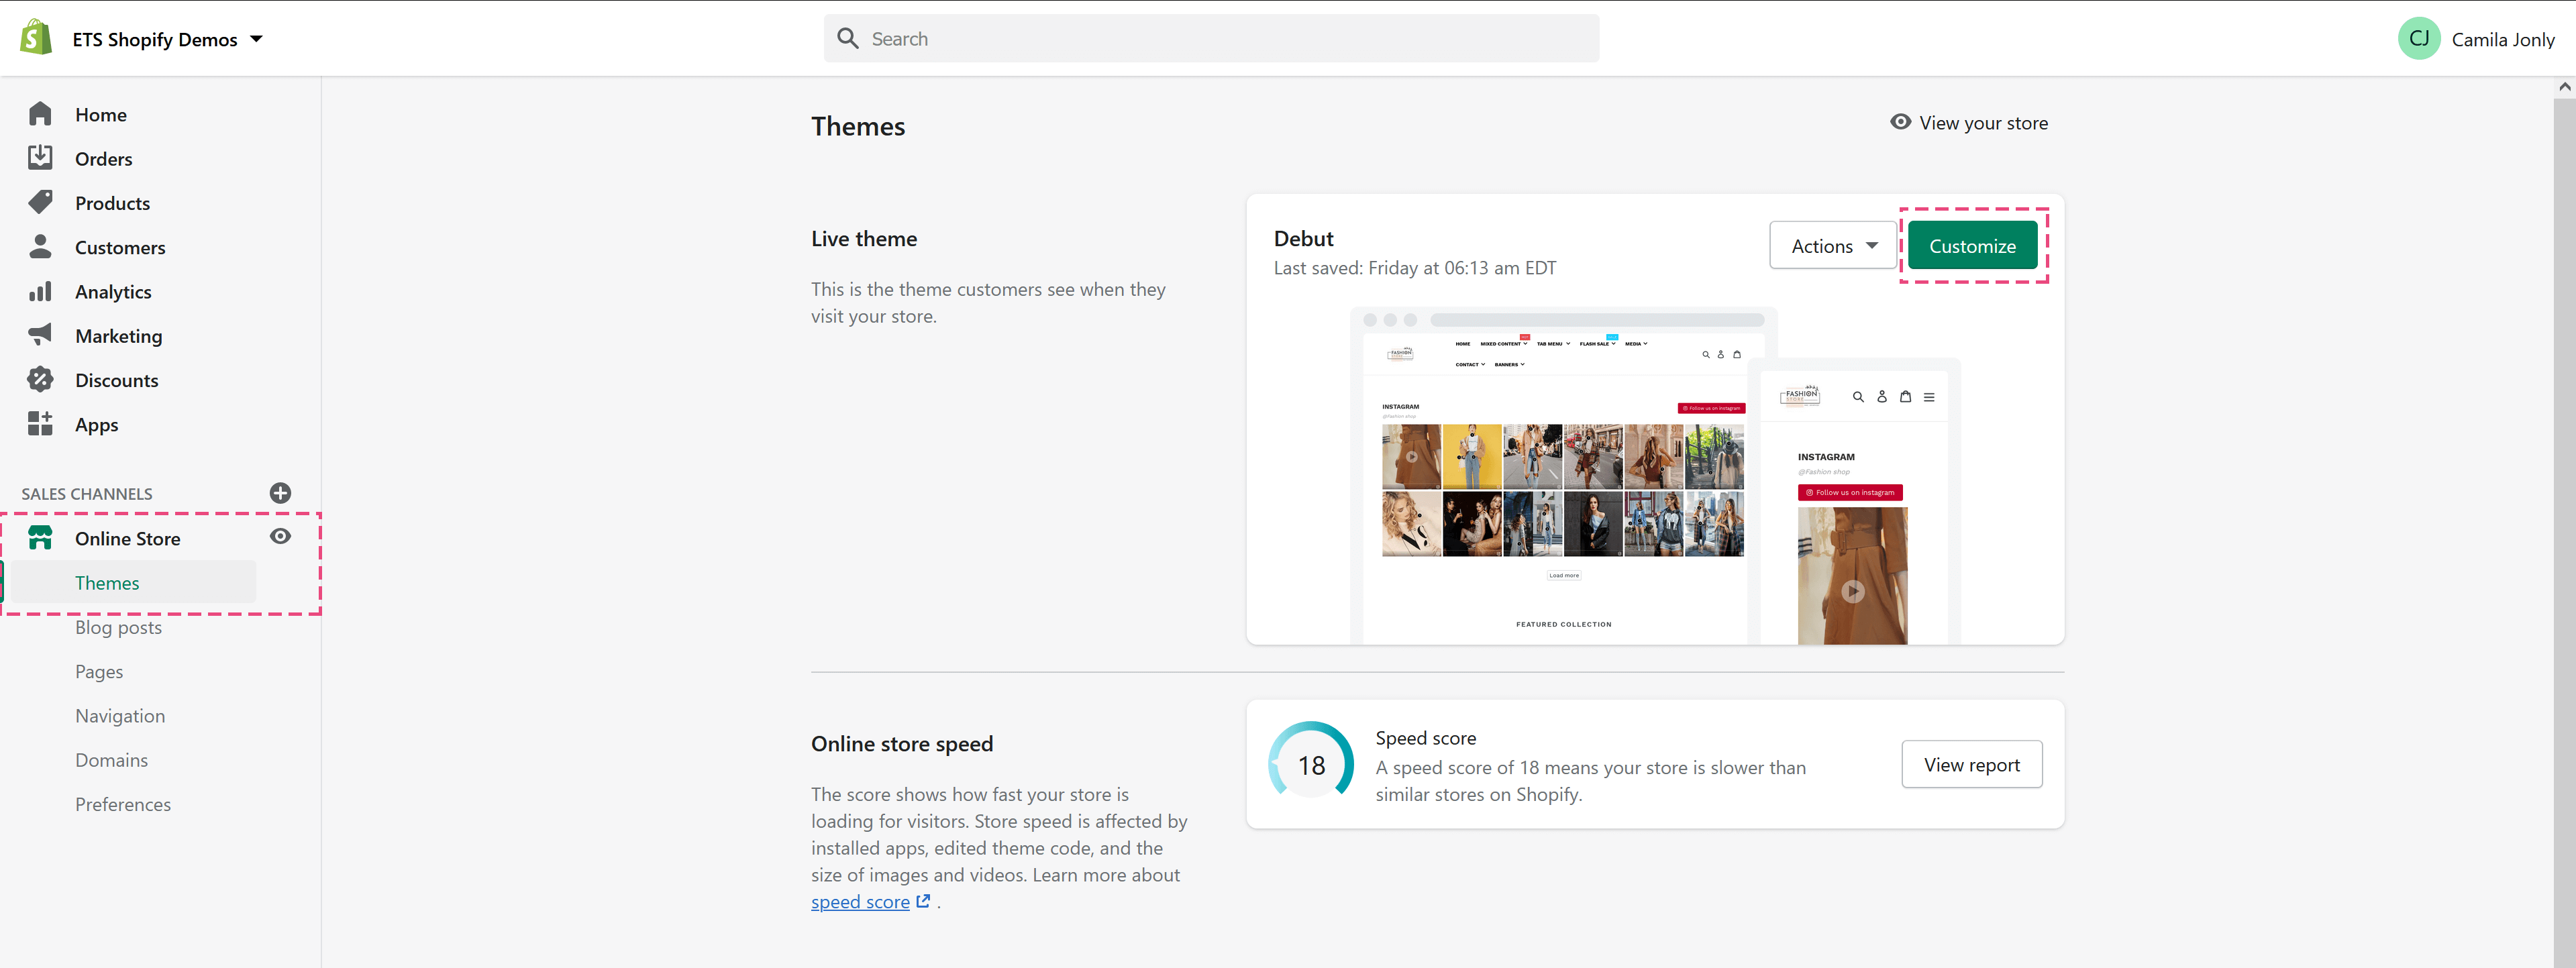
Navigate to “Online store >Themes” page. Click on “Customize” button to open the settings editor page where you can change the appearance and content of the theme.

Find and select “Instagram” section on the left sidebar.

You will find the following options to customize the Instagram section:

General settings

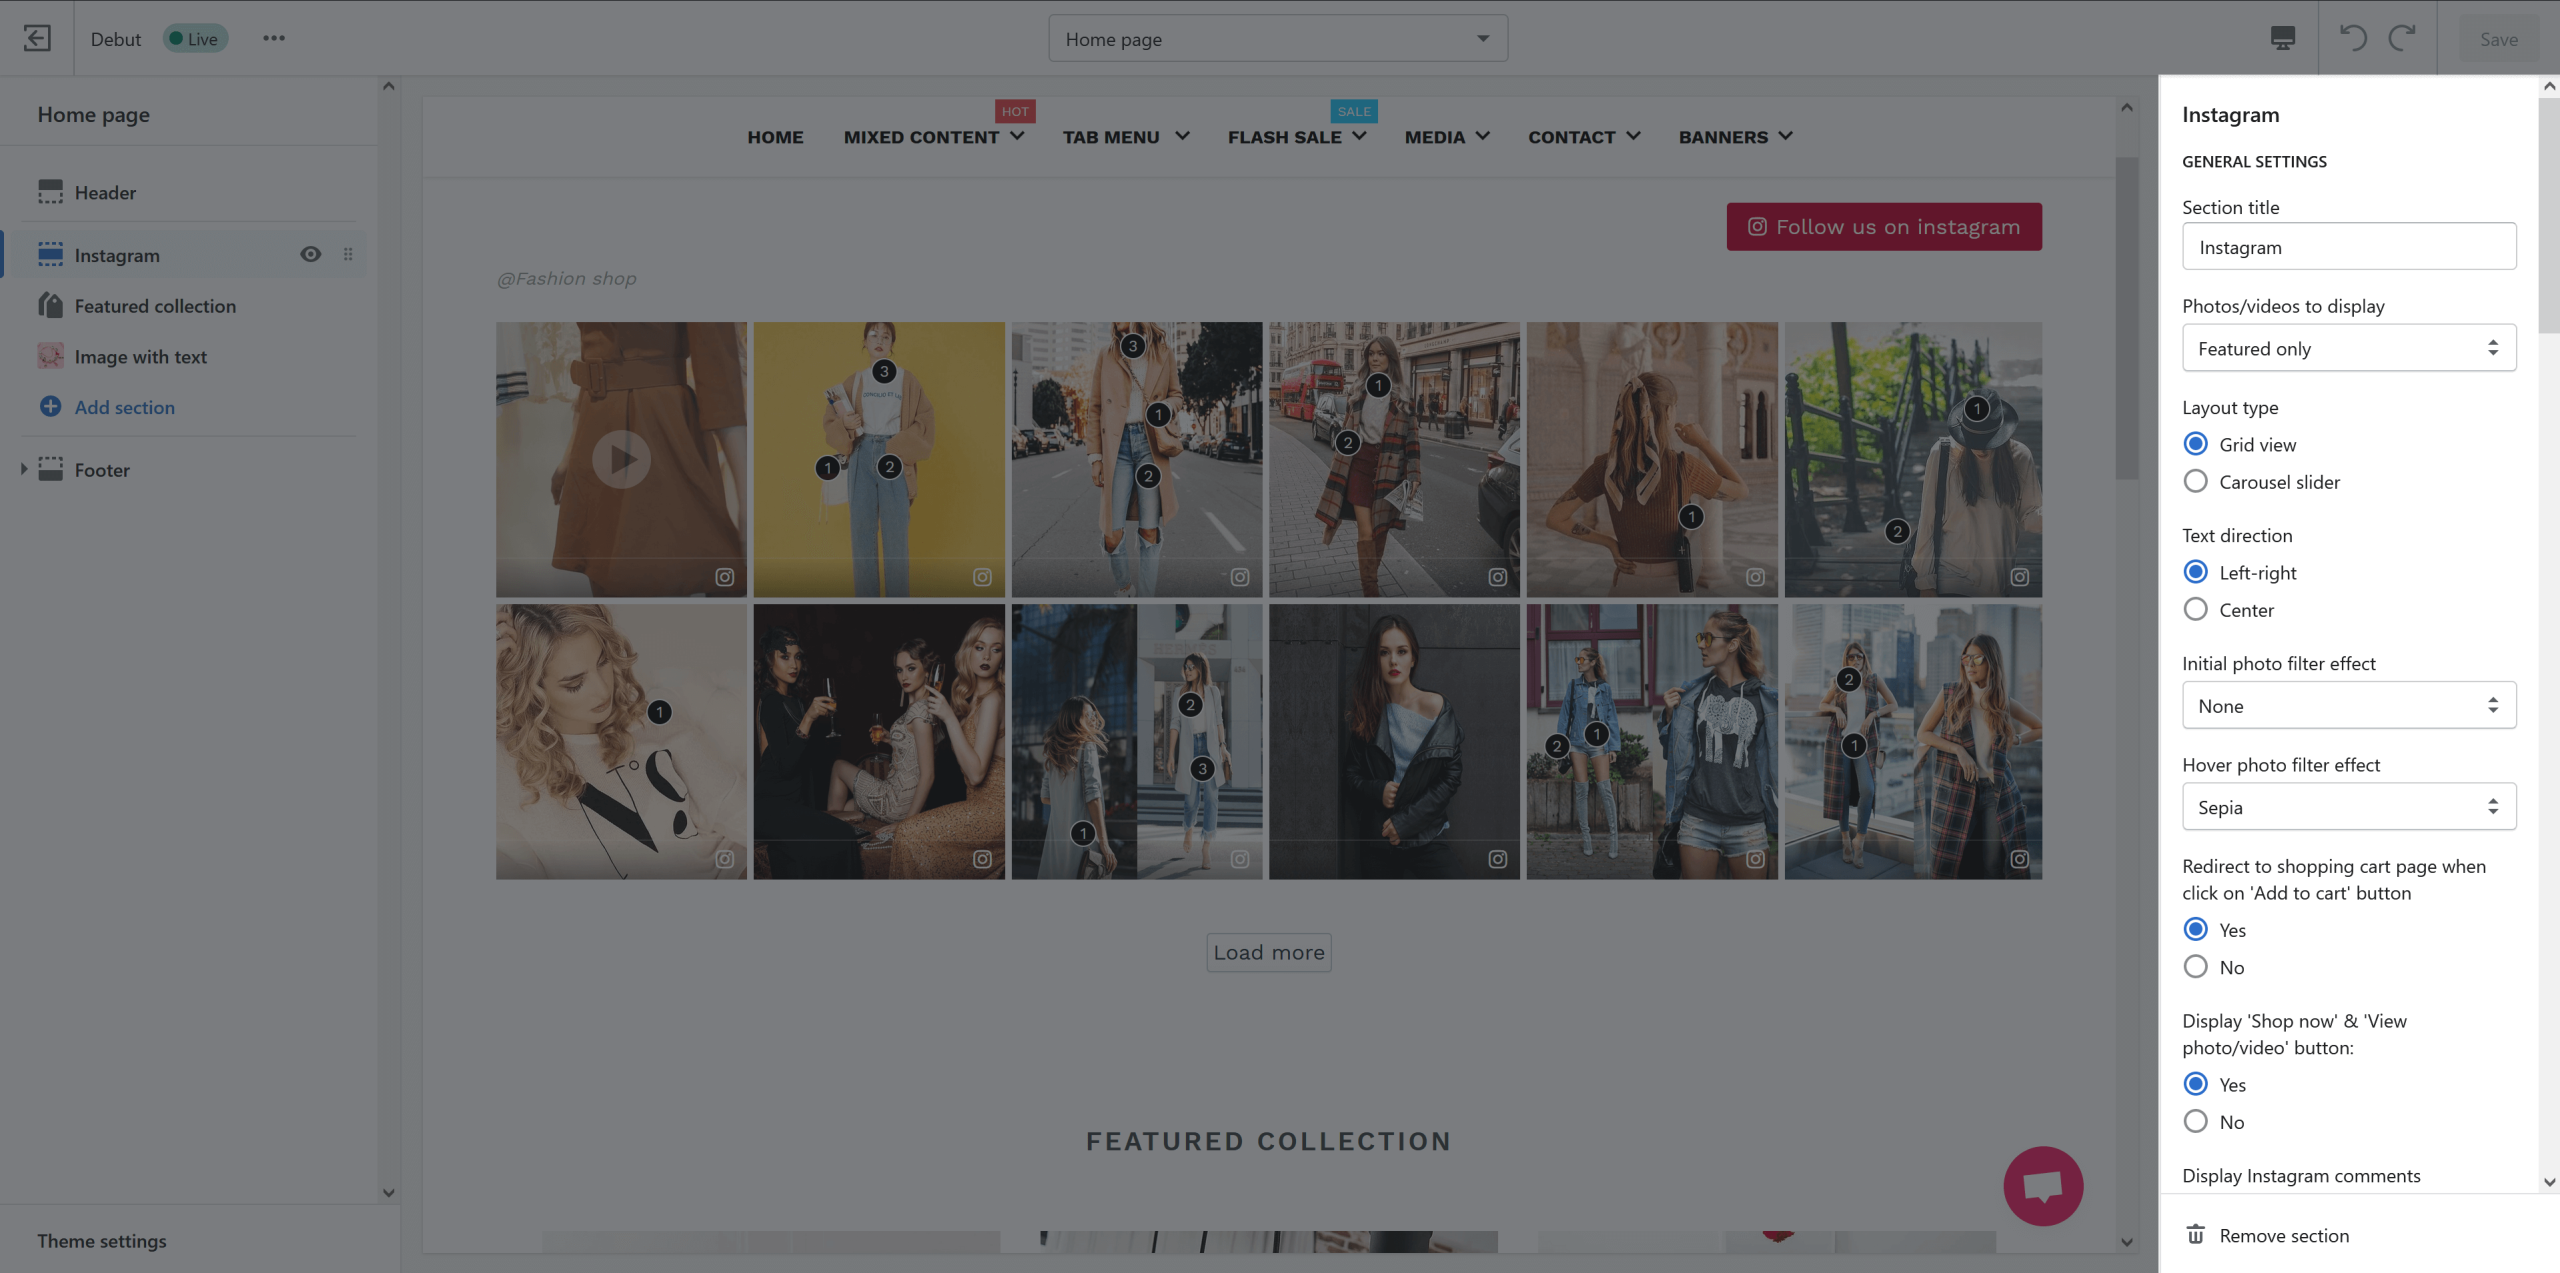
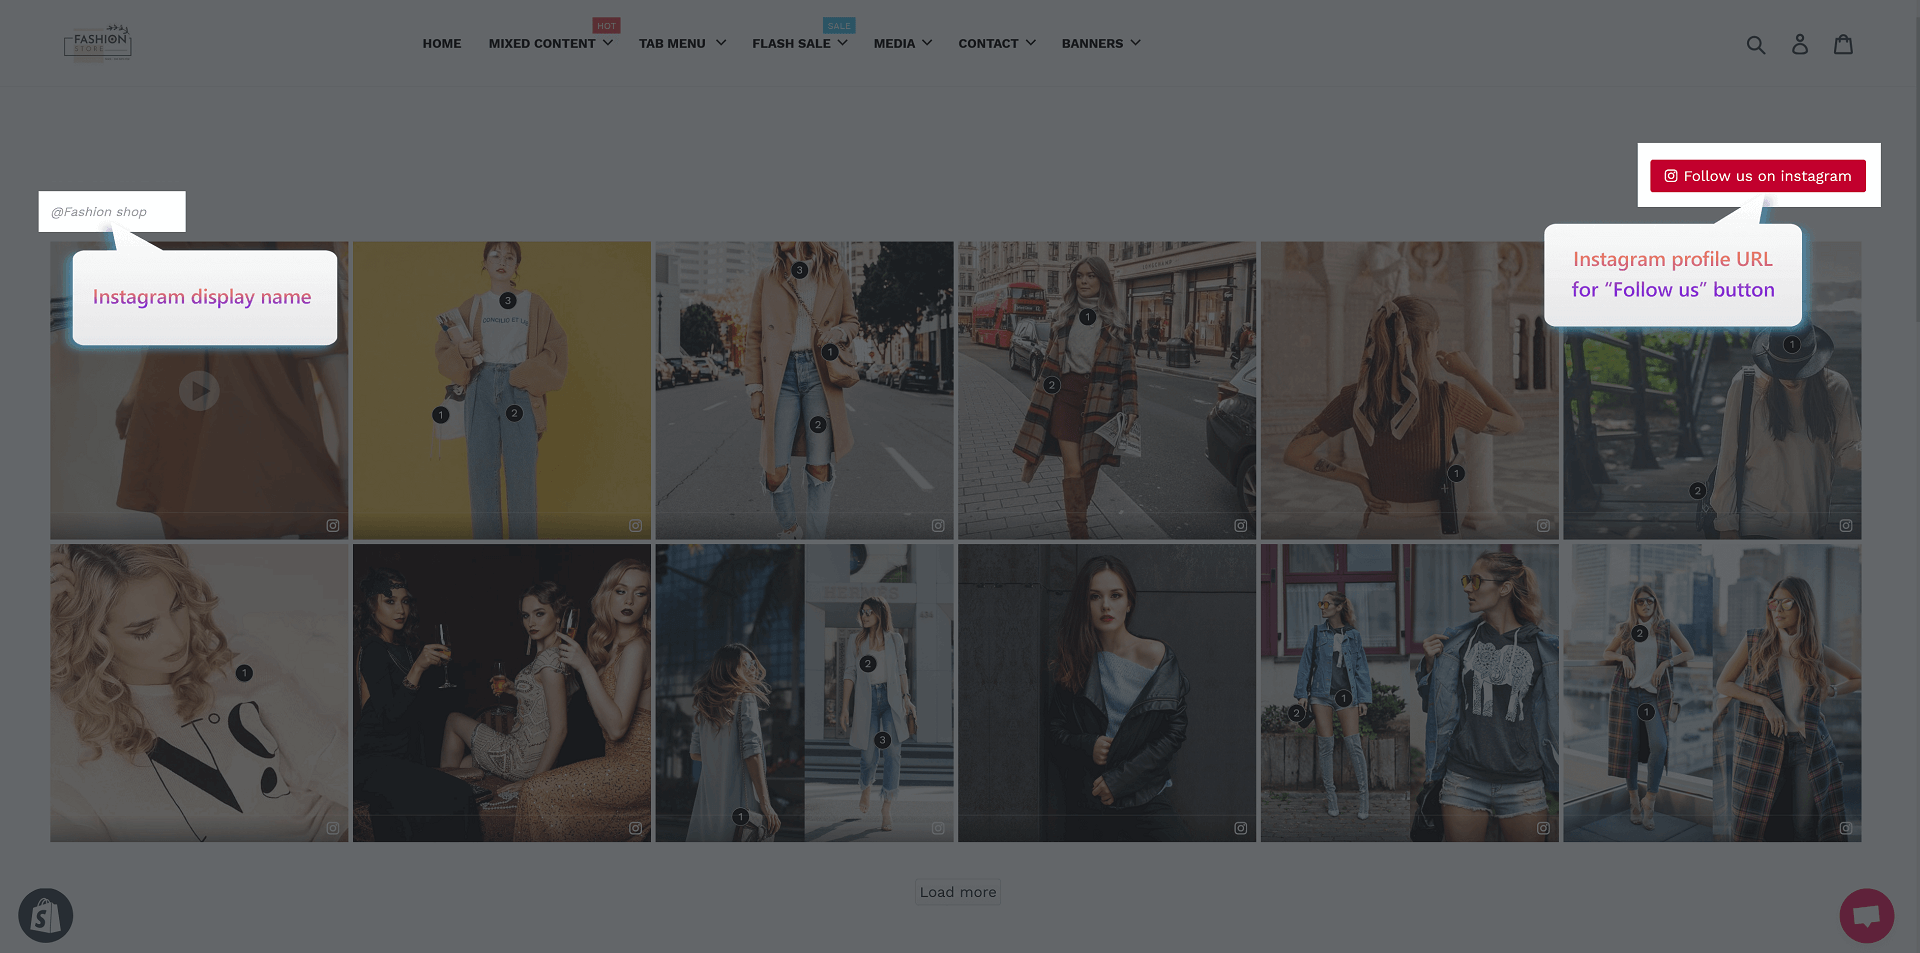
a. You can adjust Instagram section title and select which type of photos/videos to display.

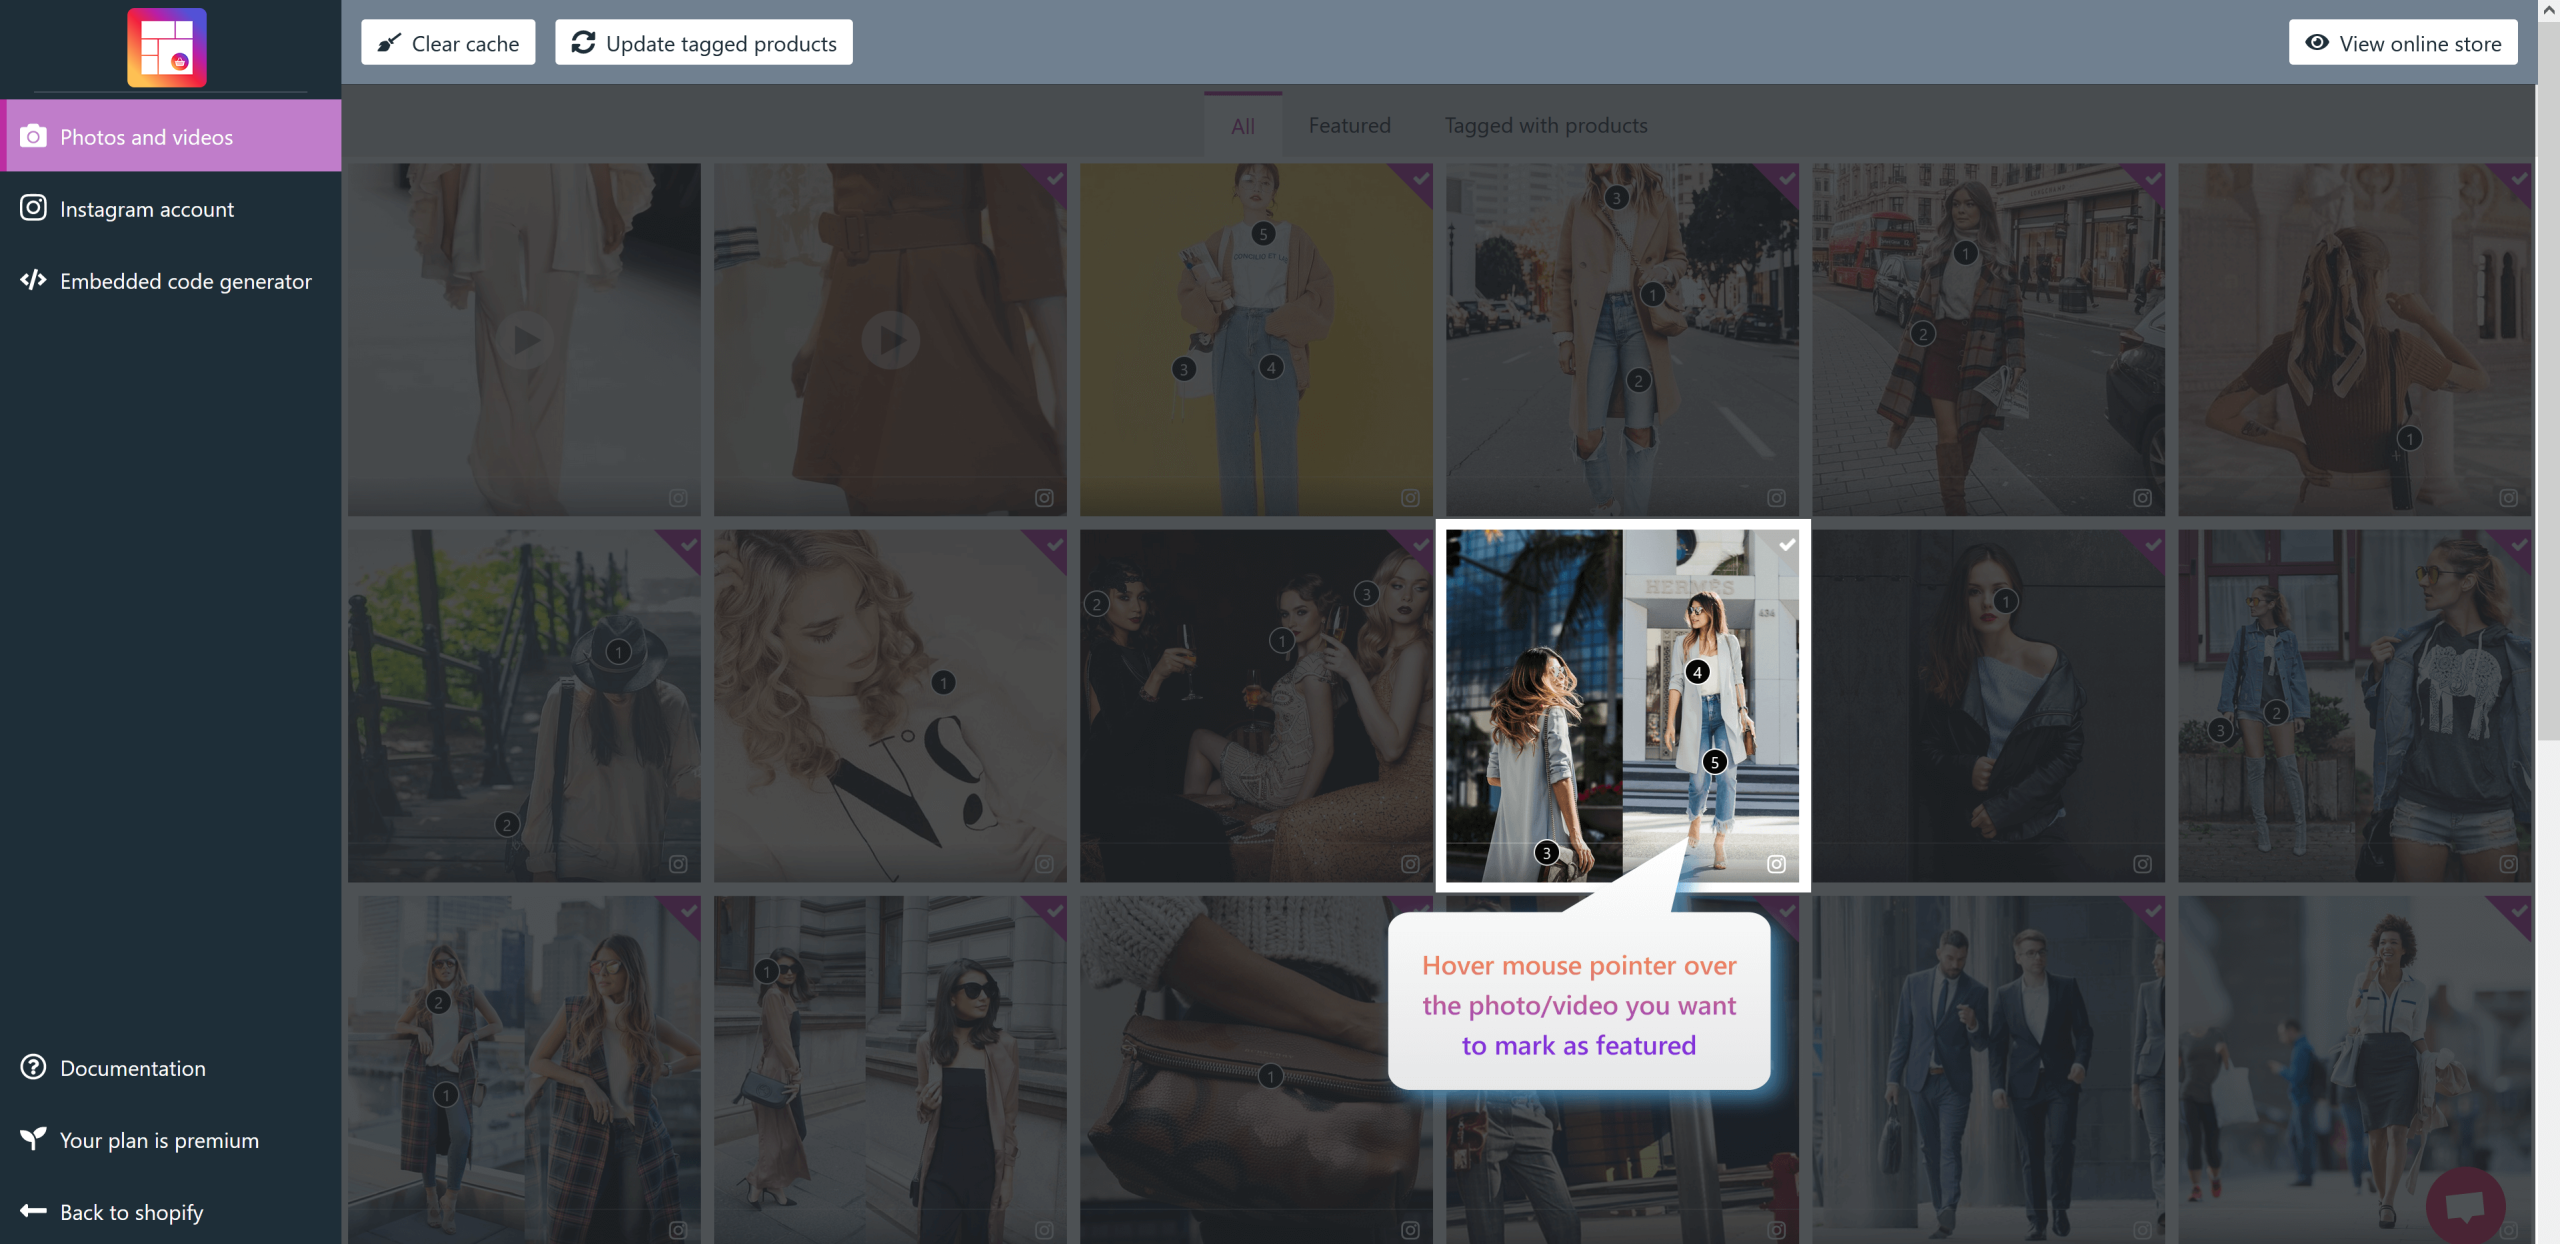
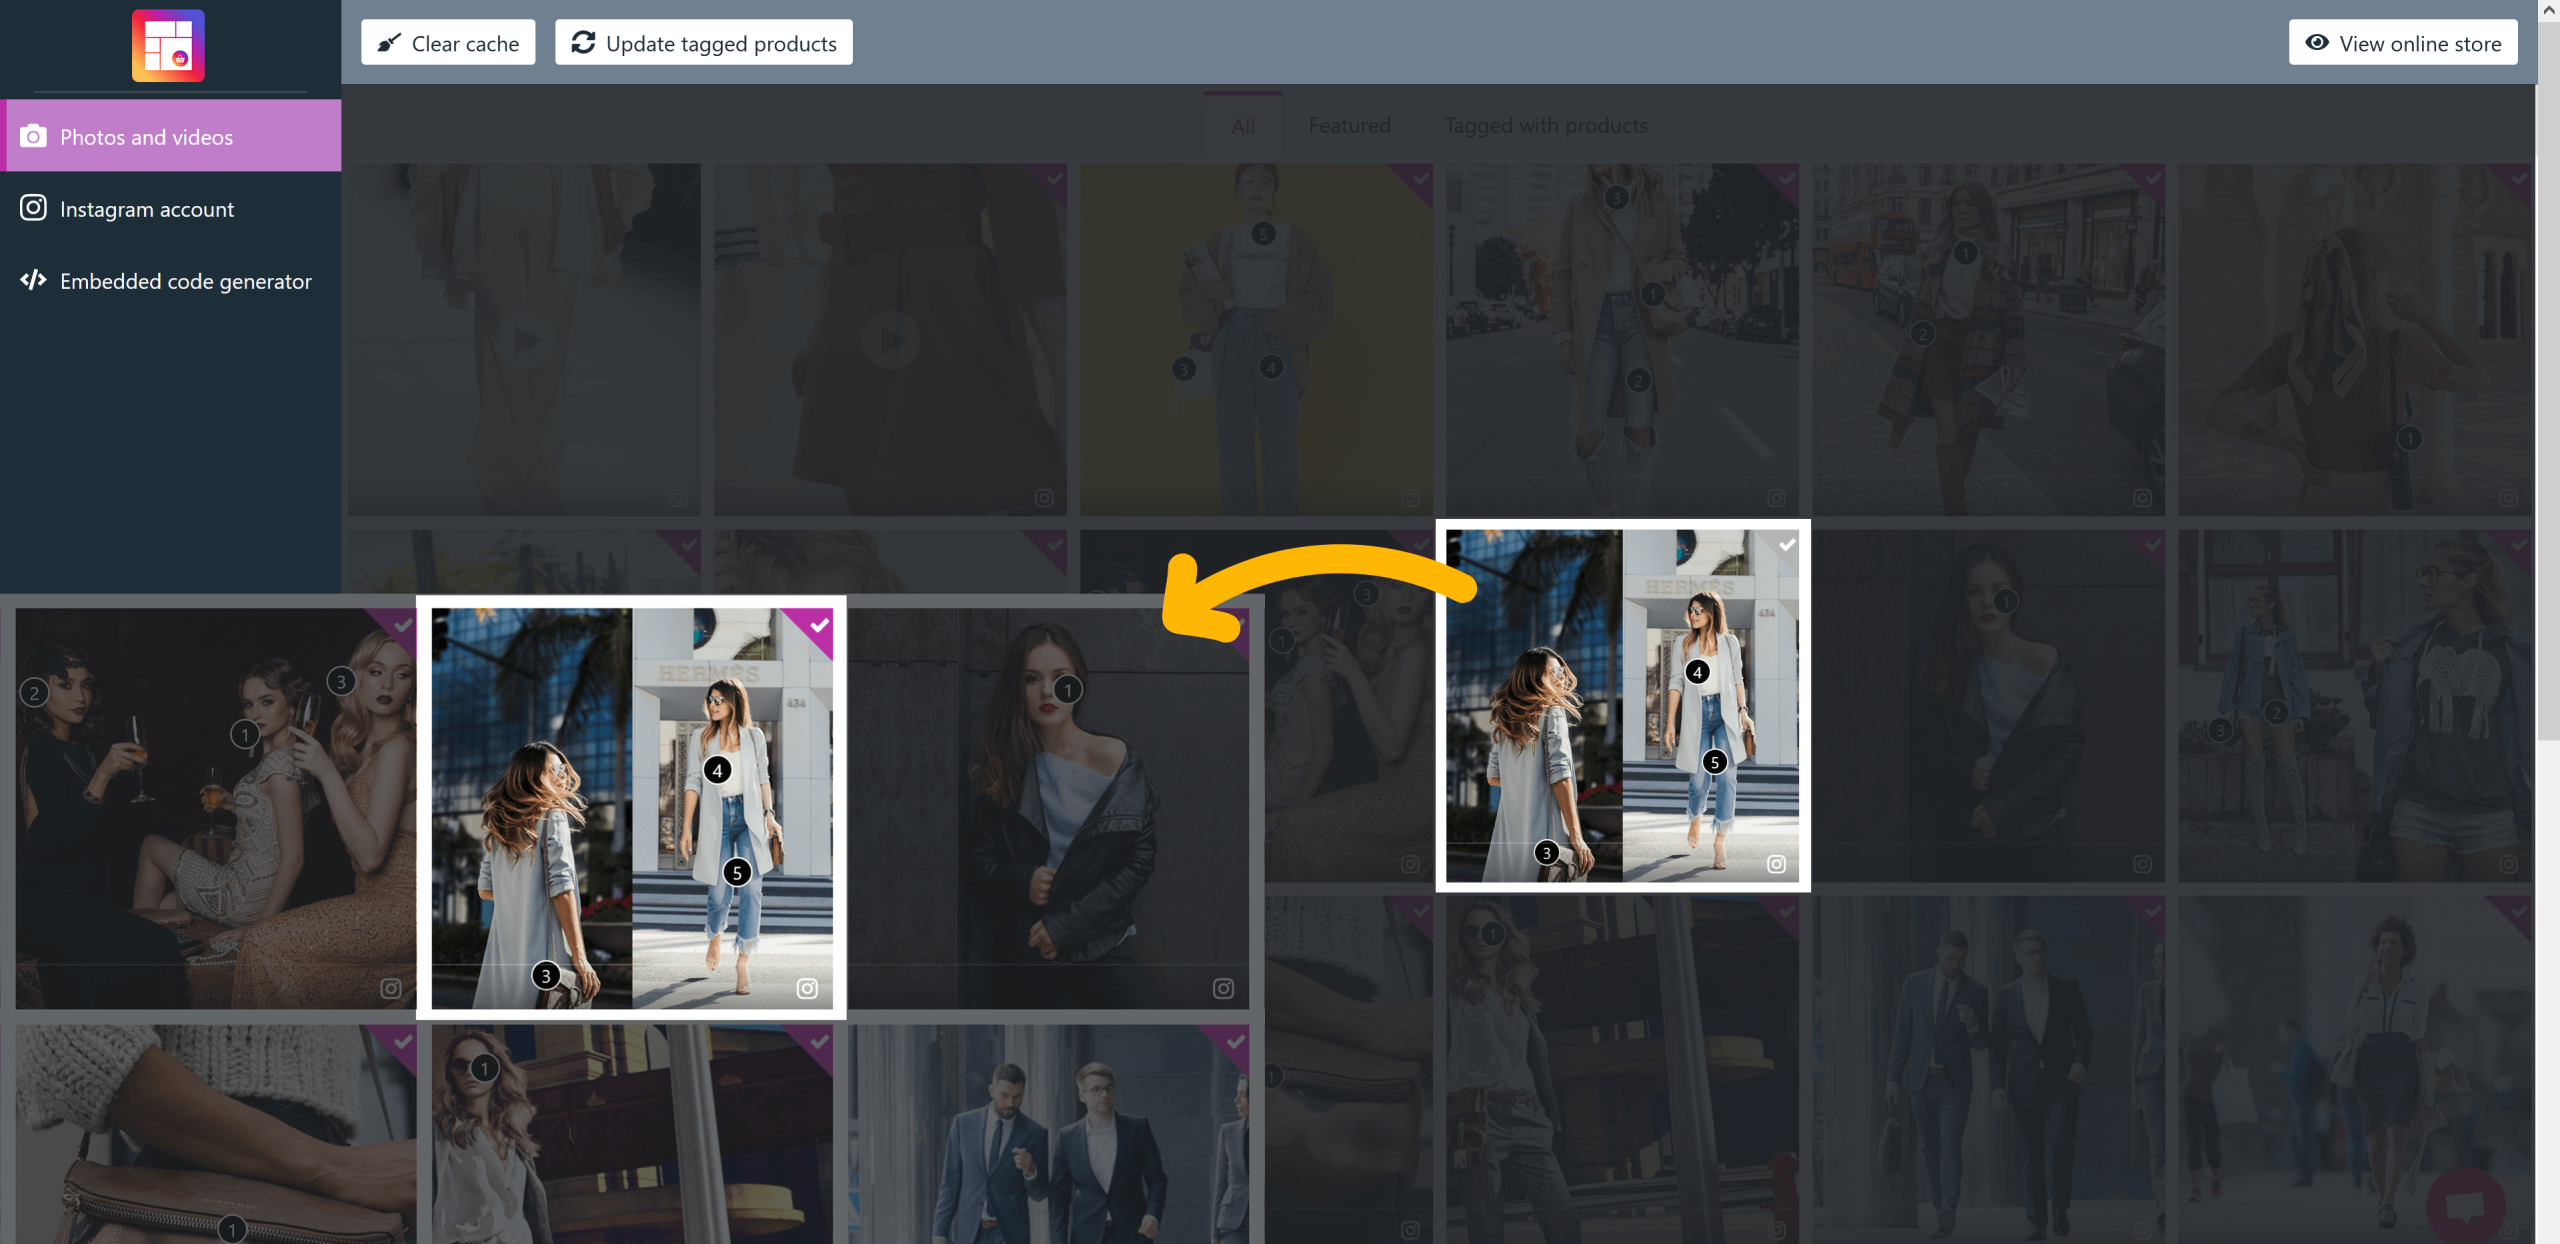
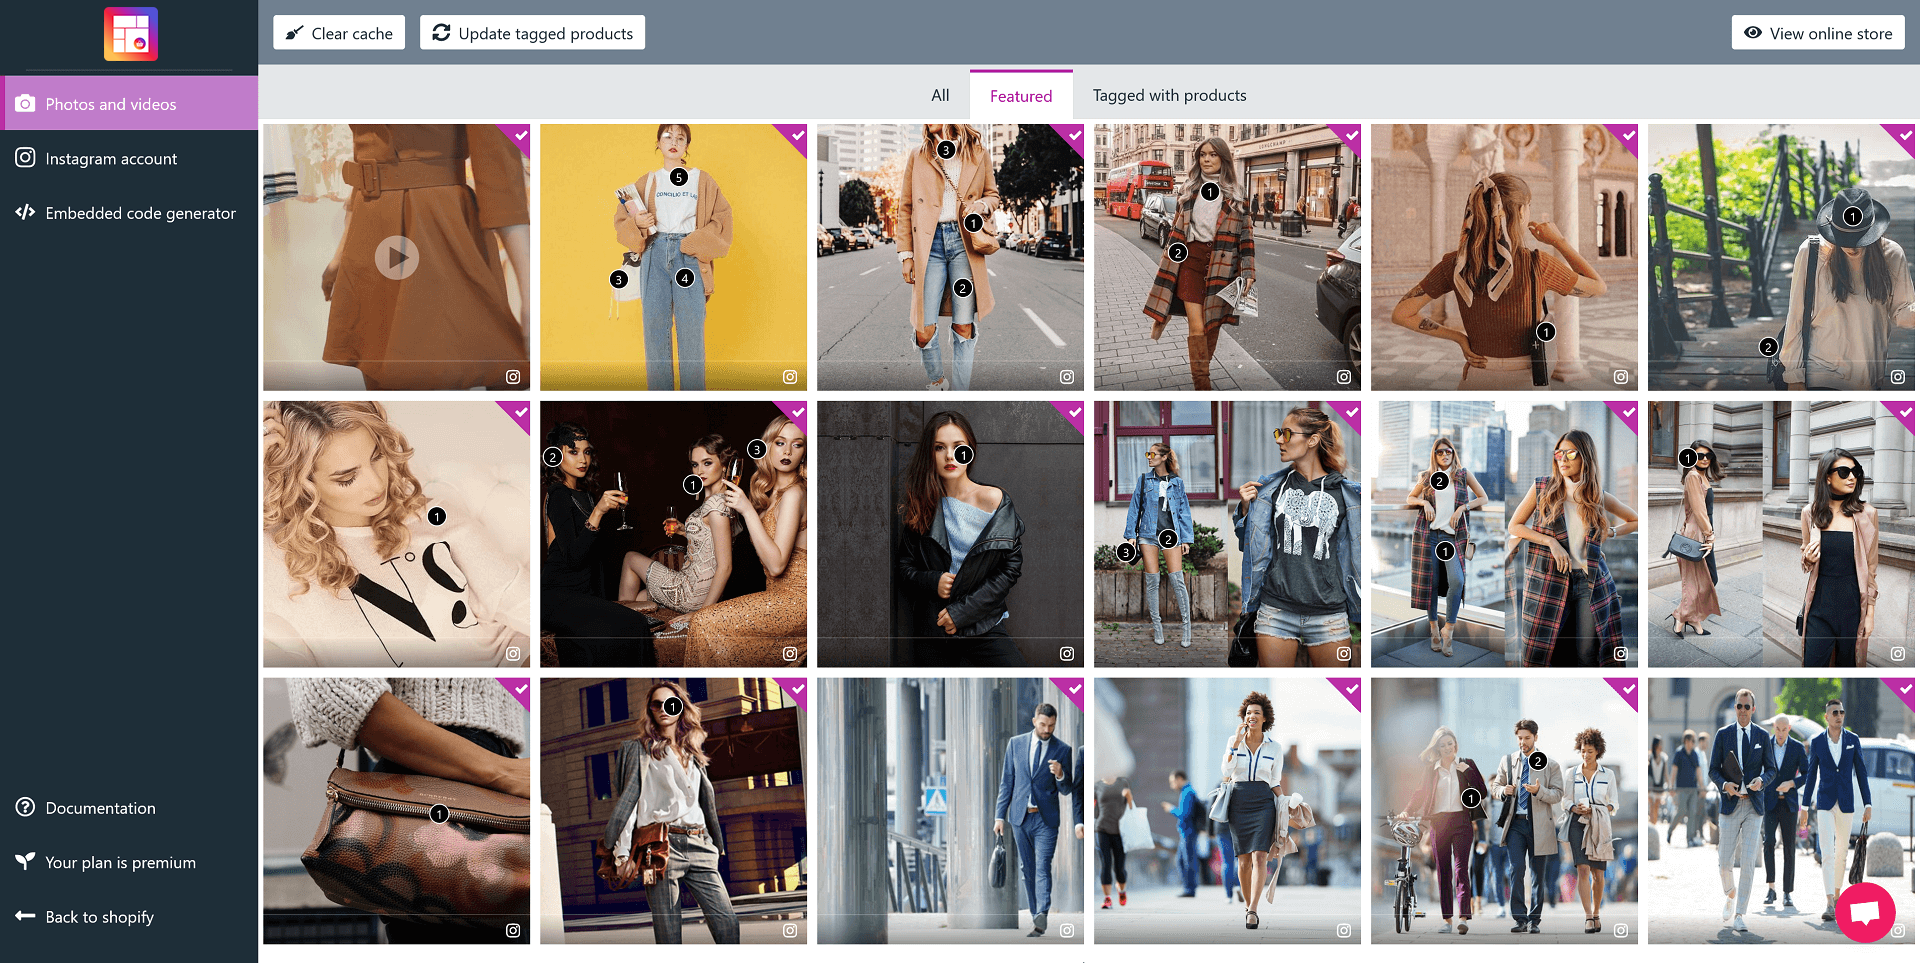
Display “Featured only” photos/videos and display “tagged with products only” photos/videos options are available after you marking featured photos/videos and tagging products onto photos/videos.


To read more about how to mark featured photos/videos, please navigate to “Featured photos/videos” section.

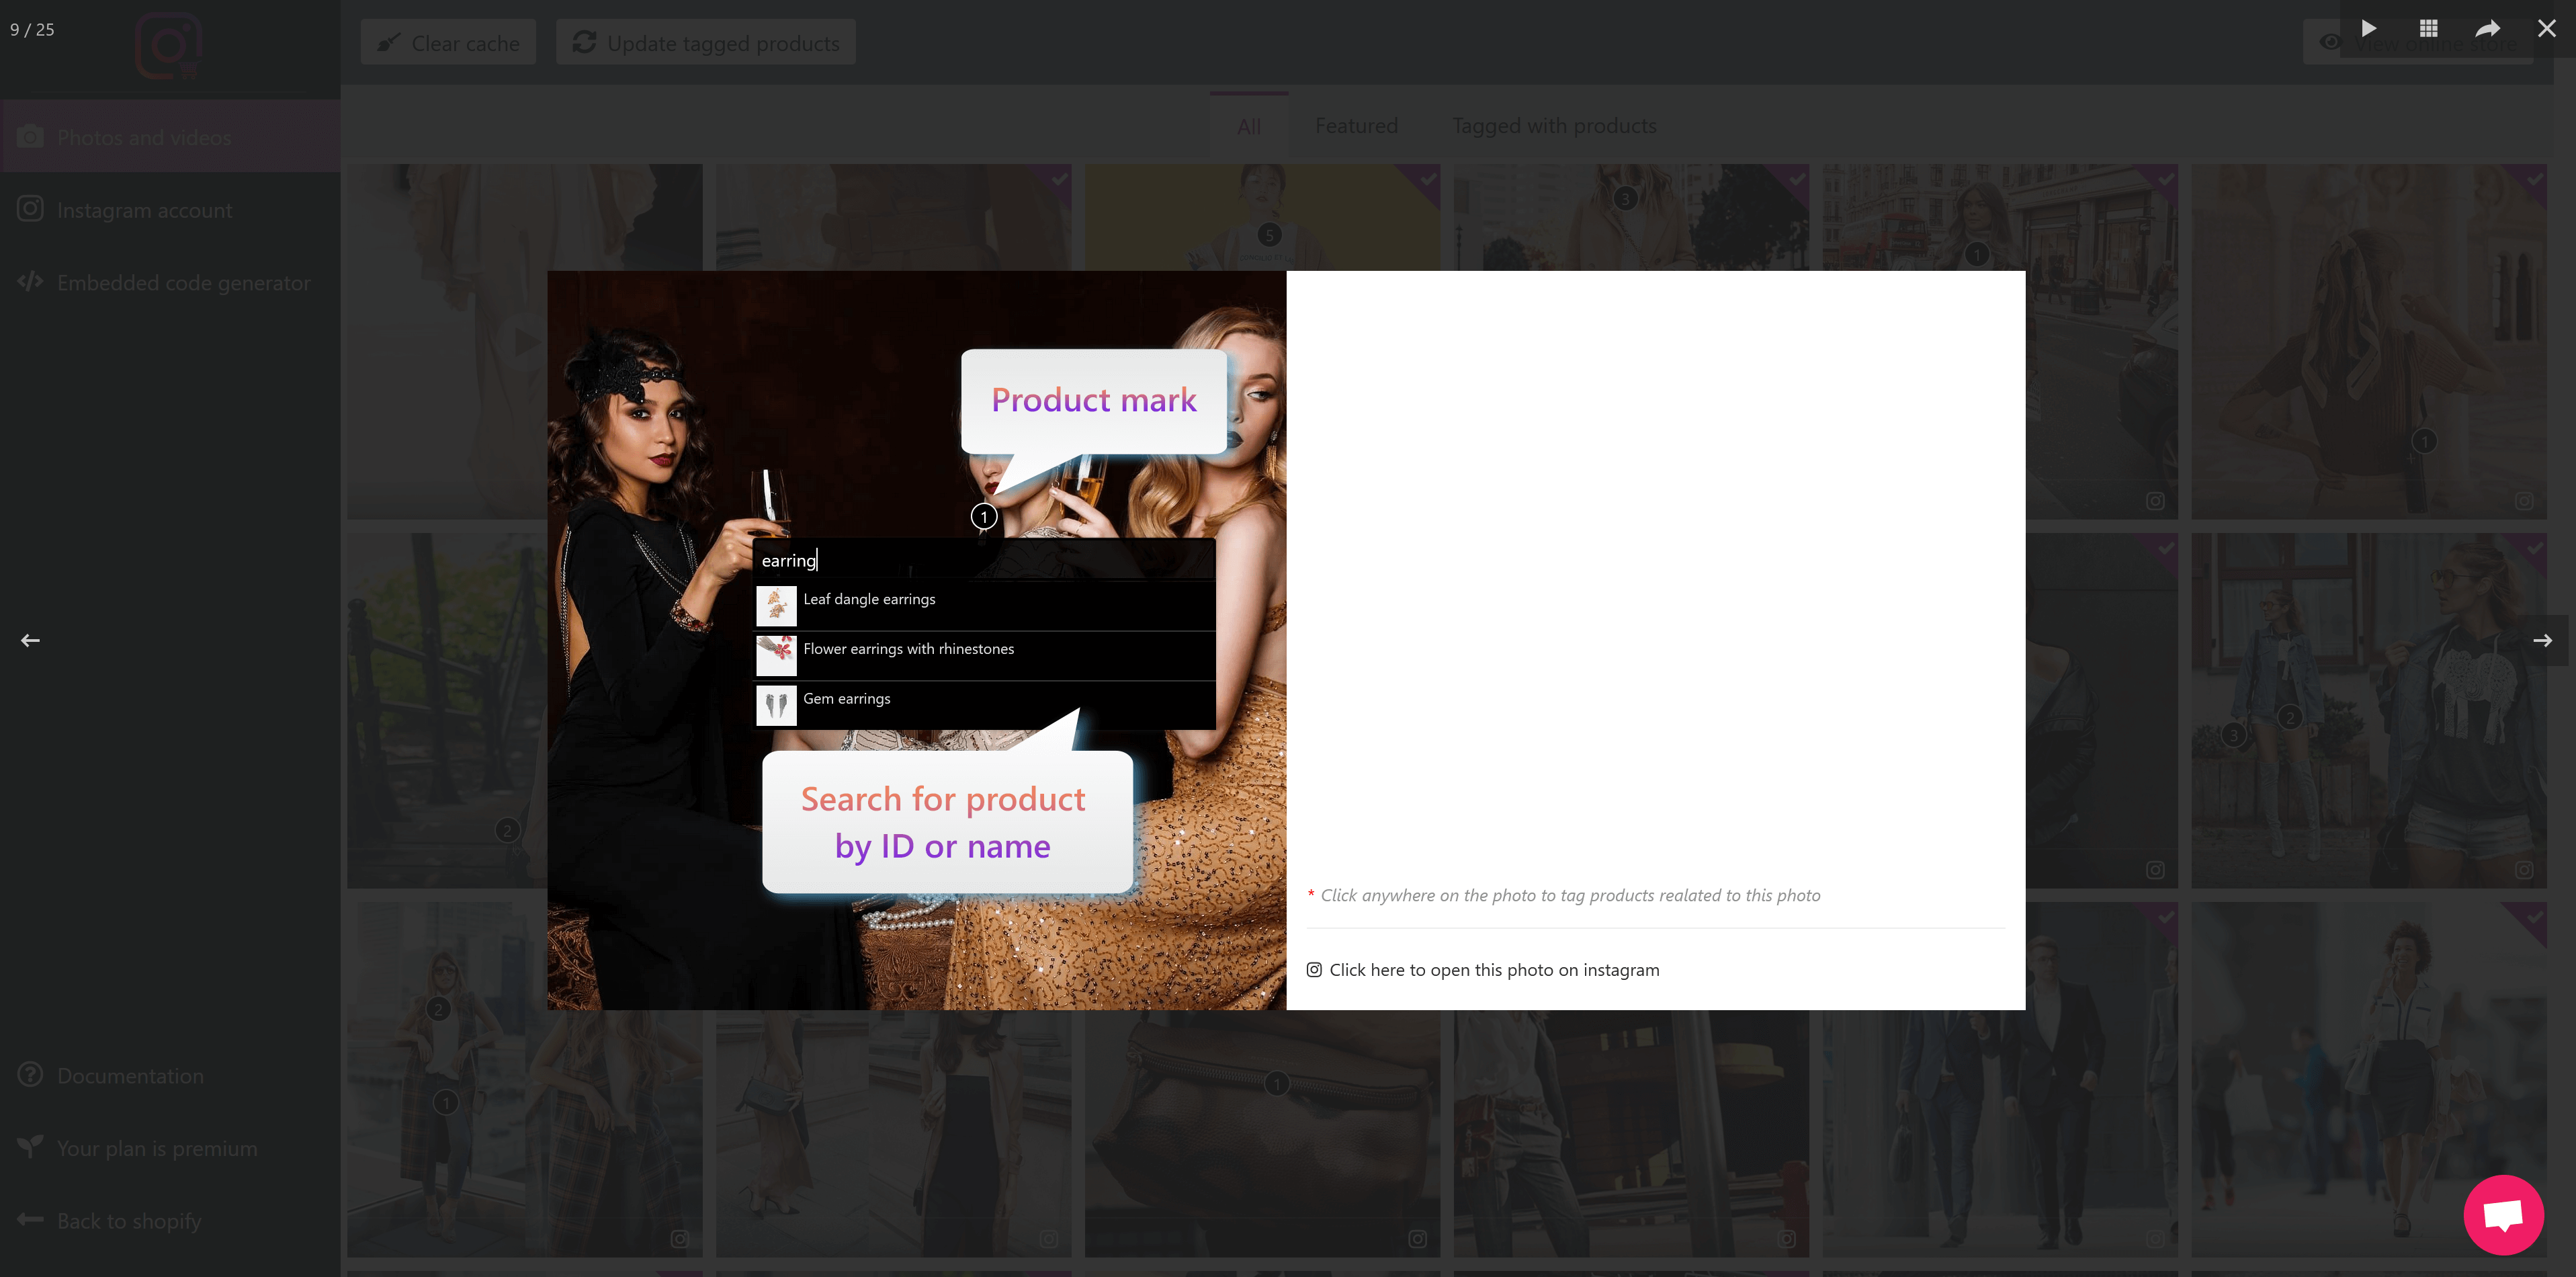
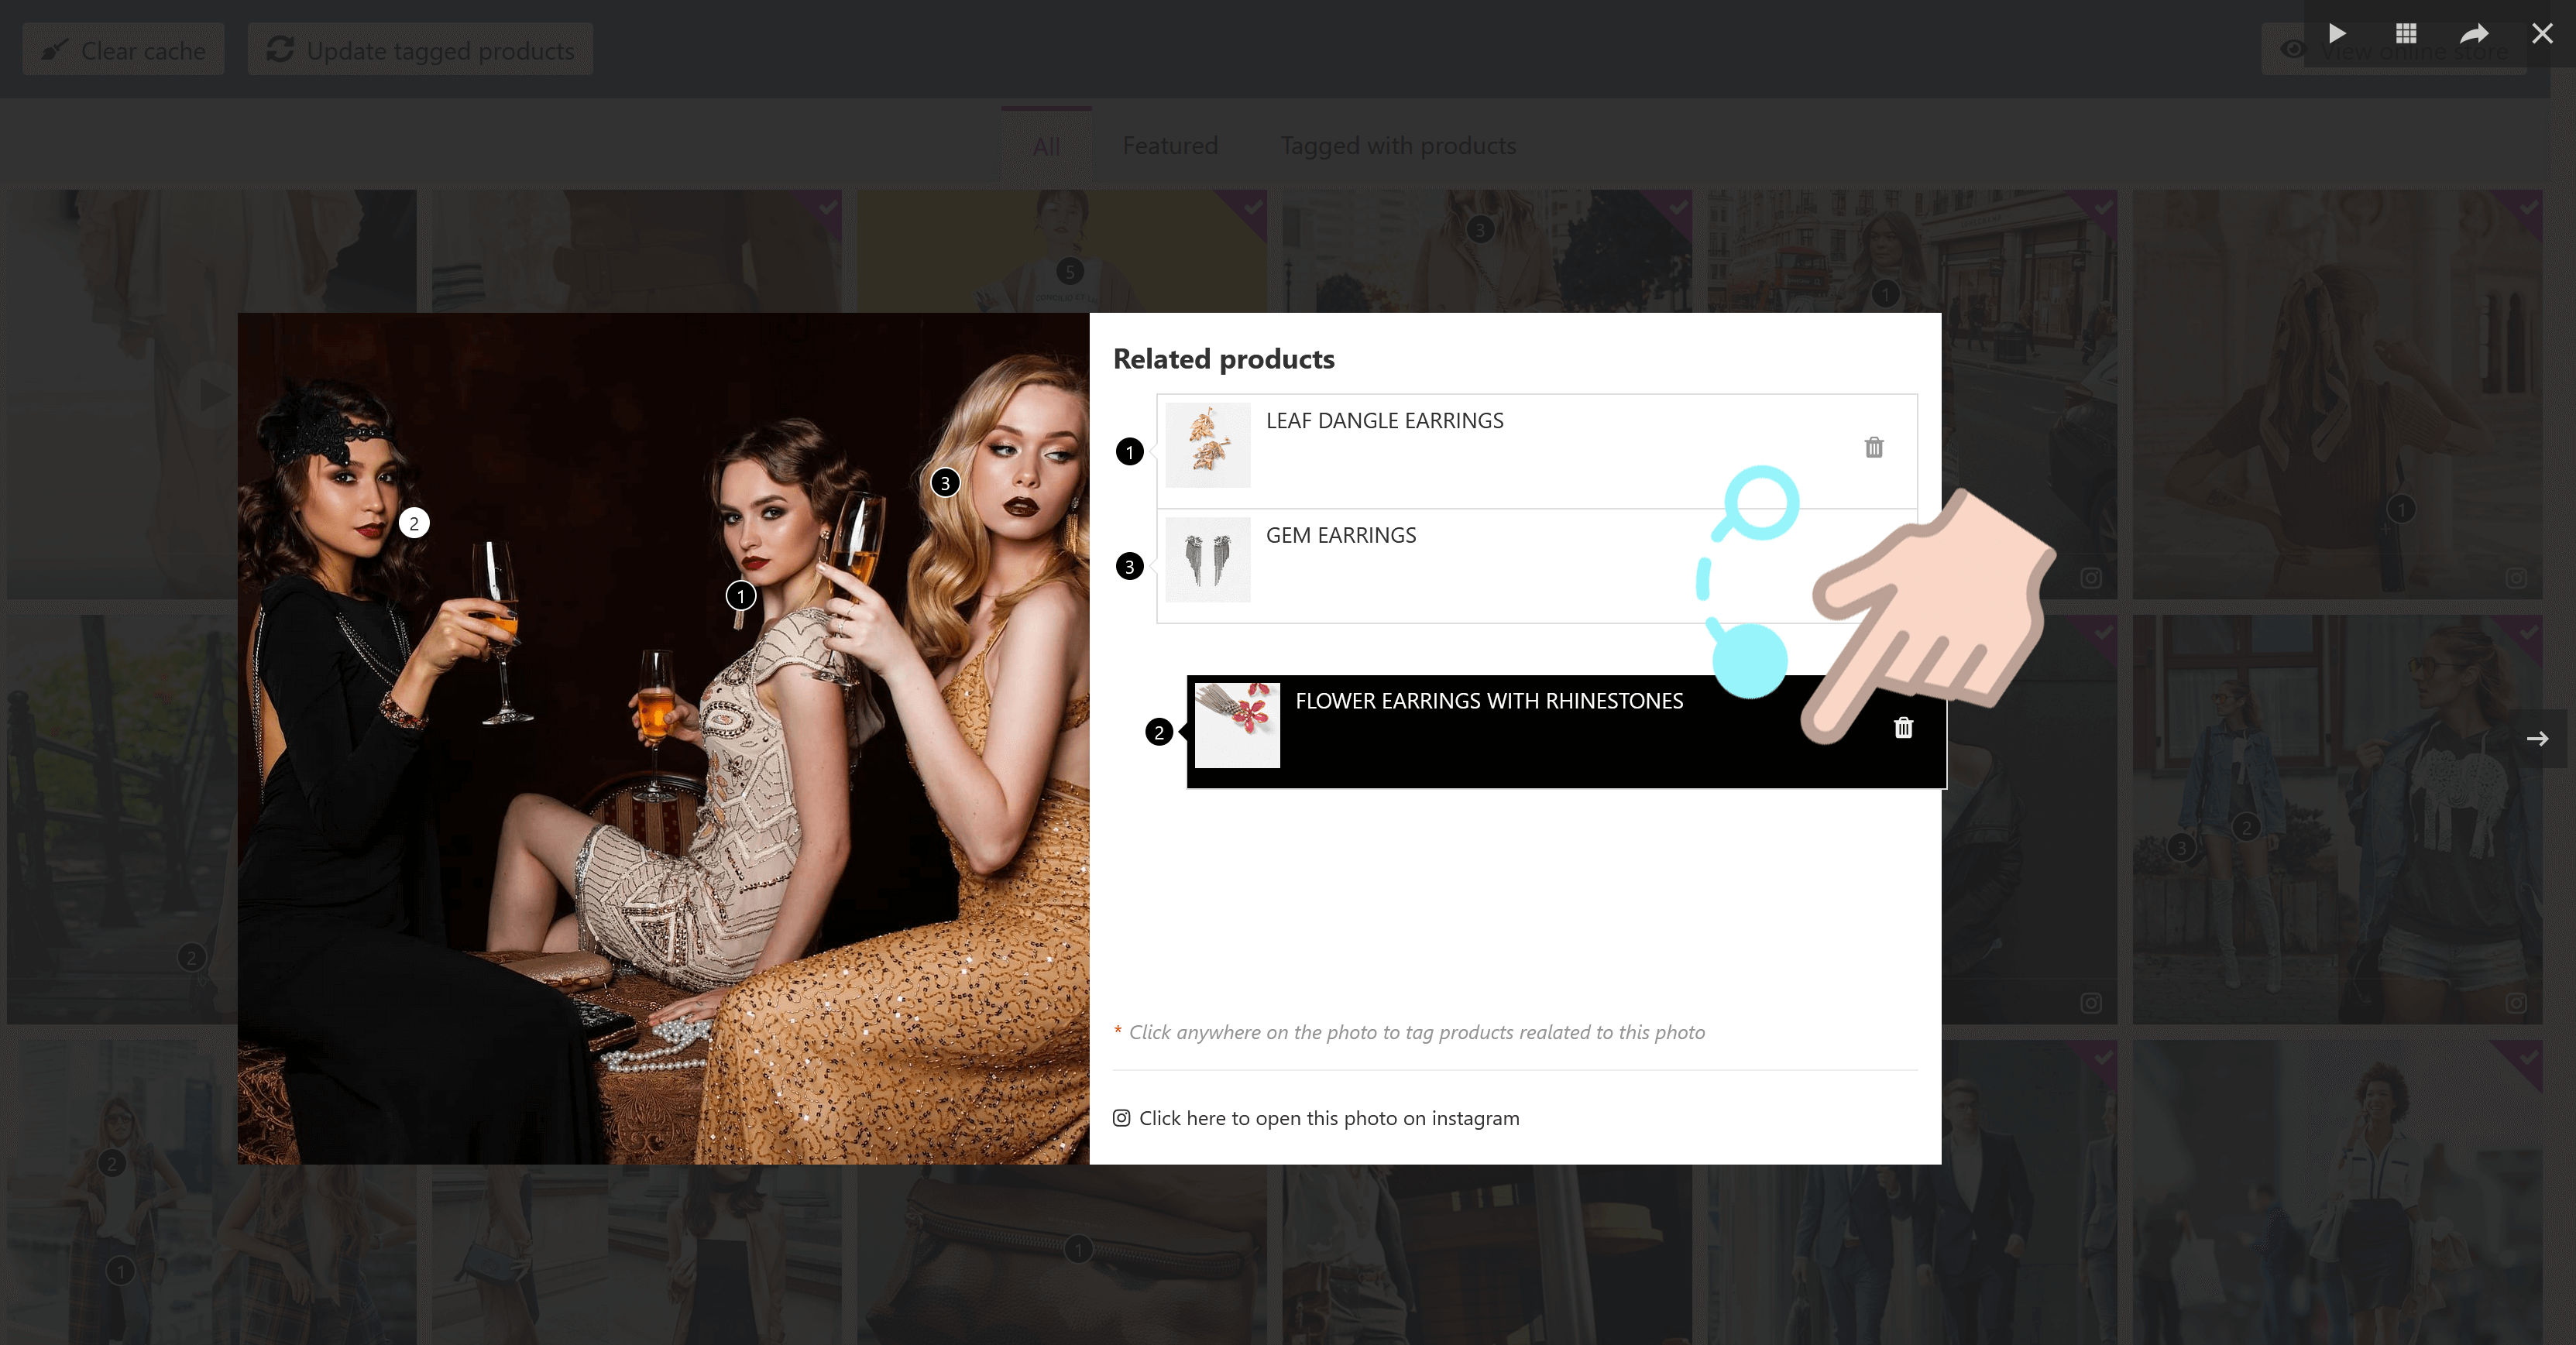
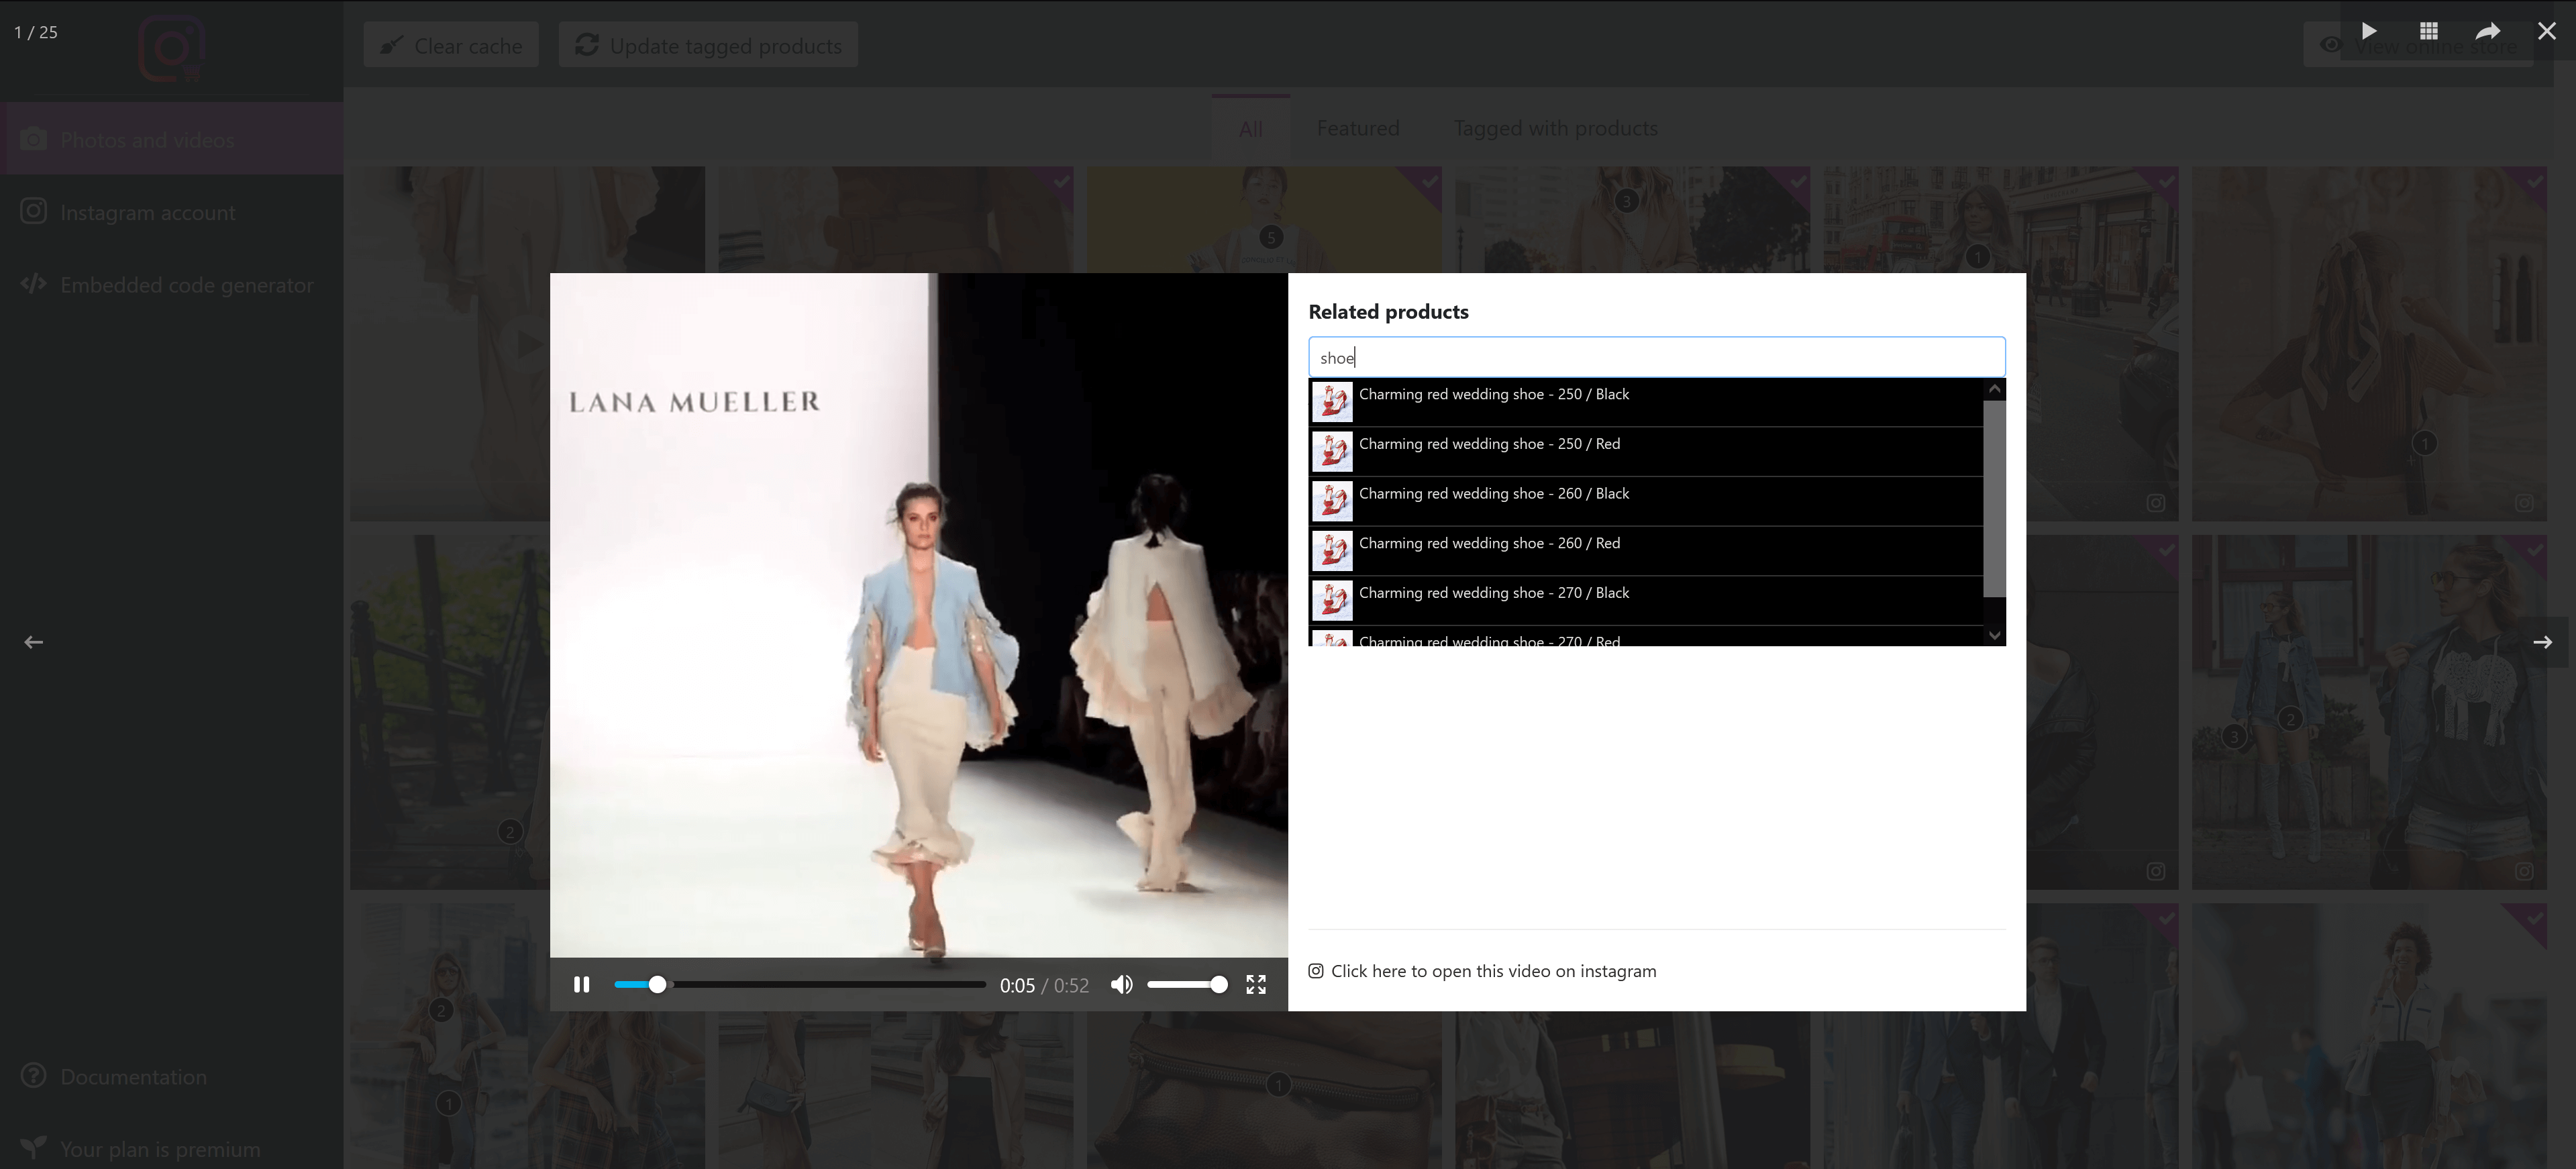
To read more about how to tag products onto photos/videos, please navigate to “Shopping feature” section.
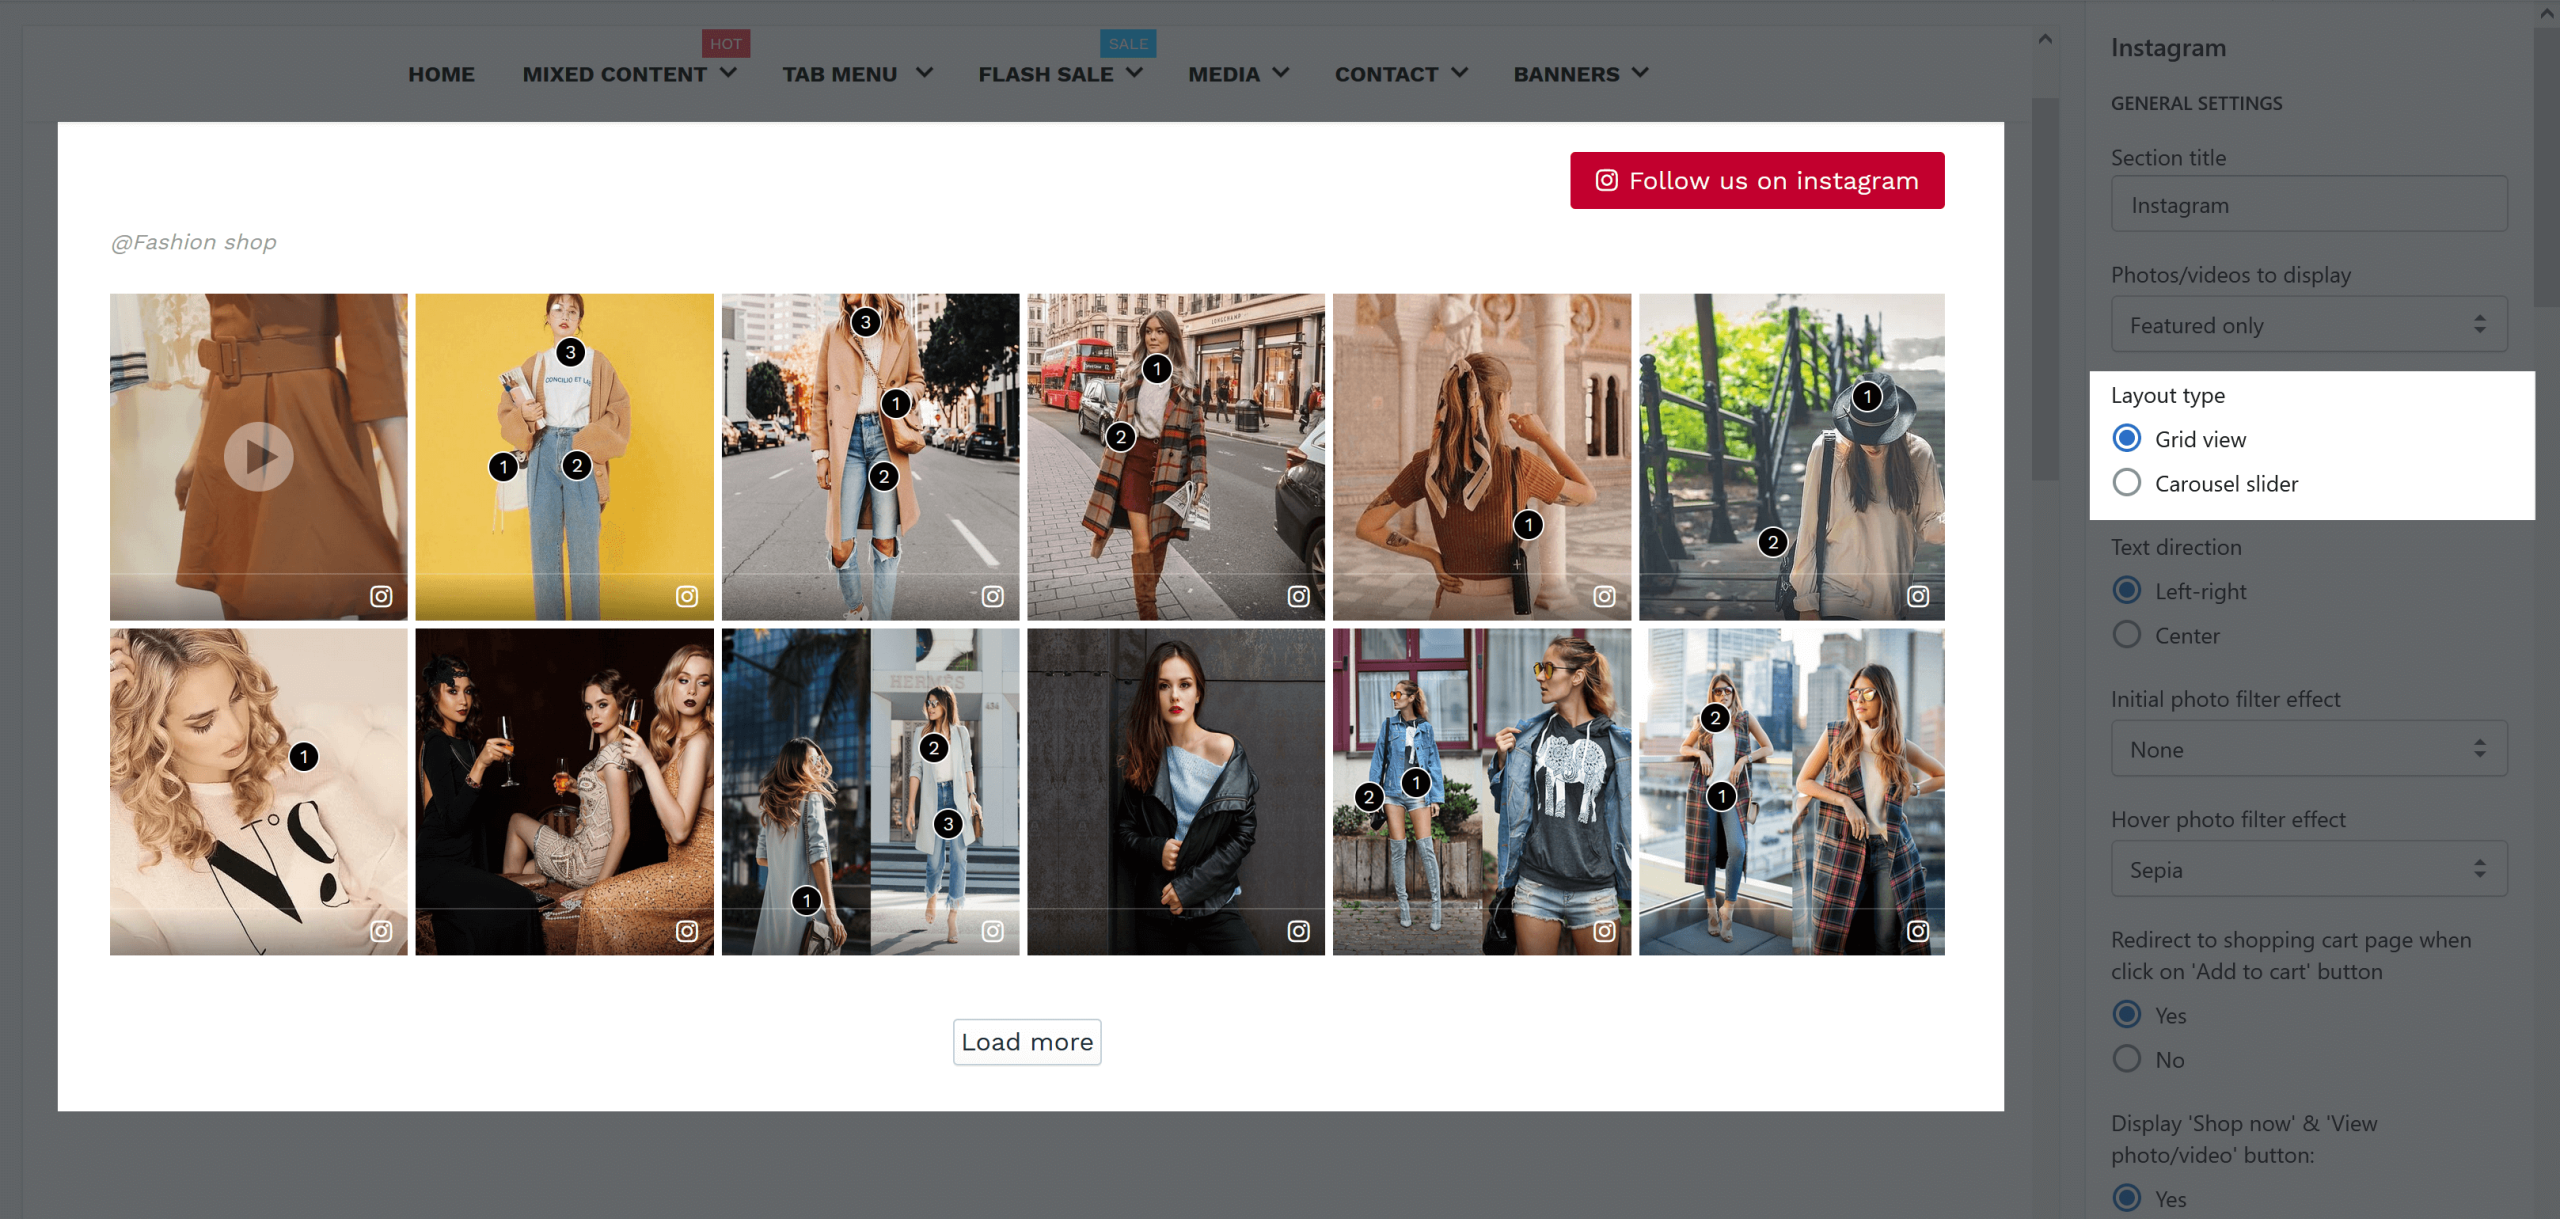
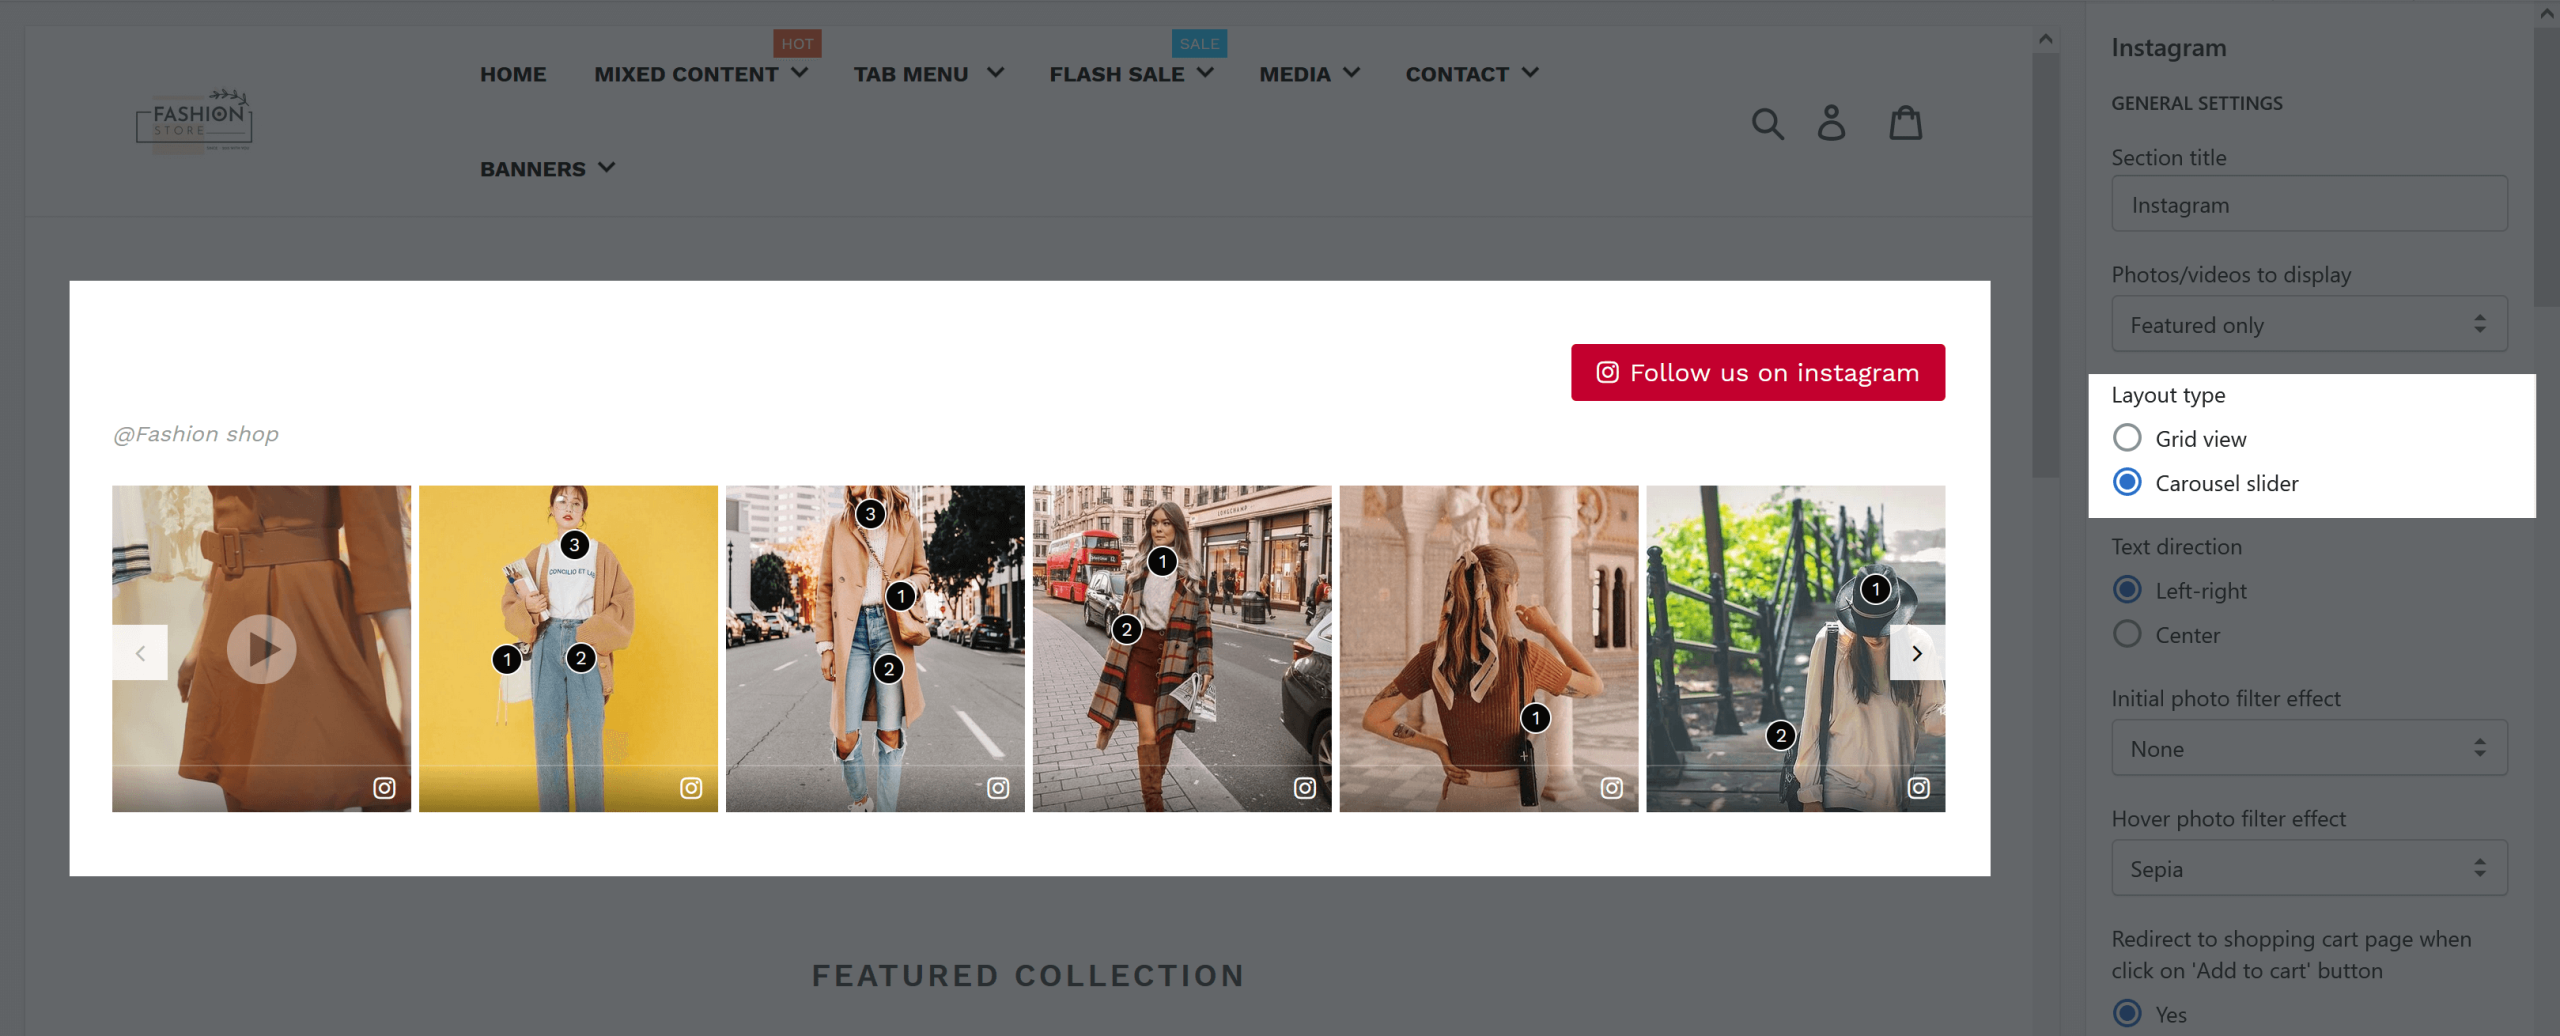
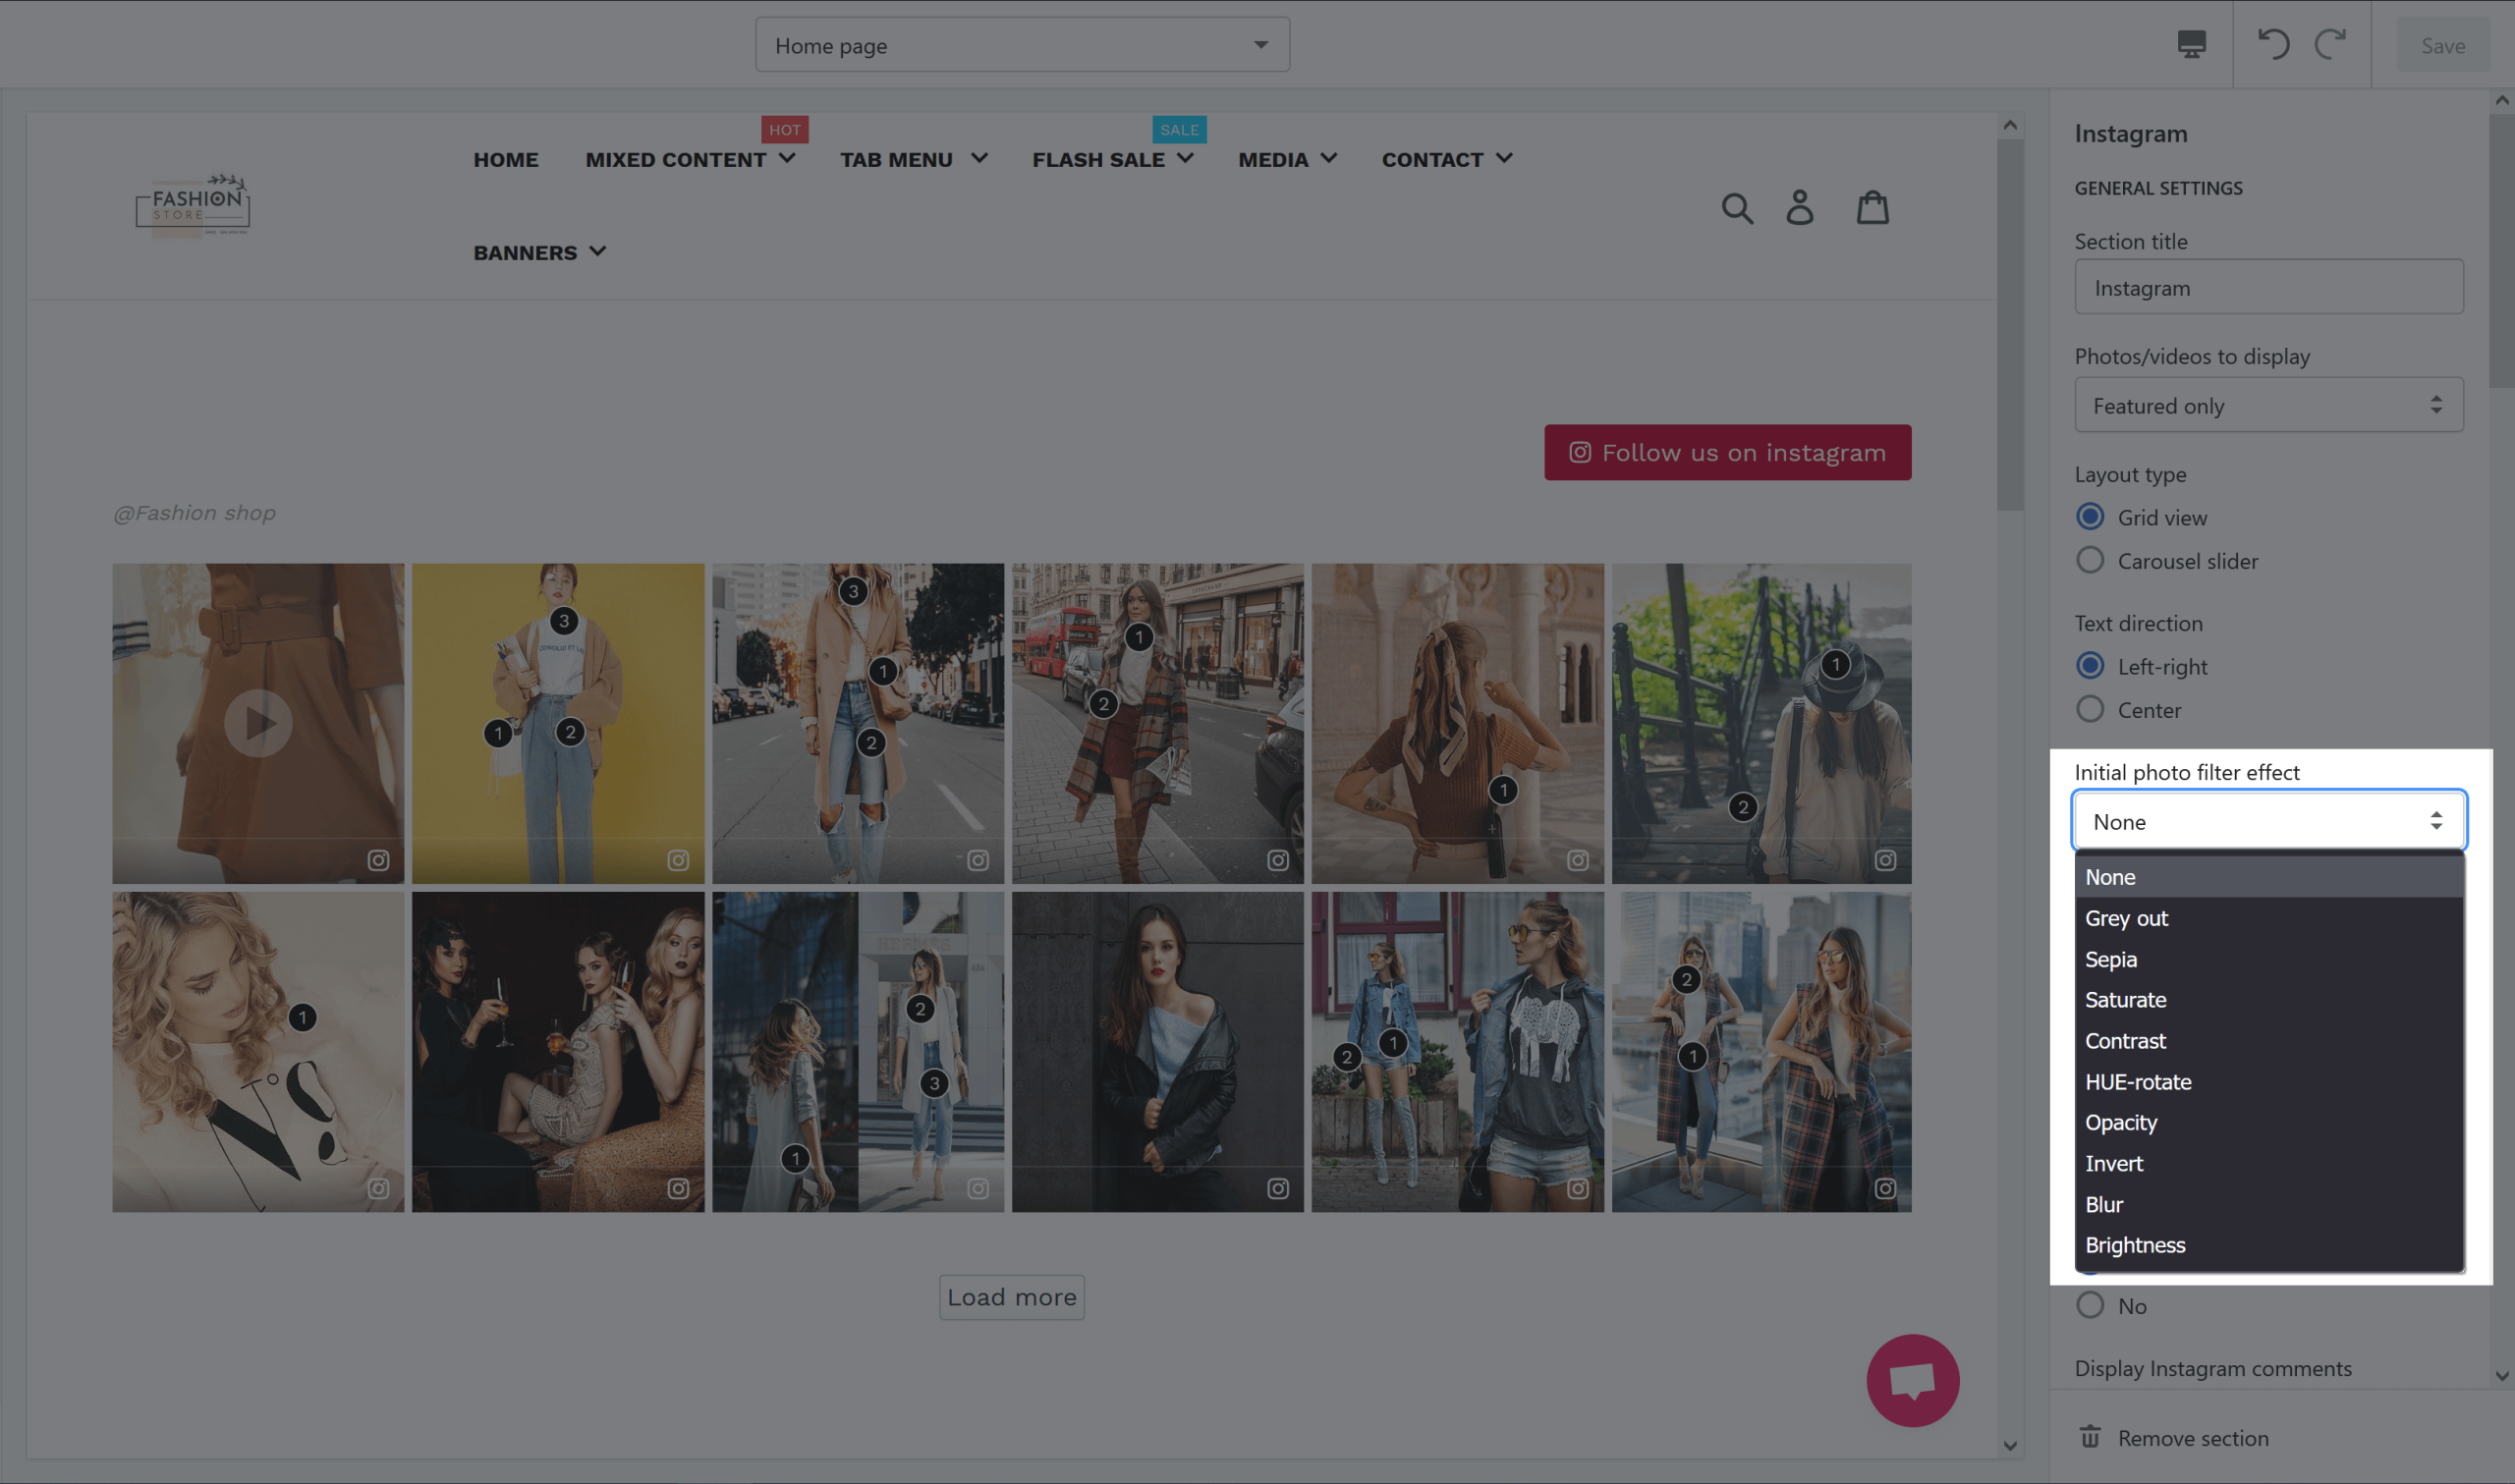
b. Layout typeVA: Instagram Slider & Feed app supports 2 layout types for the Instagram section: grid and carousel slider.

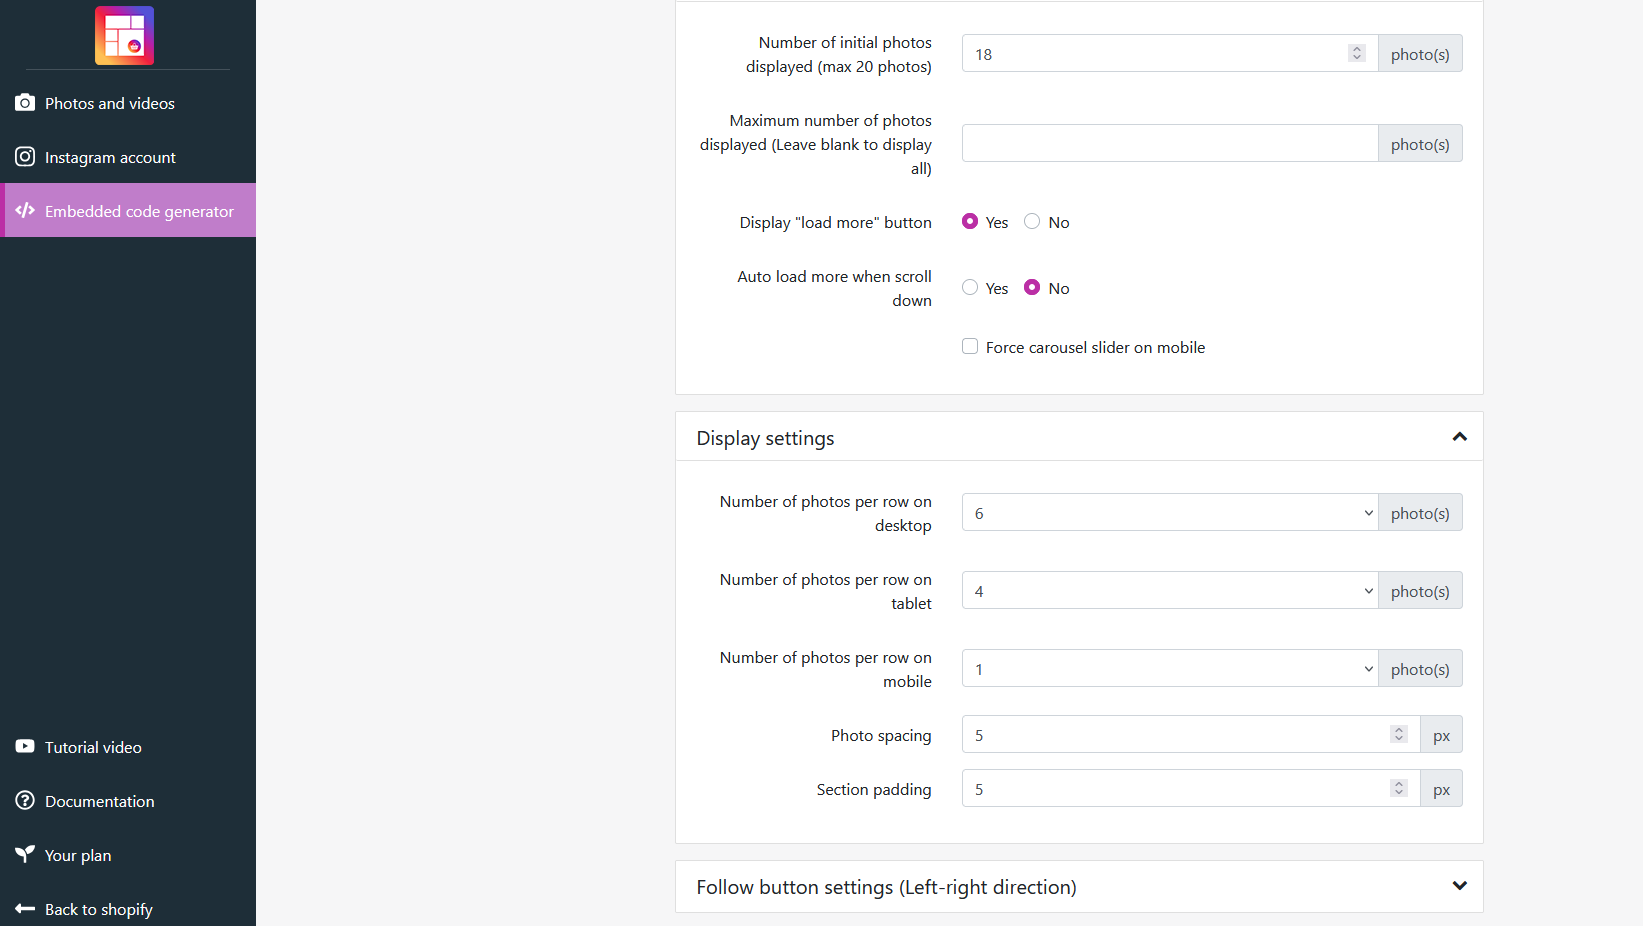
  • Grid layout settings: you can set up the number of initial photos displayed and the maximum number of photos displayed. You can also display or hide “Load more” button.

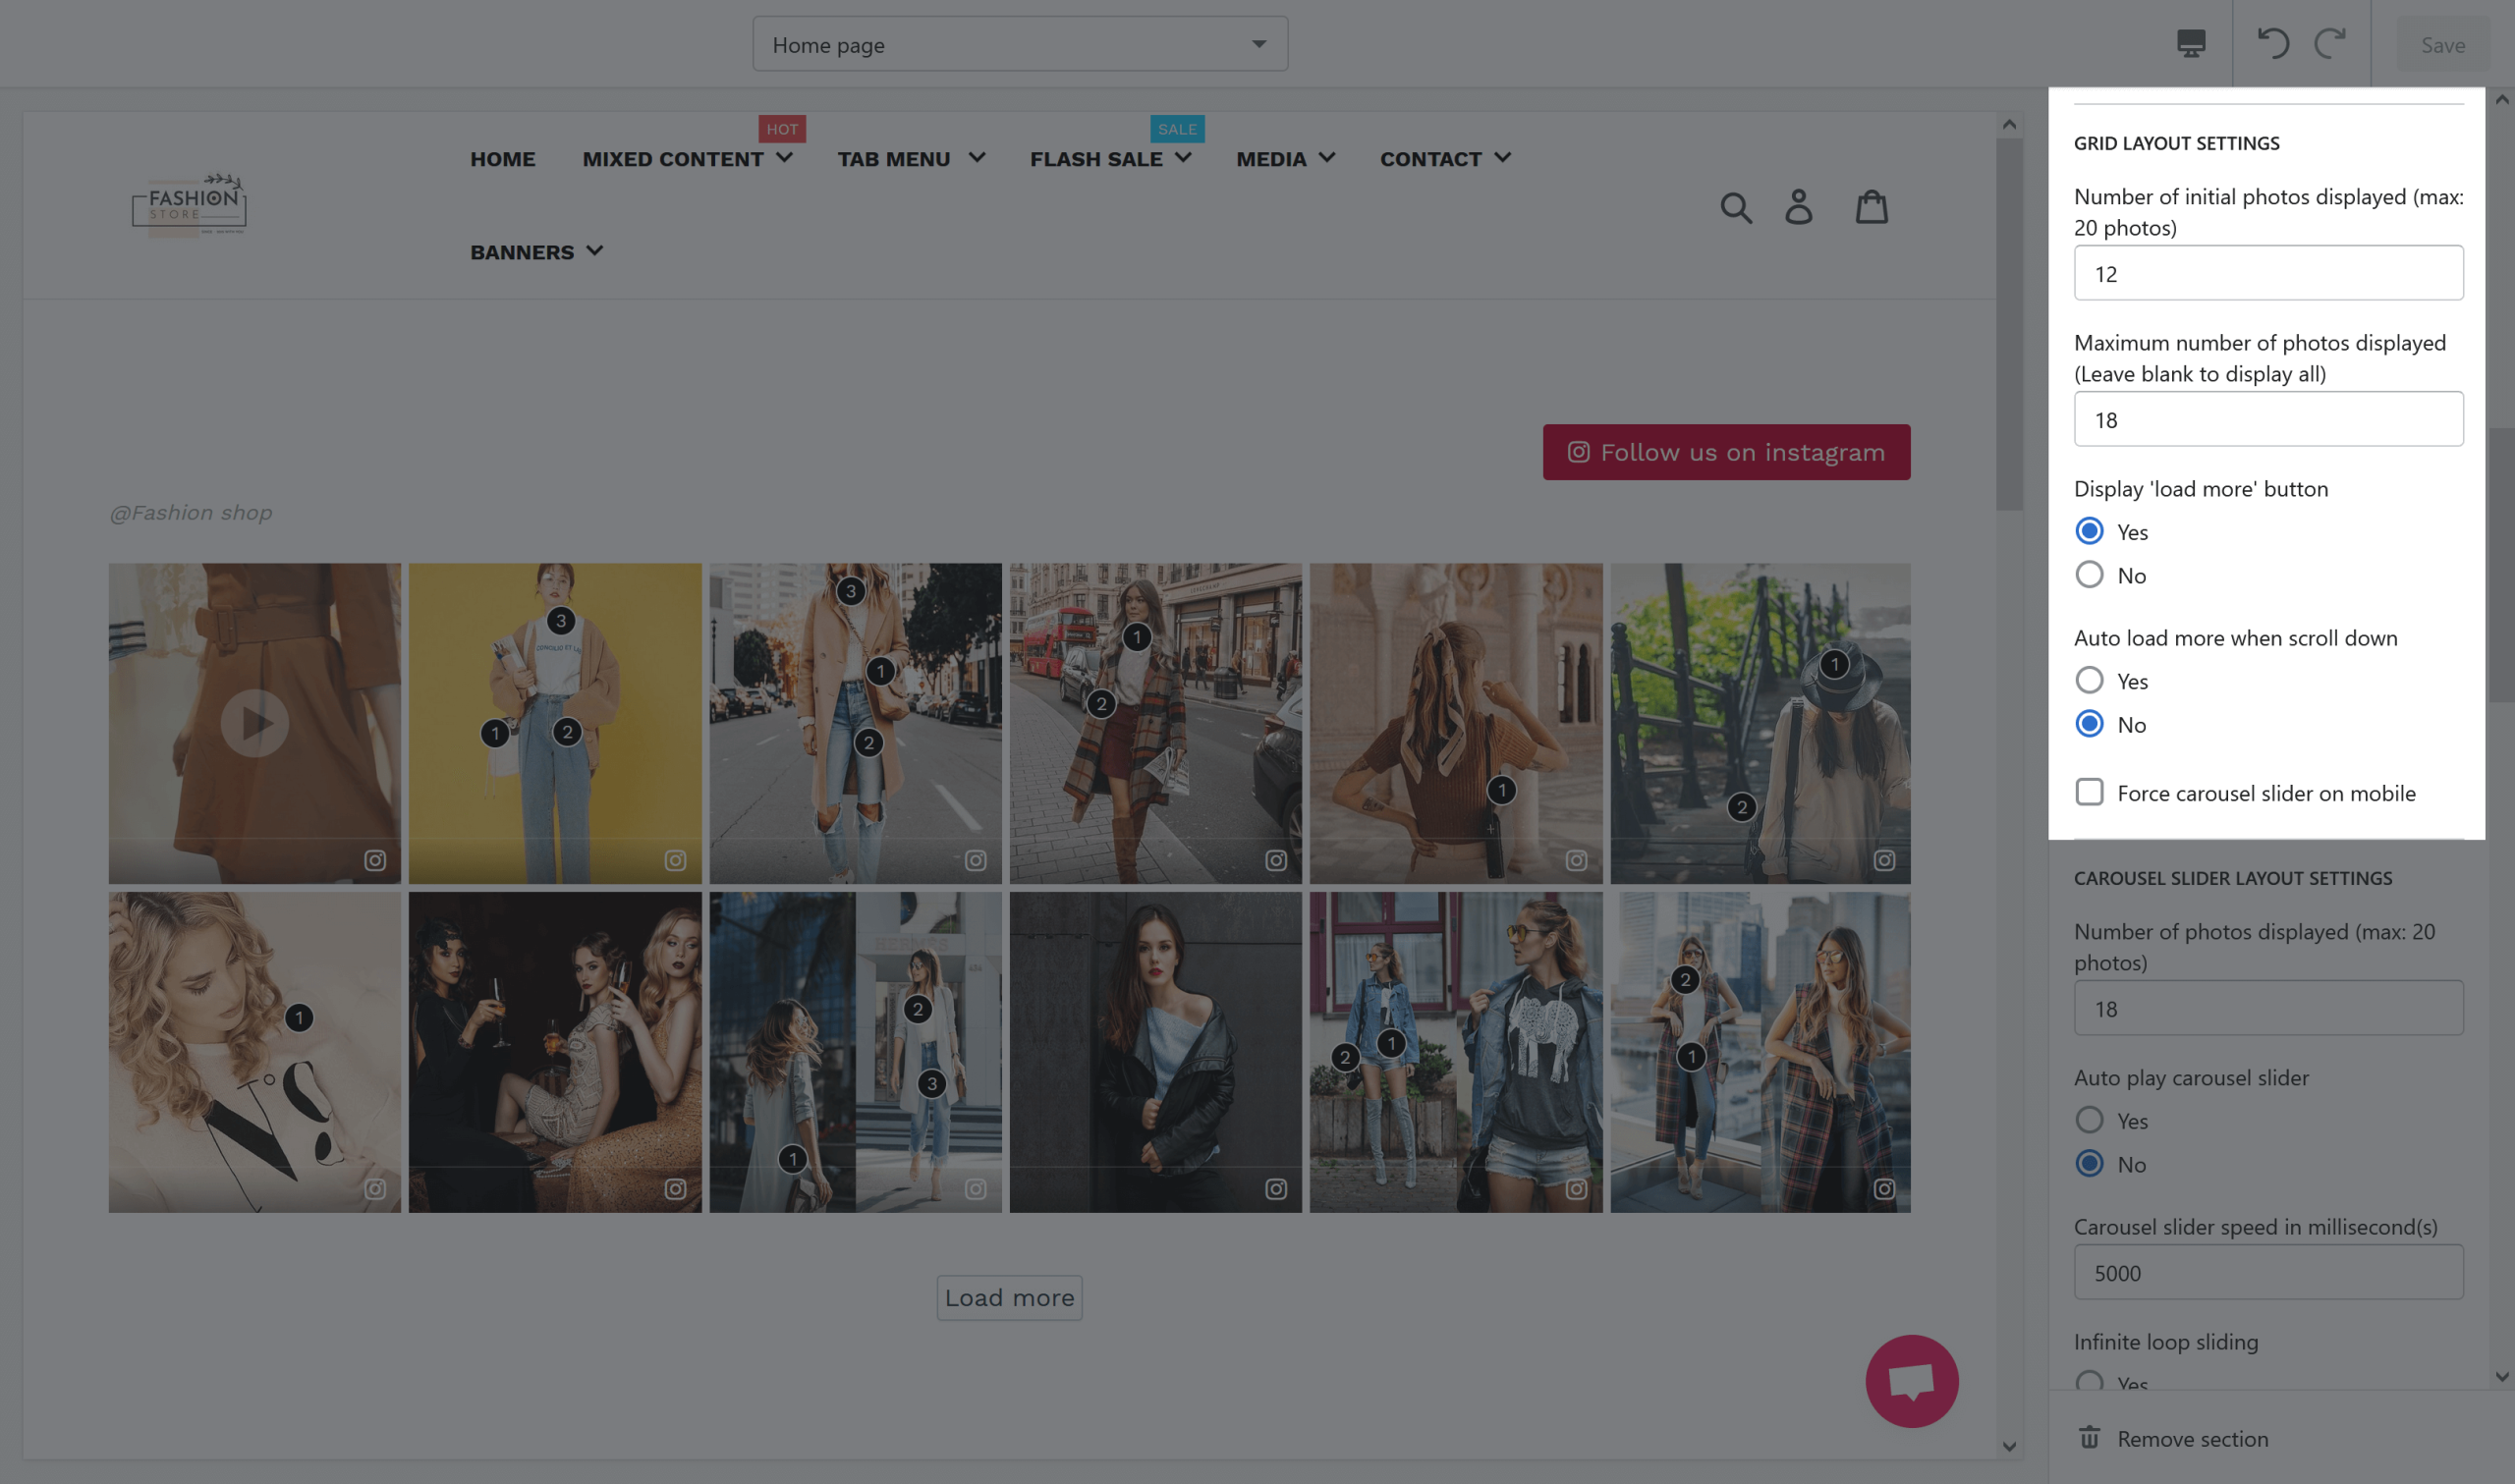
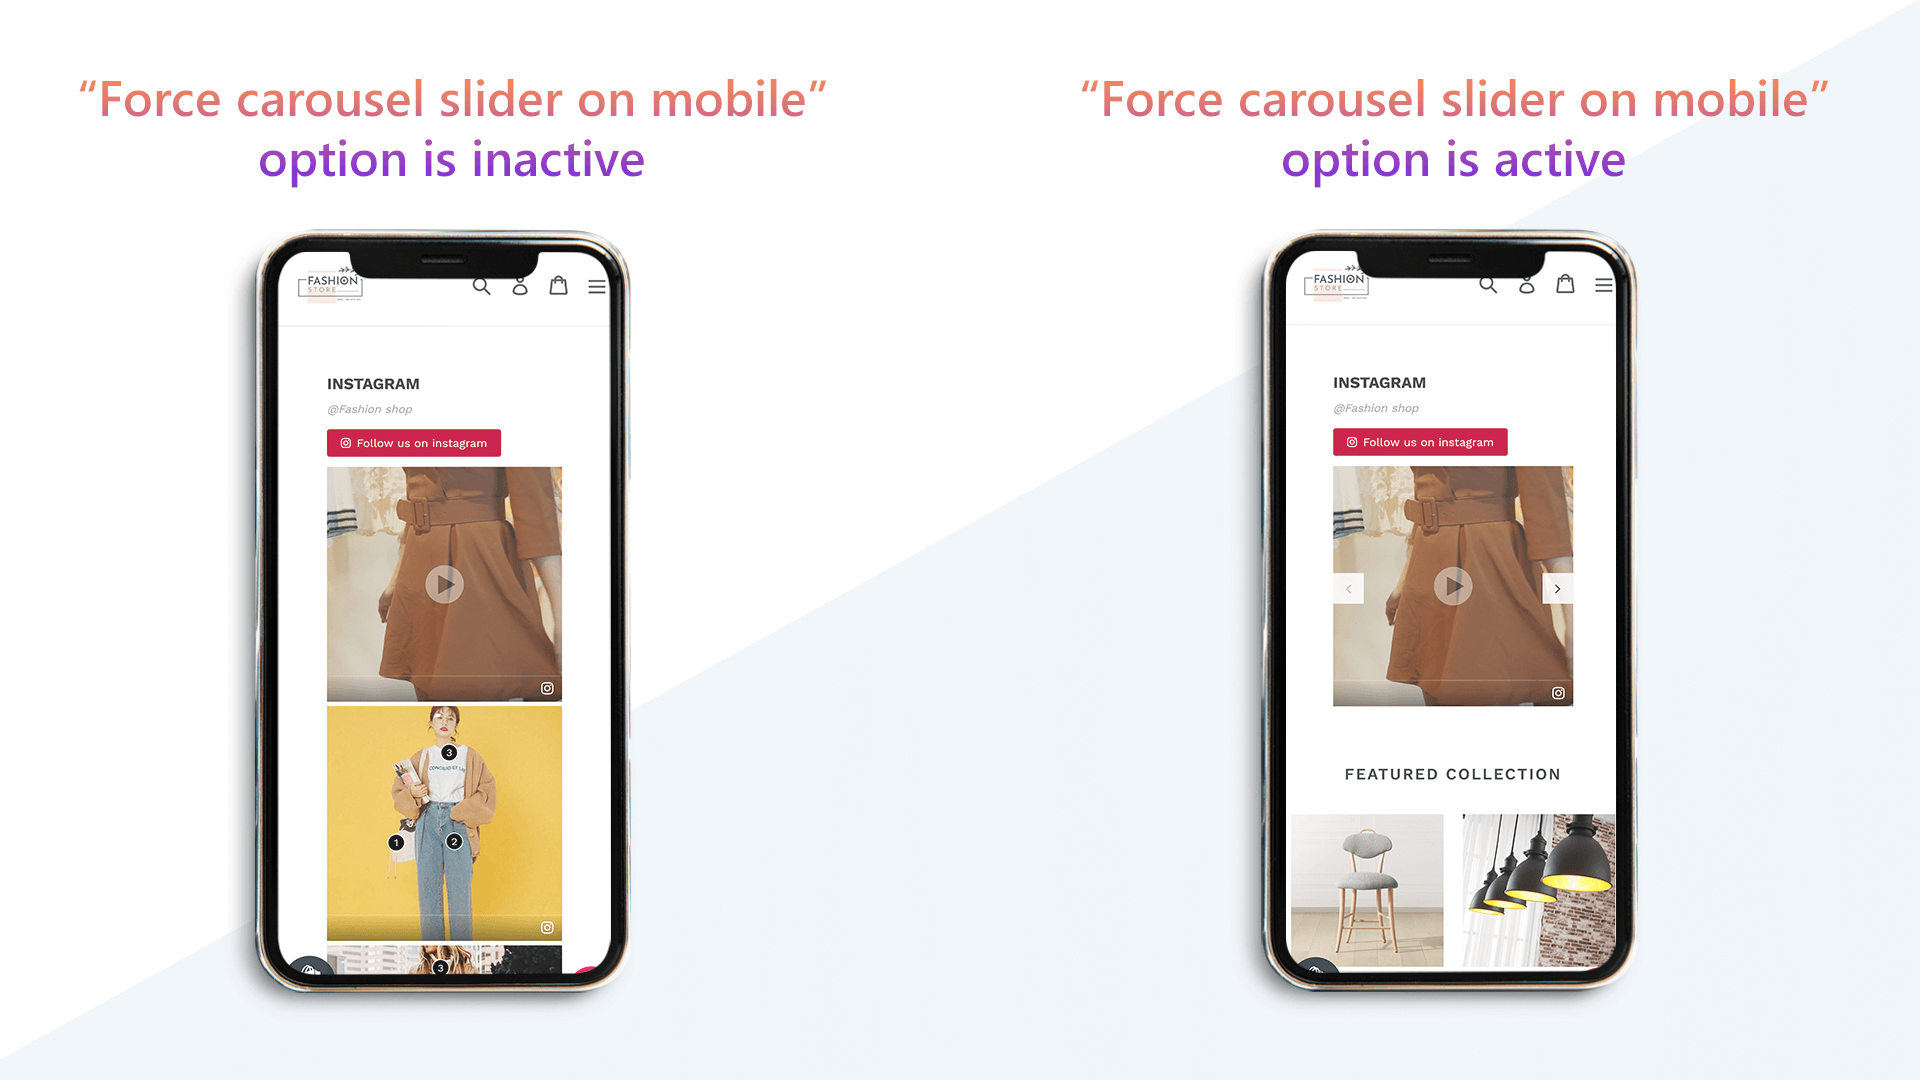
By default, when you select grid layout type, the Instagram section on mobile devices will be displayed on a grid layout. If you enable “Force carousel slider on mobile” option, the Instagram section on mobile devices will be displayed on the carousel slider layout even though the layout type on the desktop is grid layout.

  • Carousel slider layout settings: you can set up the number of photos displayed, enable/disable auto-play carousel slider, set up slider playing speed (in millisecond), and enable/disable infinite loop slider.
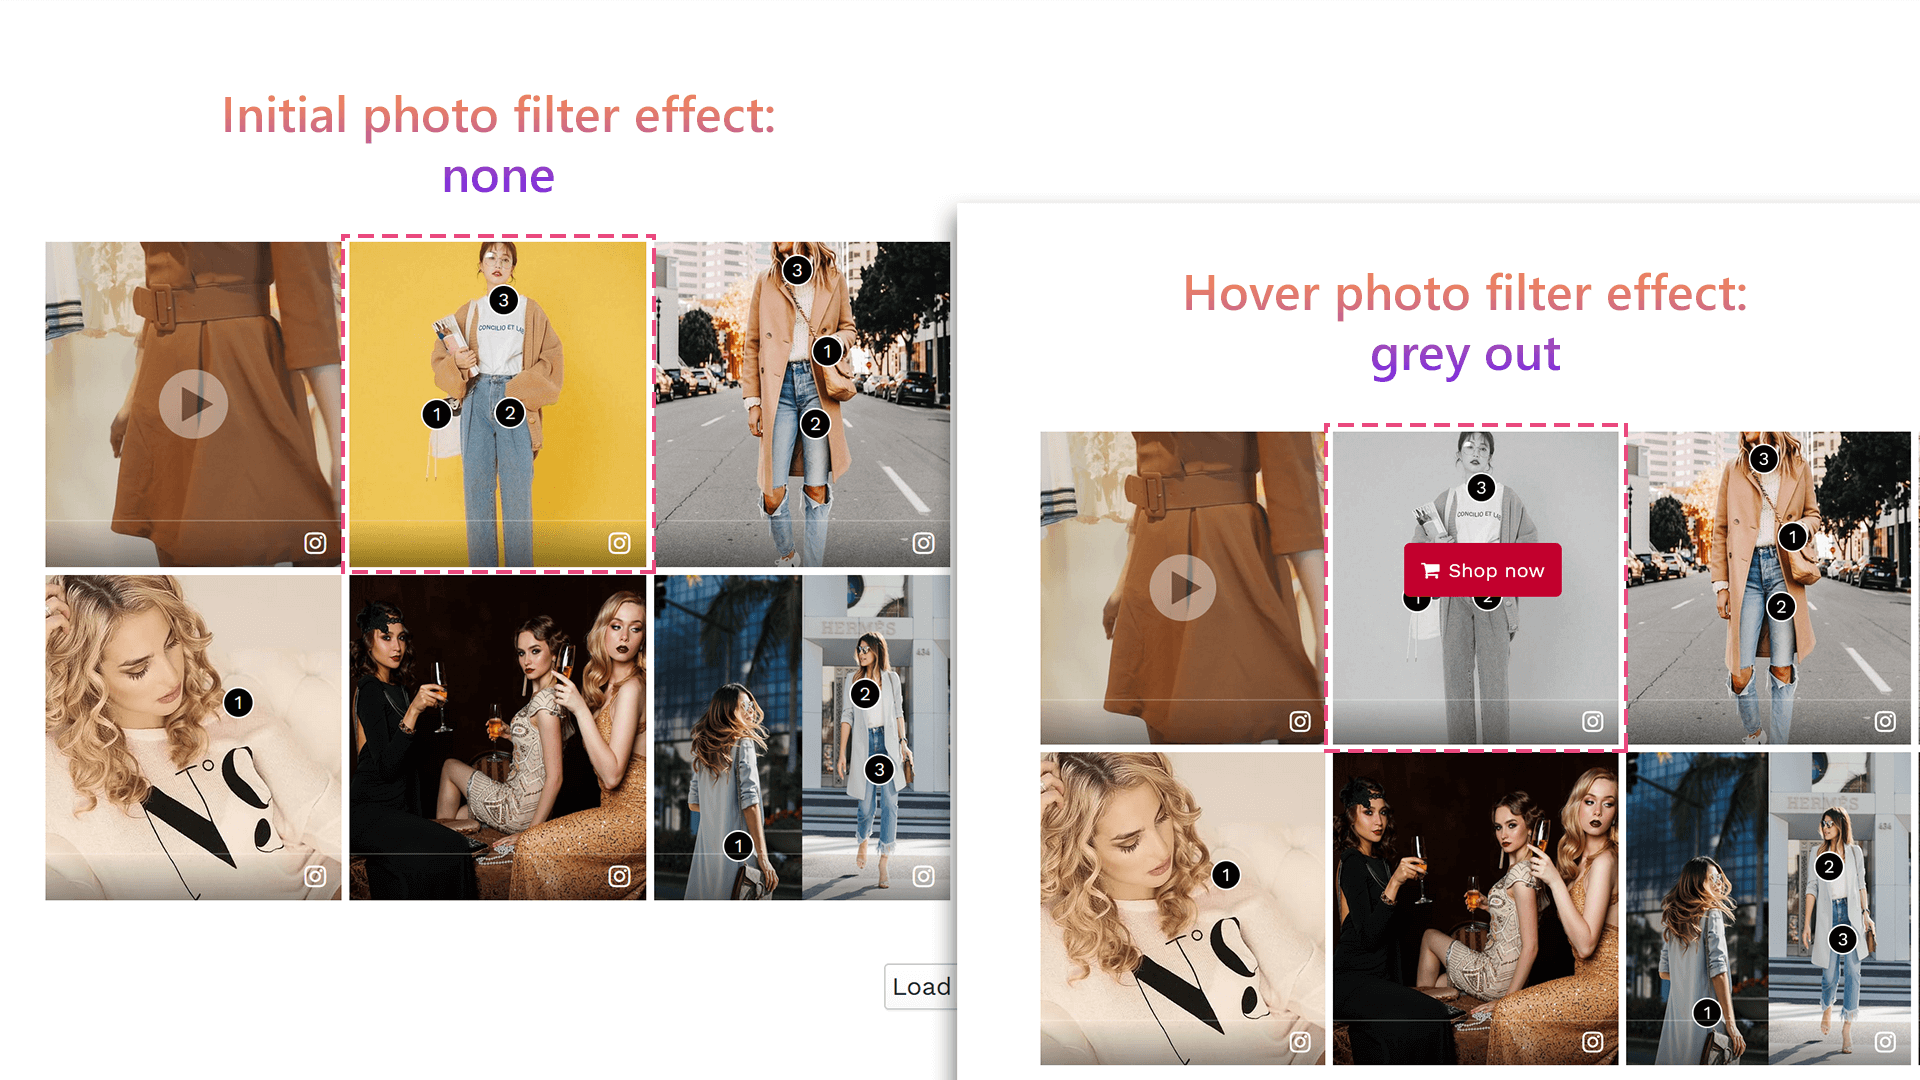
c. Photo filter effects: VA: Instagram Slider & Feed supports 9 beautiful photo filter effects to make your Instagram photos/videos more attractive. You may select the preferred filter effect for initial photos and when hovers mouse pointer over photos.

Here is an example:

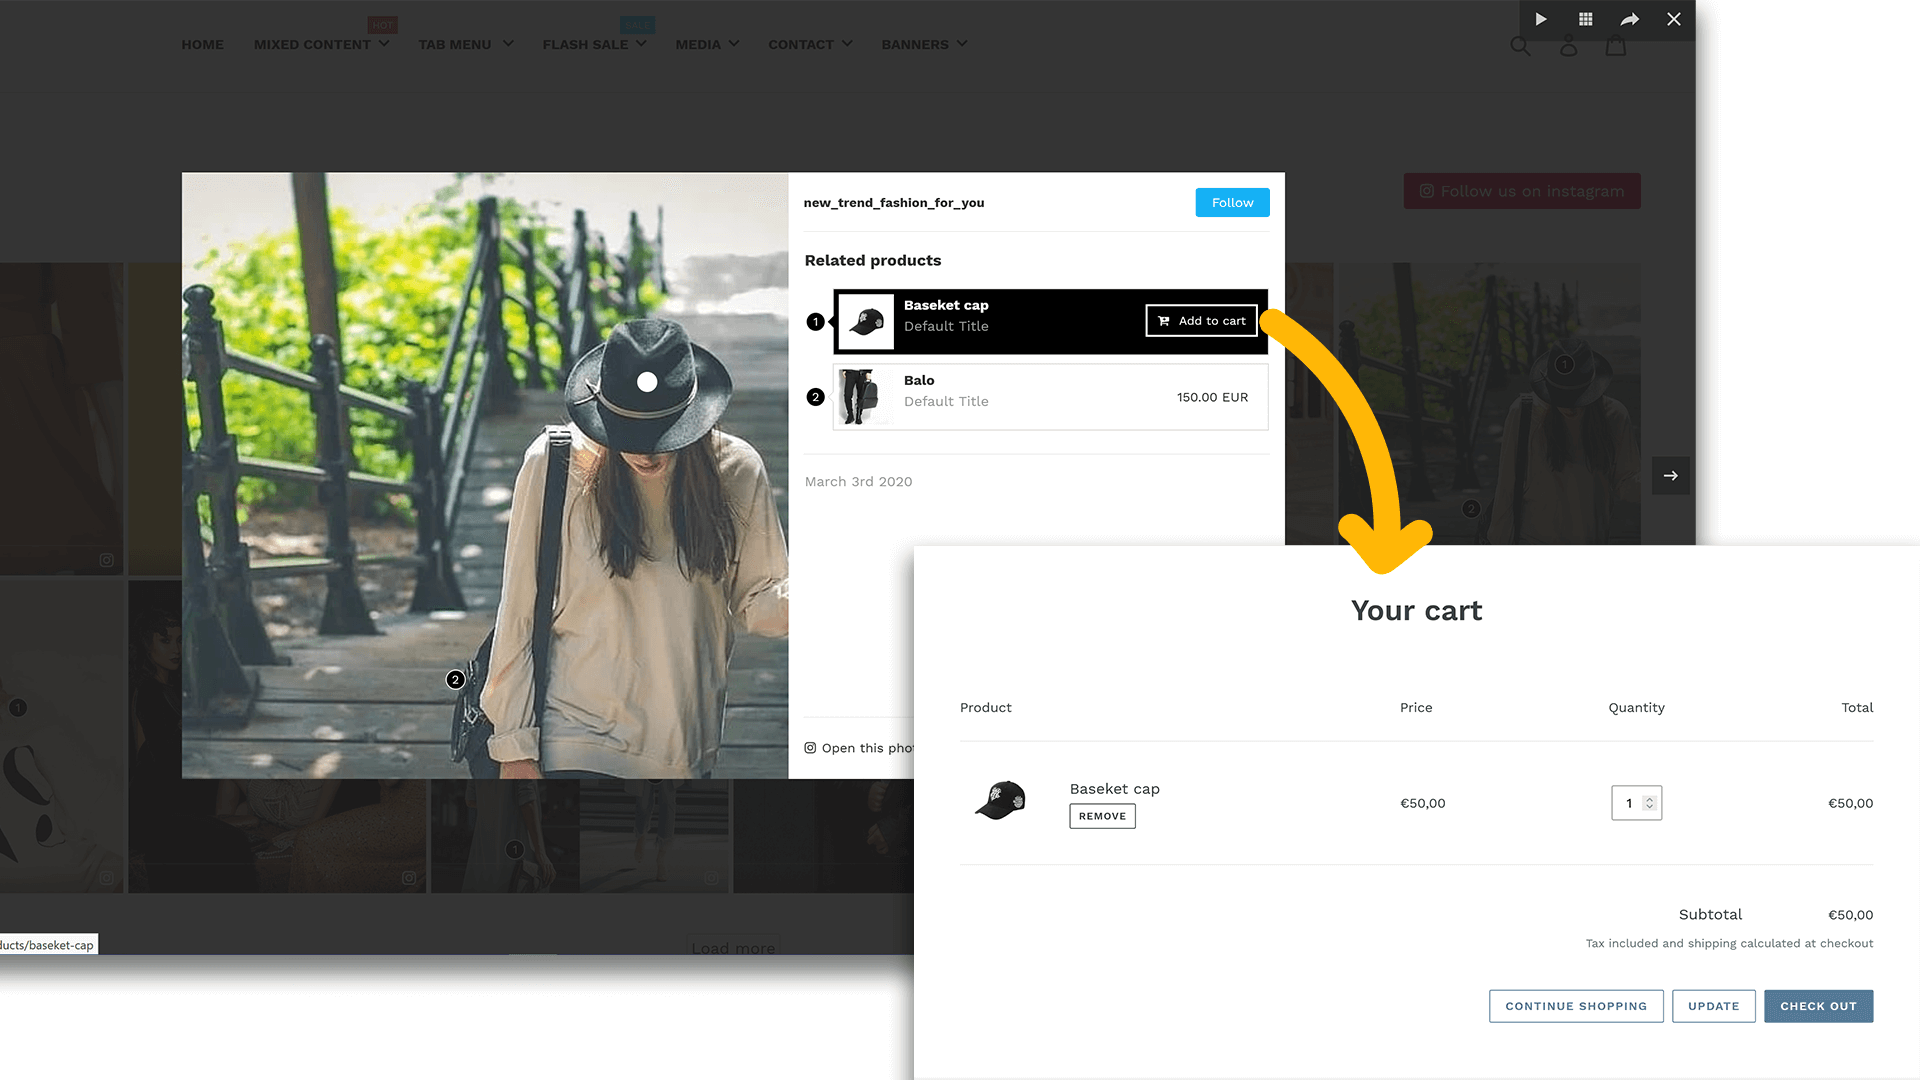
d. Redirect to shopping cart page when clicking on “Add to cart” button

When customers view a photo/video and want to purchase any product, they can click on “Add to cart” button to add that product to the shopping cart. You may redirect customers to shopping cart page or keep them staying on the current page.

e. Display ‘Shop now’ & ‘View photo/video’ button

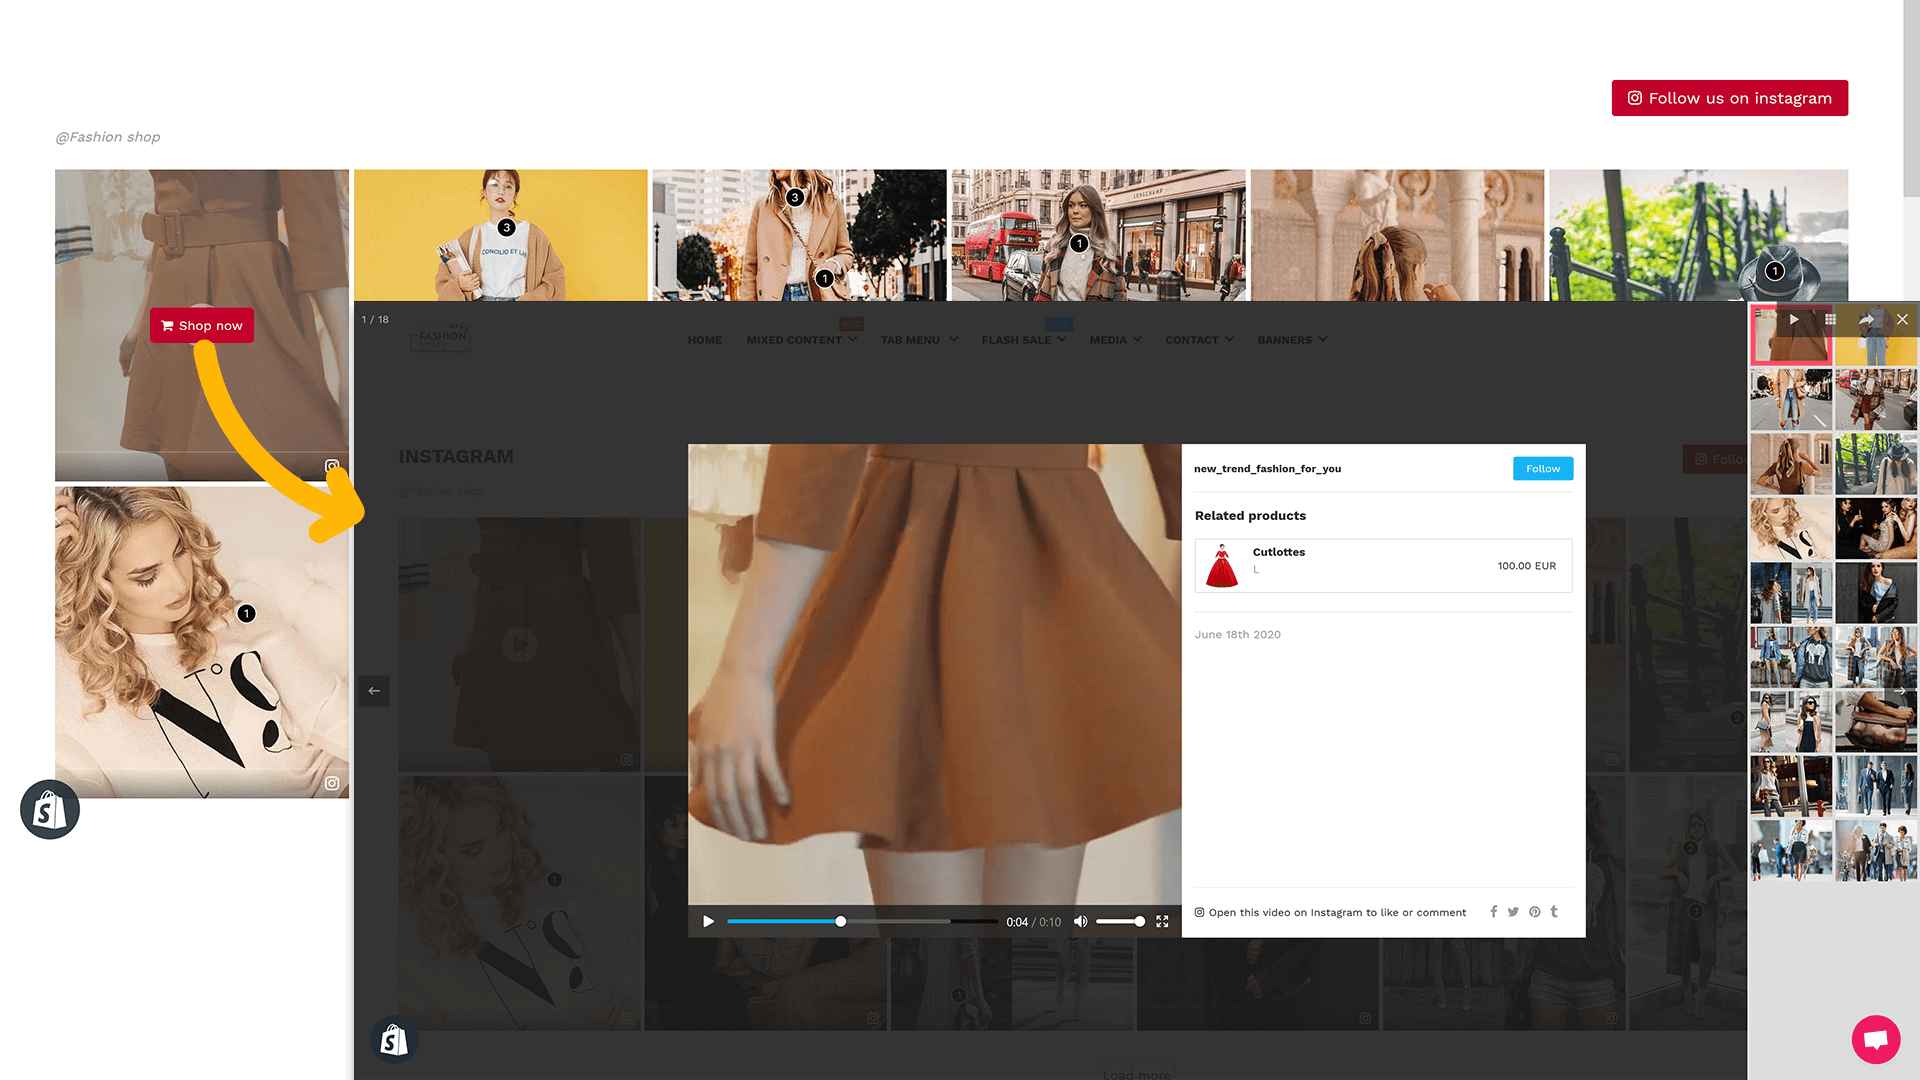
When you hover the mouse pointer over a photo/video, a shopping cart button will appear if you enable “Display “Shop now” & “View photo/video” button” option.

Store visitors can click on this button to open the full-screen Instagram photo slider using Fancybox 3.
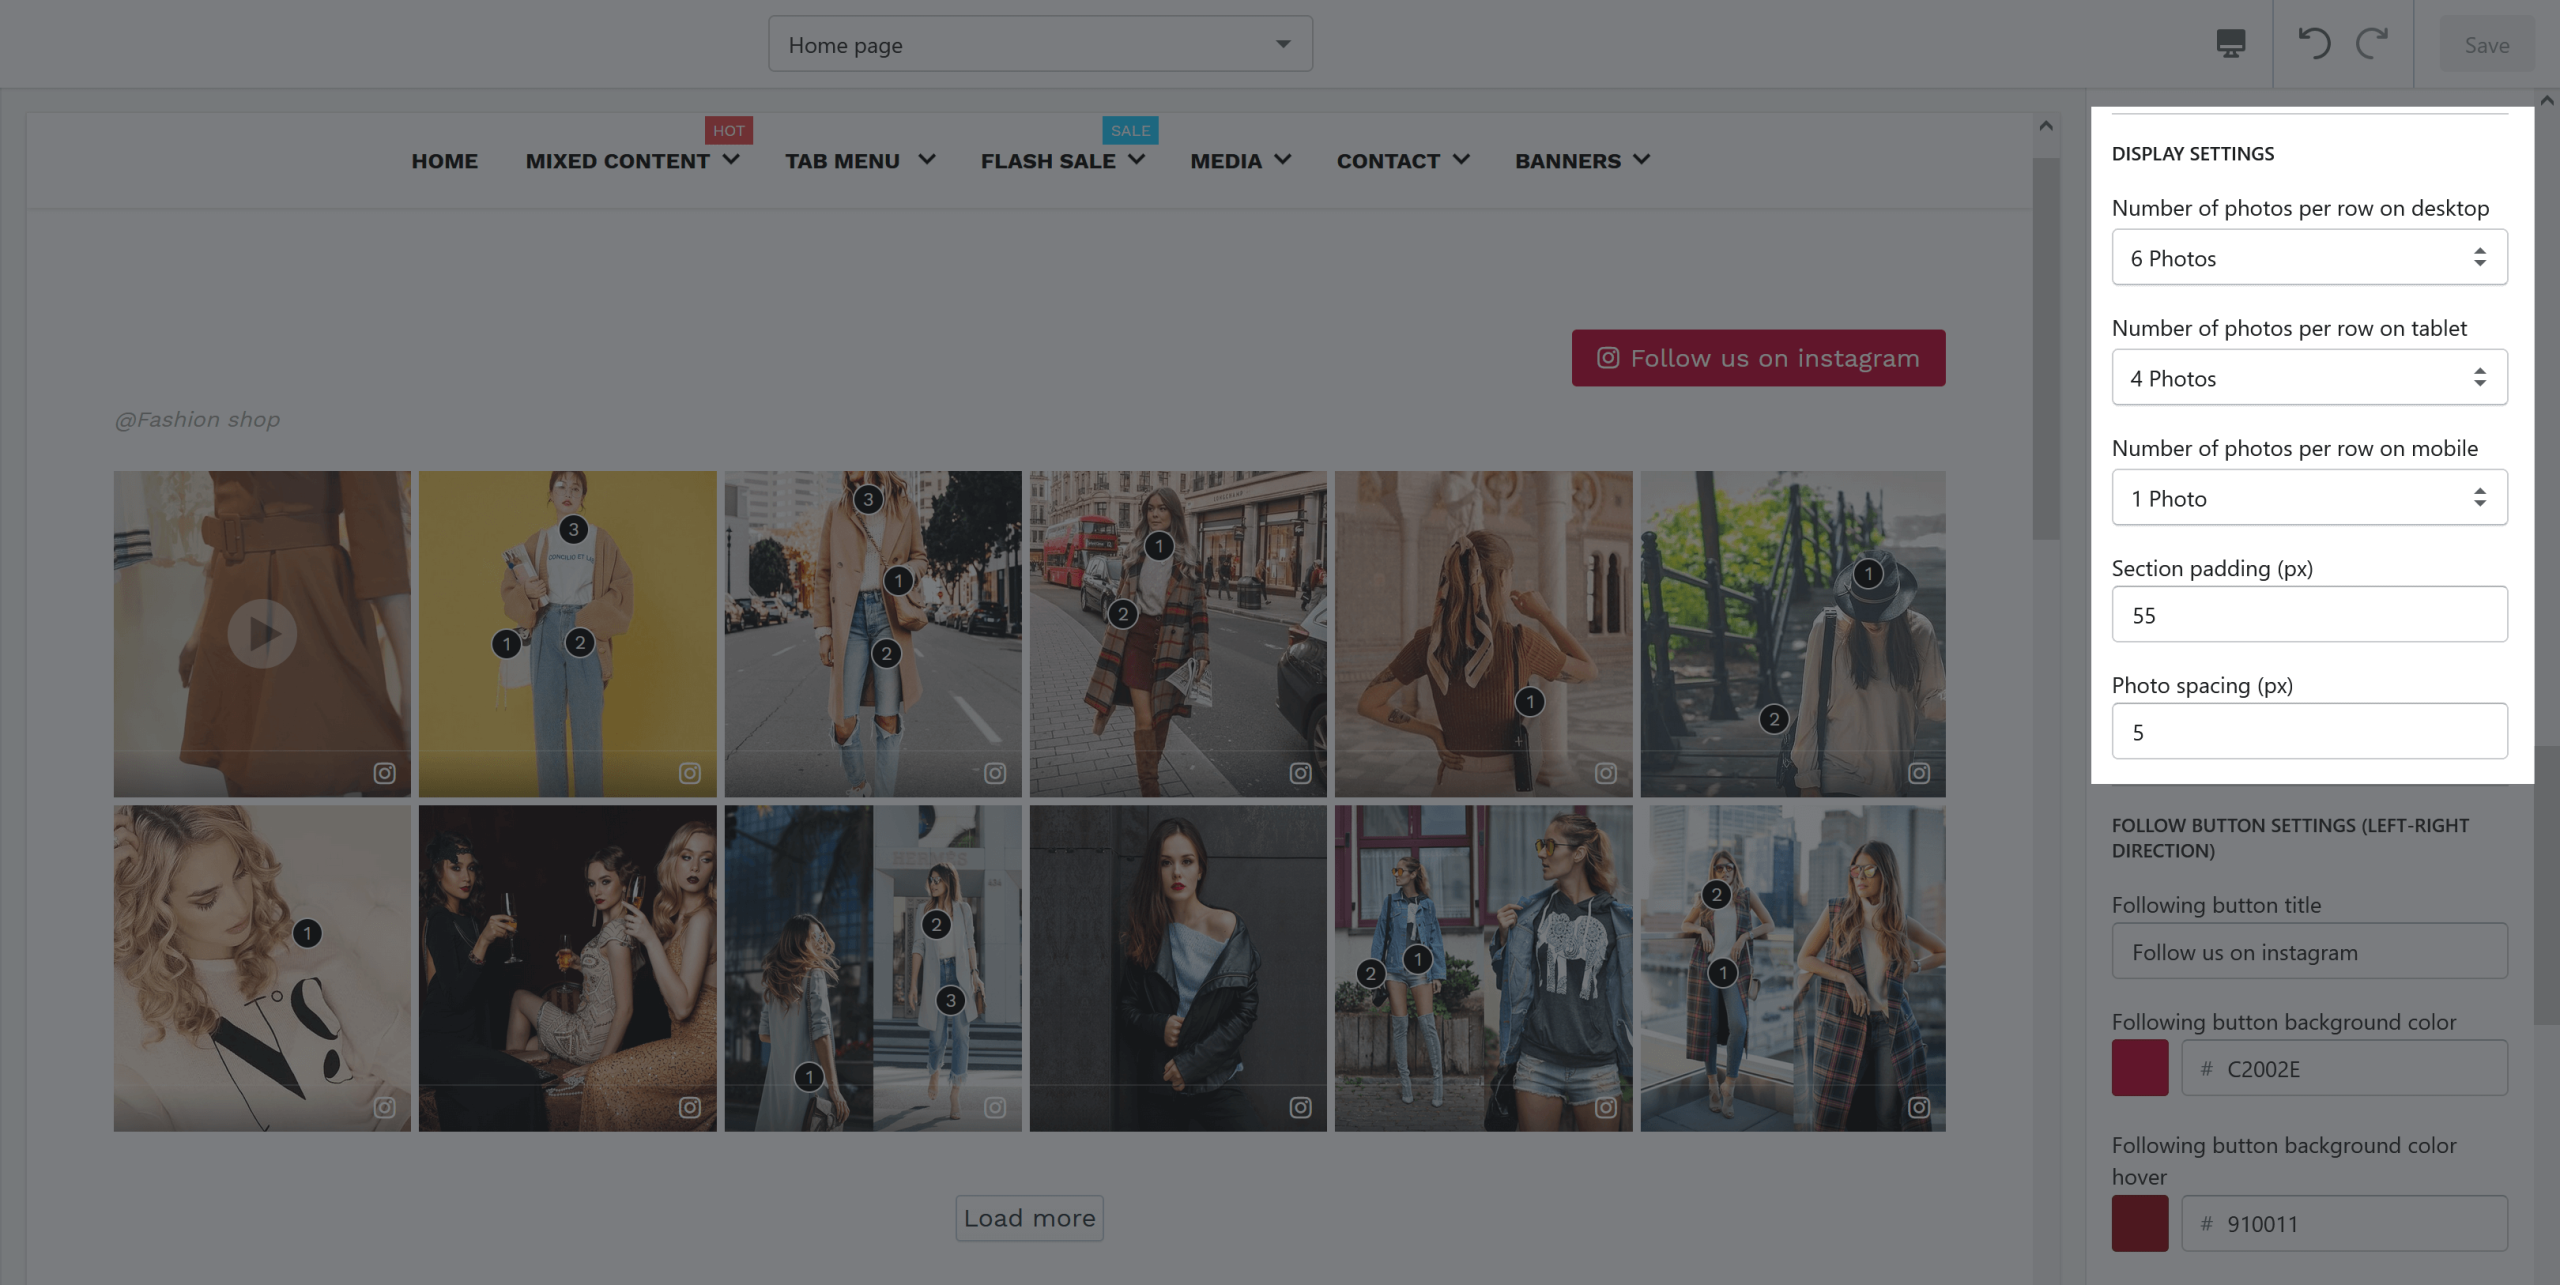
Display settings

You can modify the following settings:

  • Number of photos per row on desktop
  • Number of photos per row on tablet
  • Number of photos per row on mobile
  • Section padding (px): the spacing value between the Instagram section and other sections
  • Photo spacing (px): the spacing value between each photo on the Instagram section

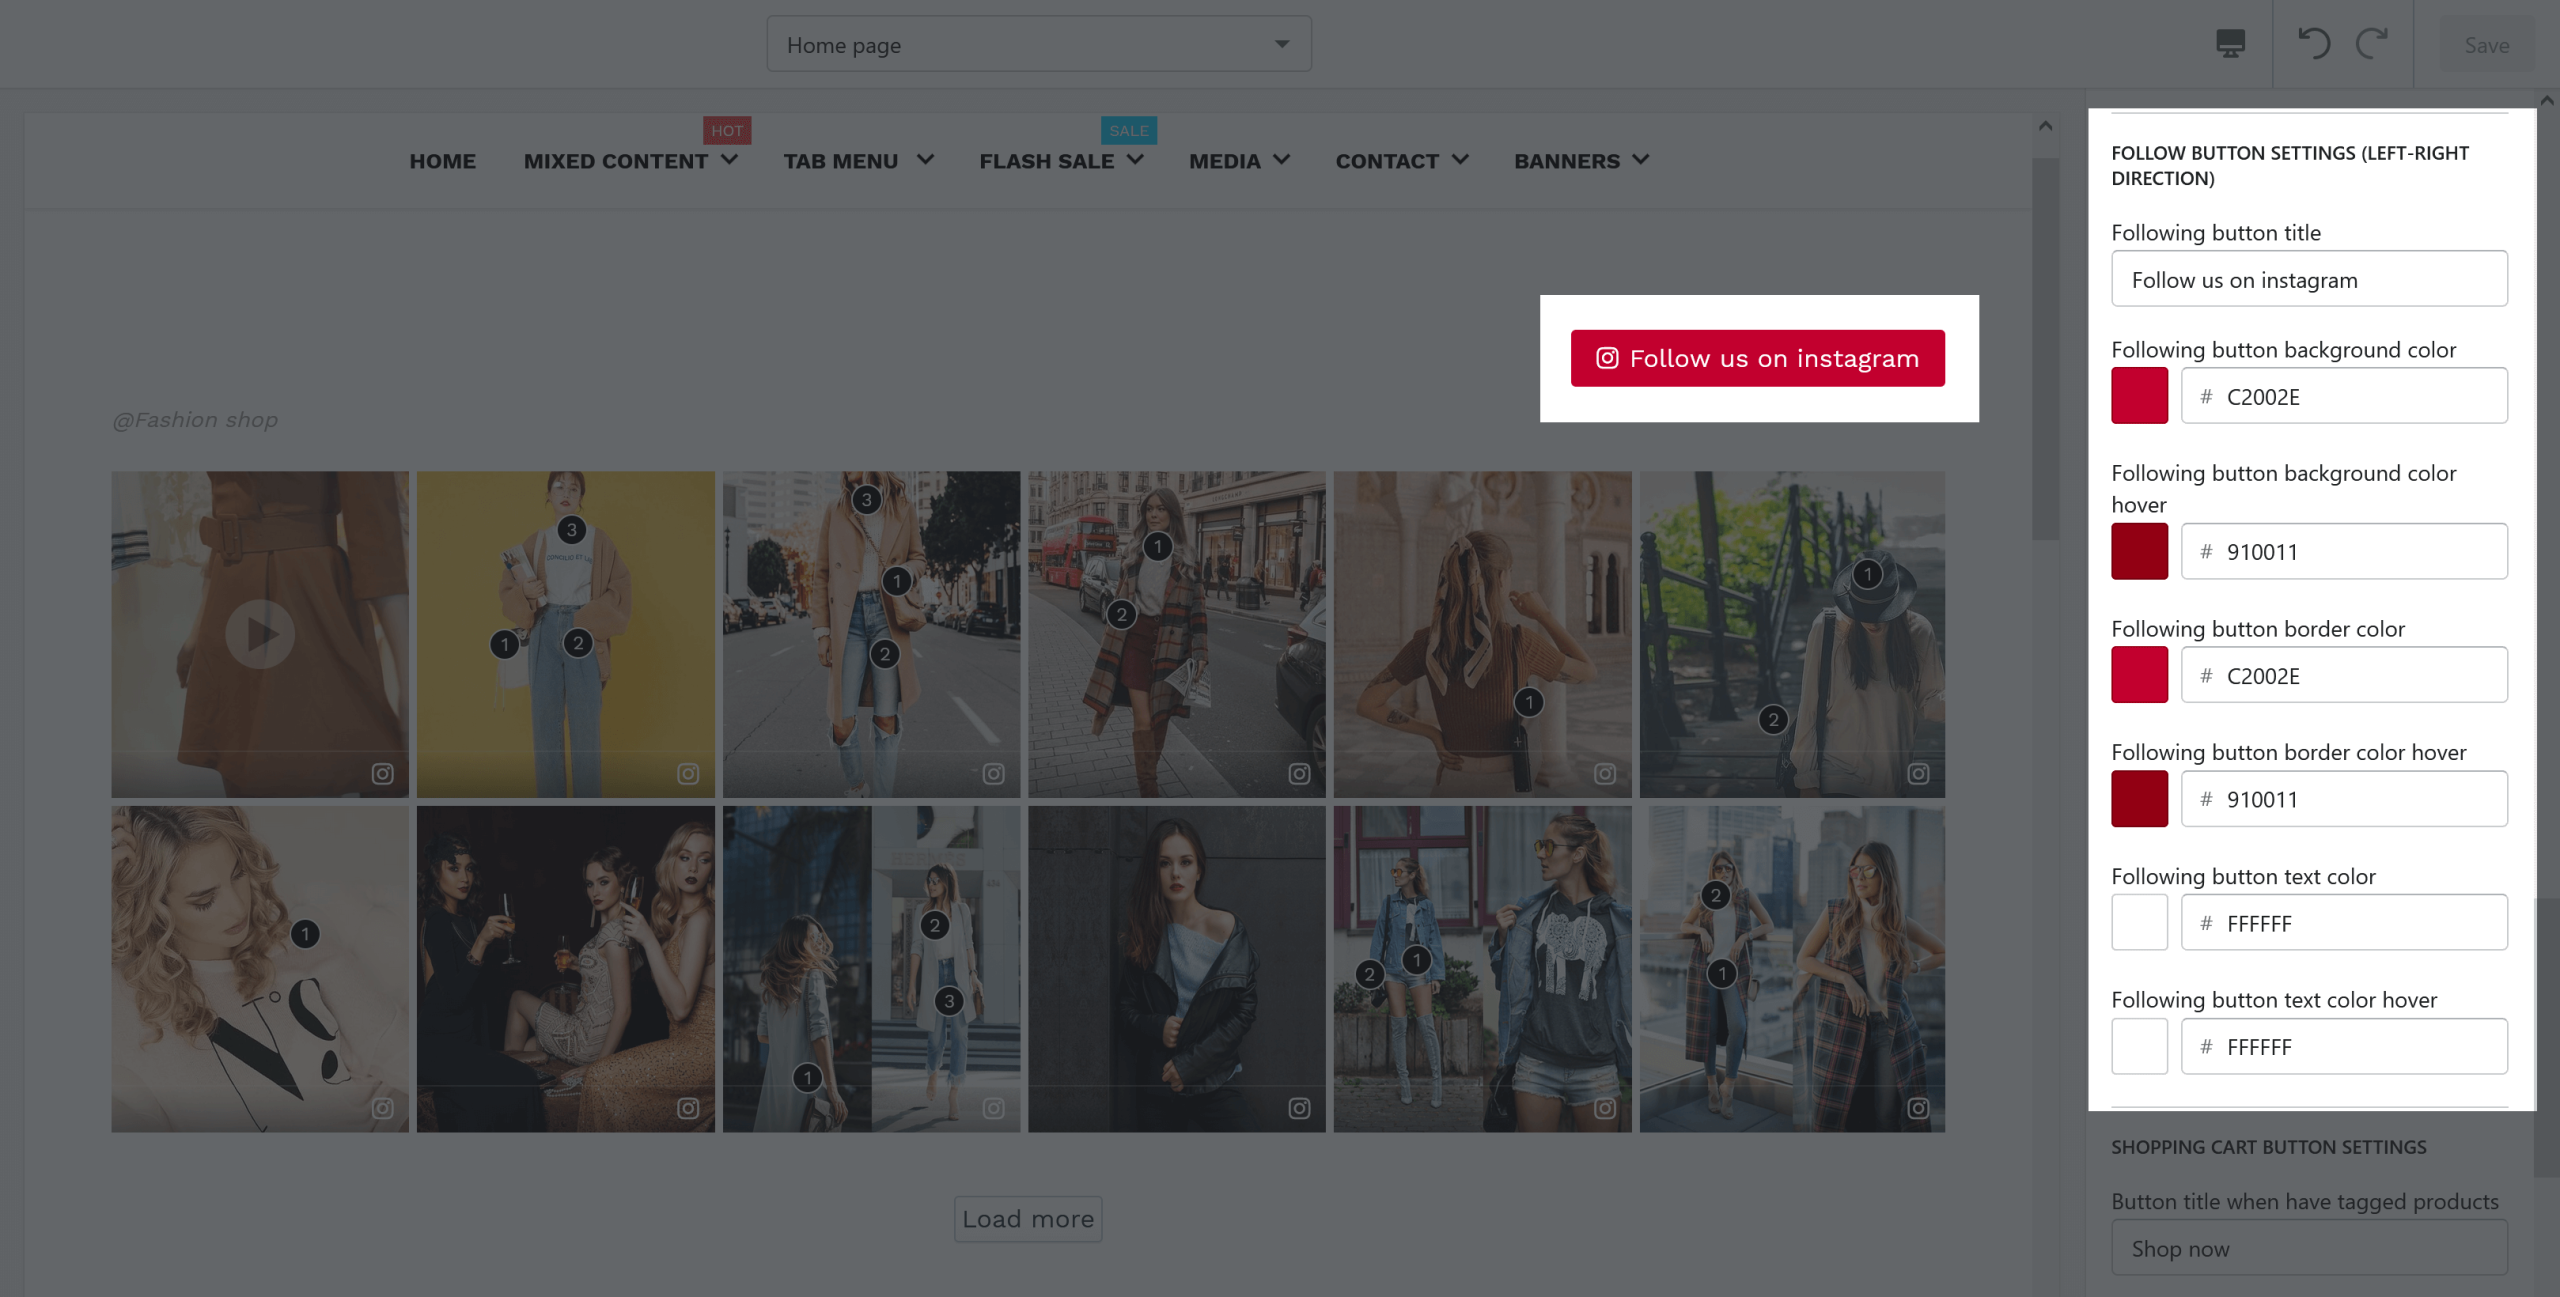
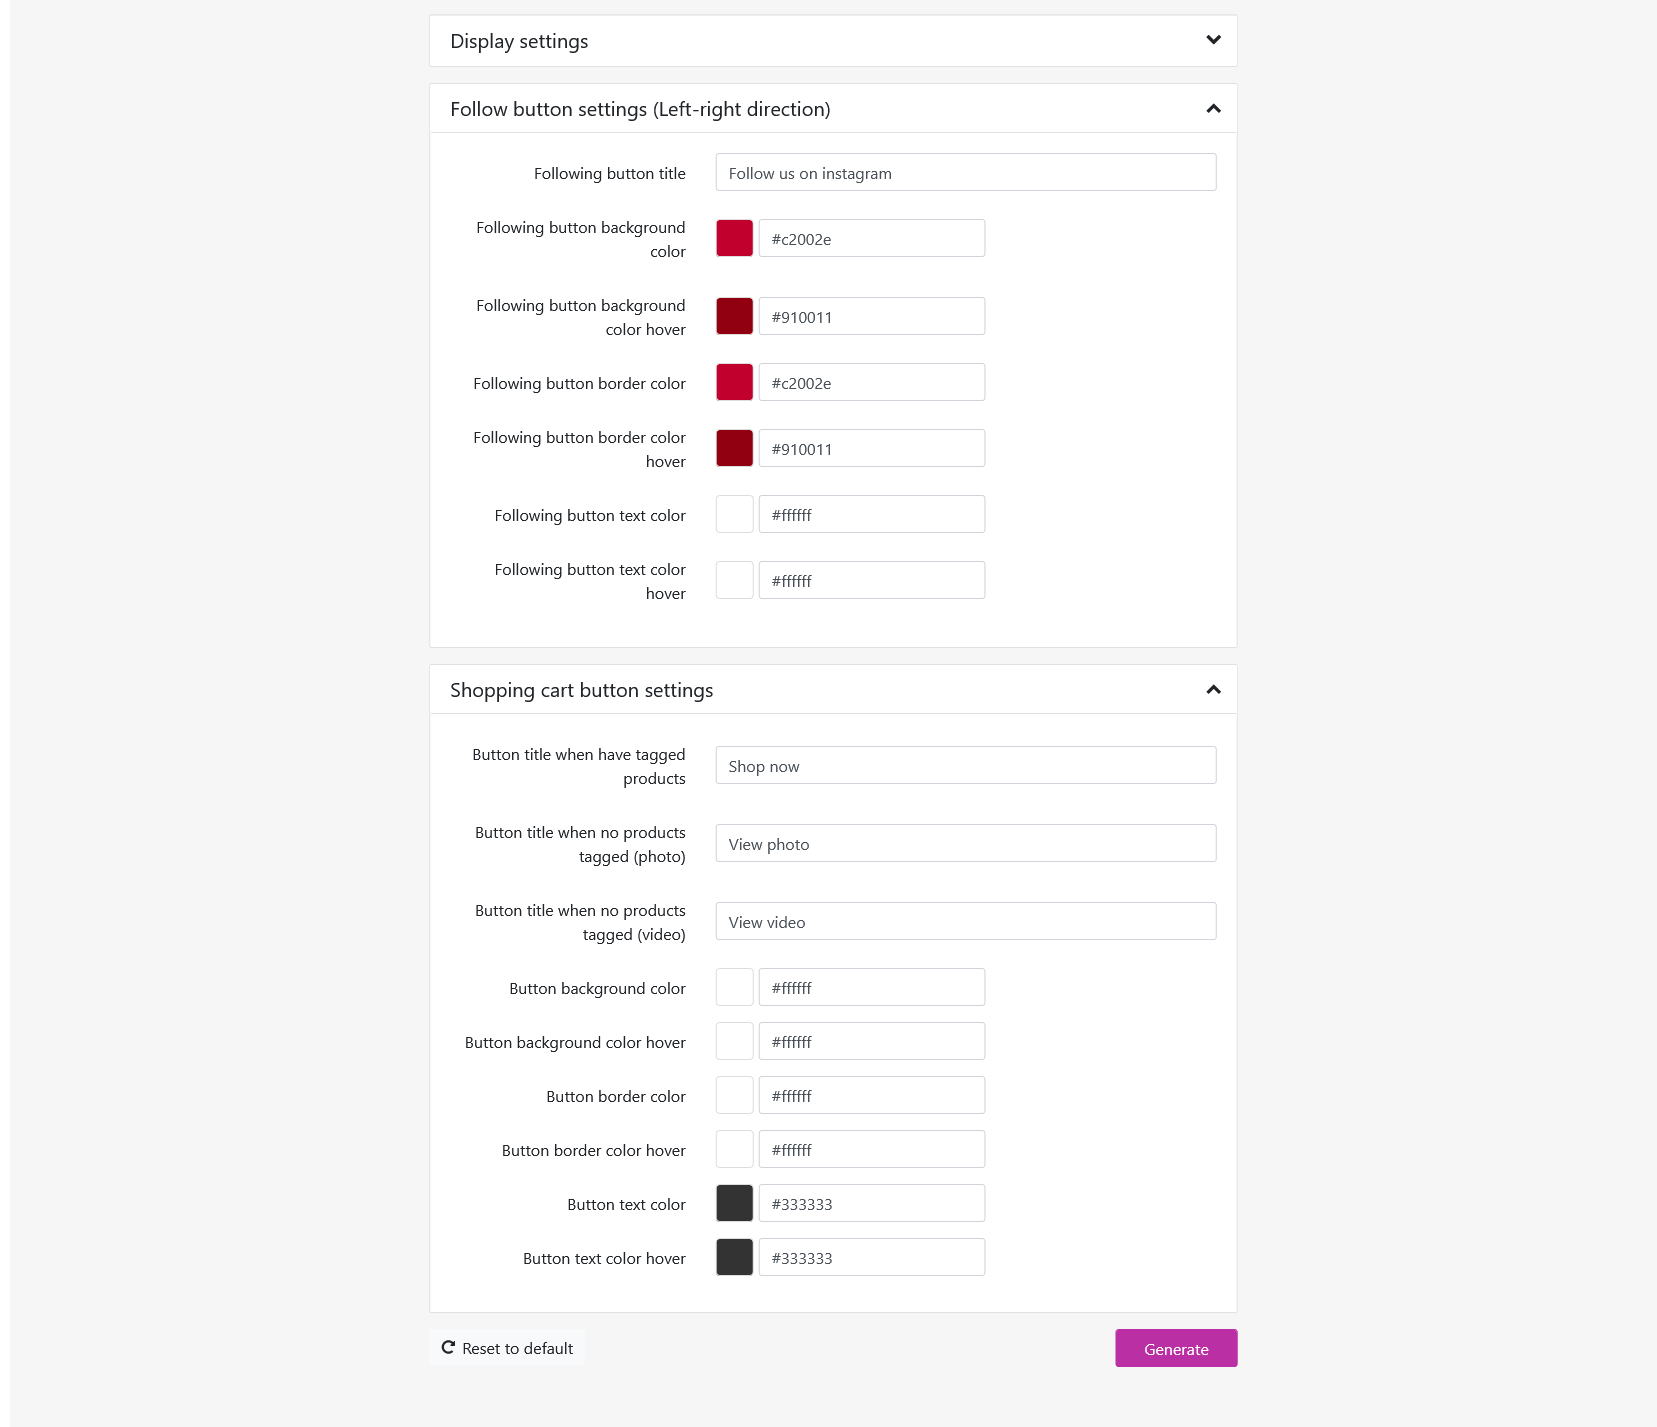
Follow button settings

You can modify “Follow” button label and its design, such as button background color, background color when mouse pointer hover, button border color, etc.

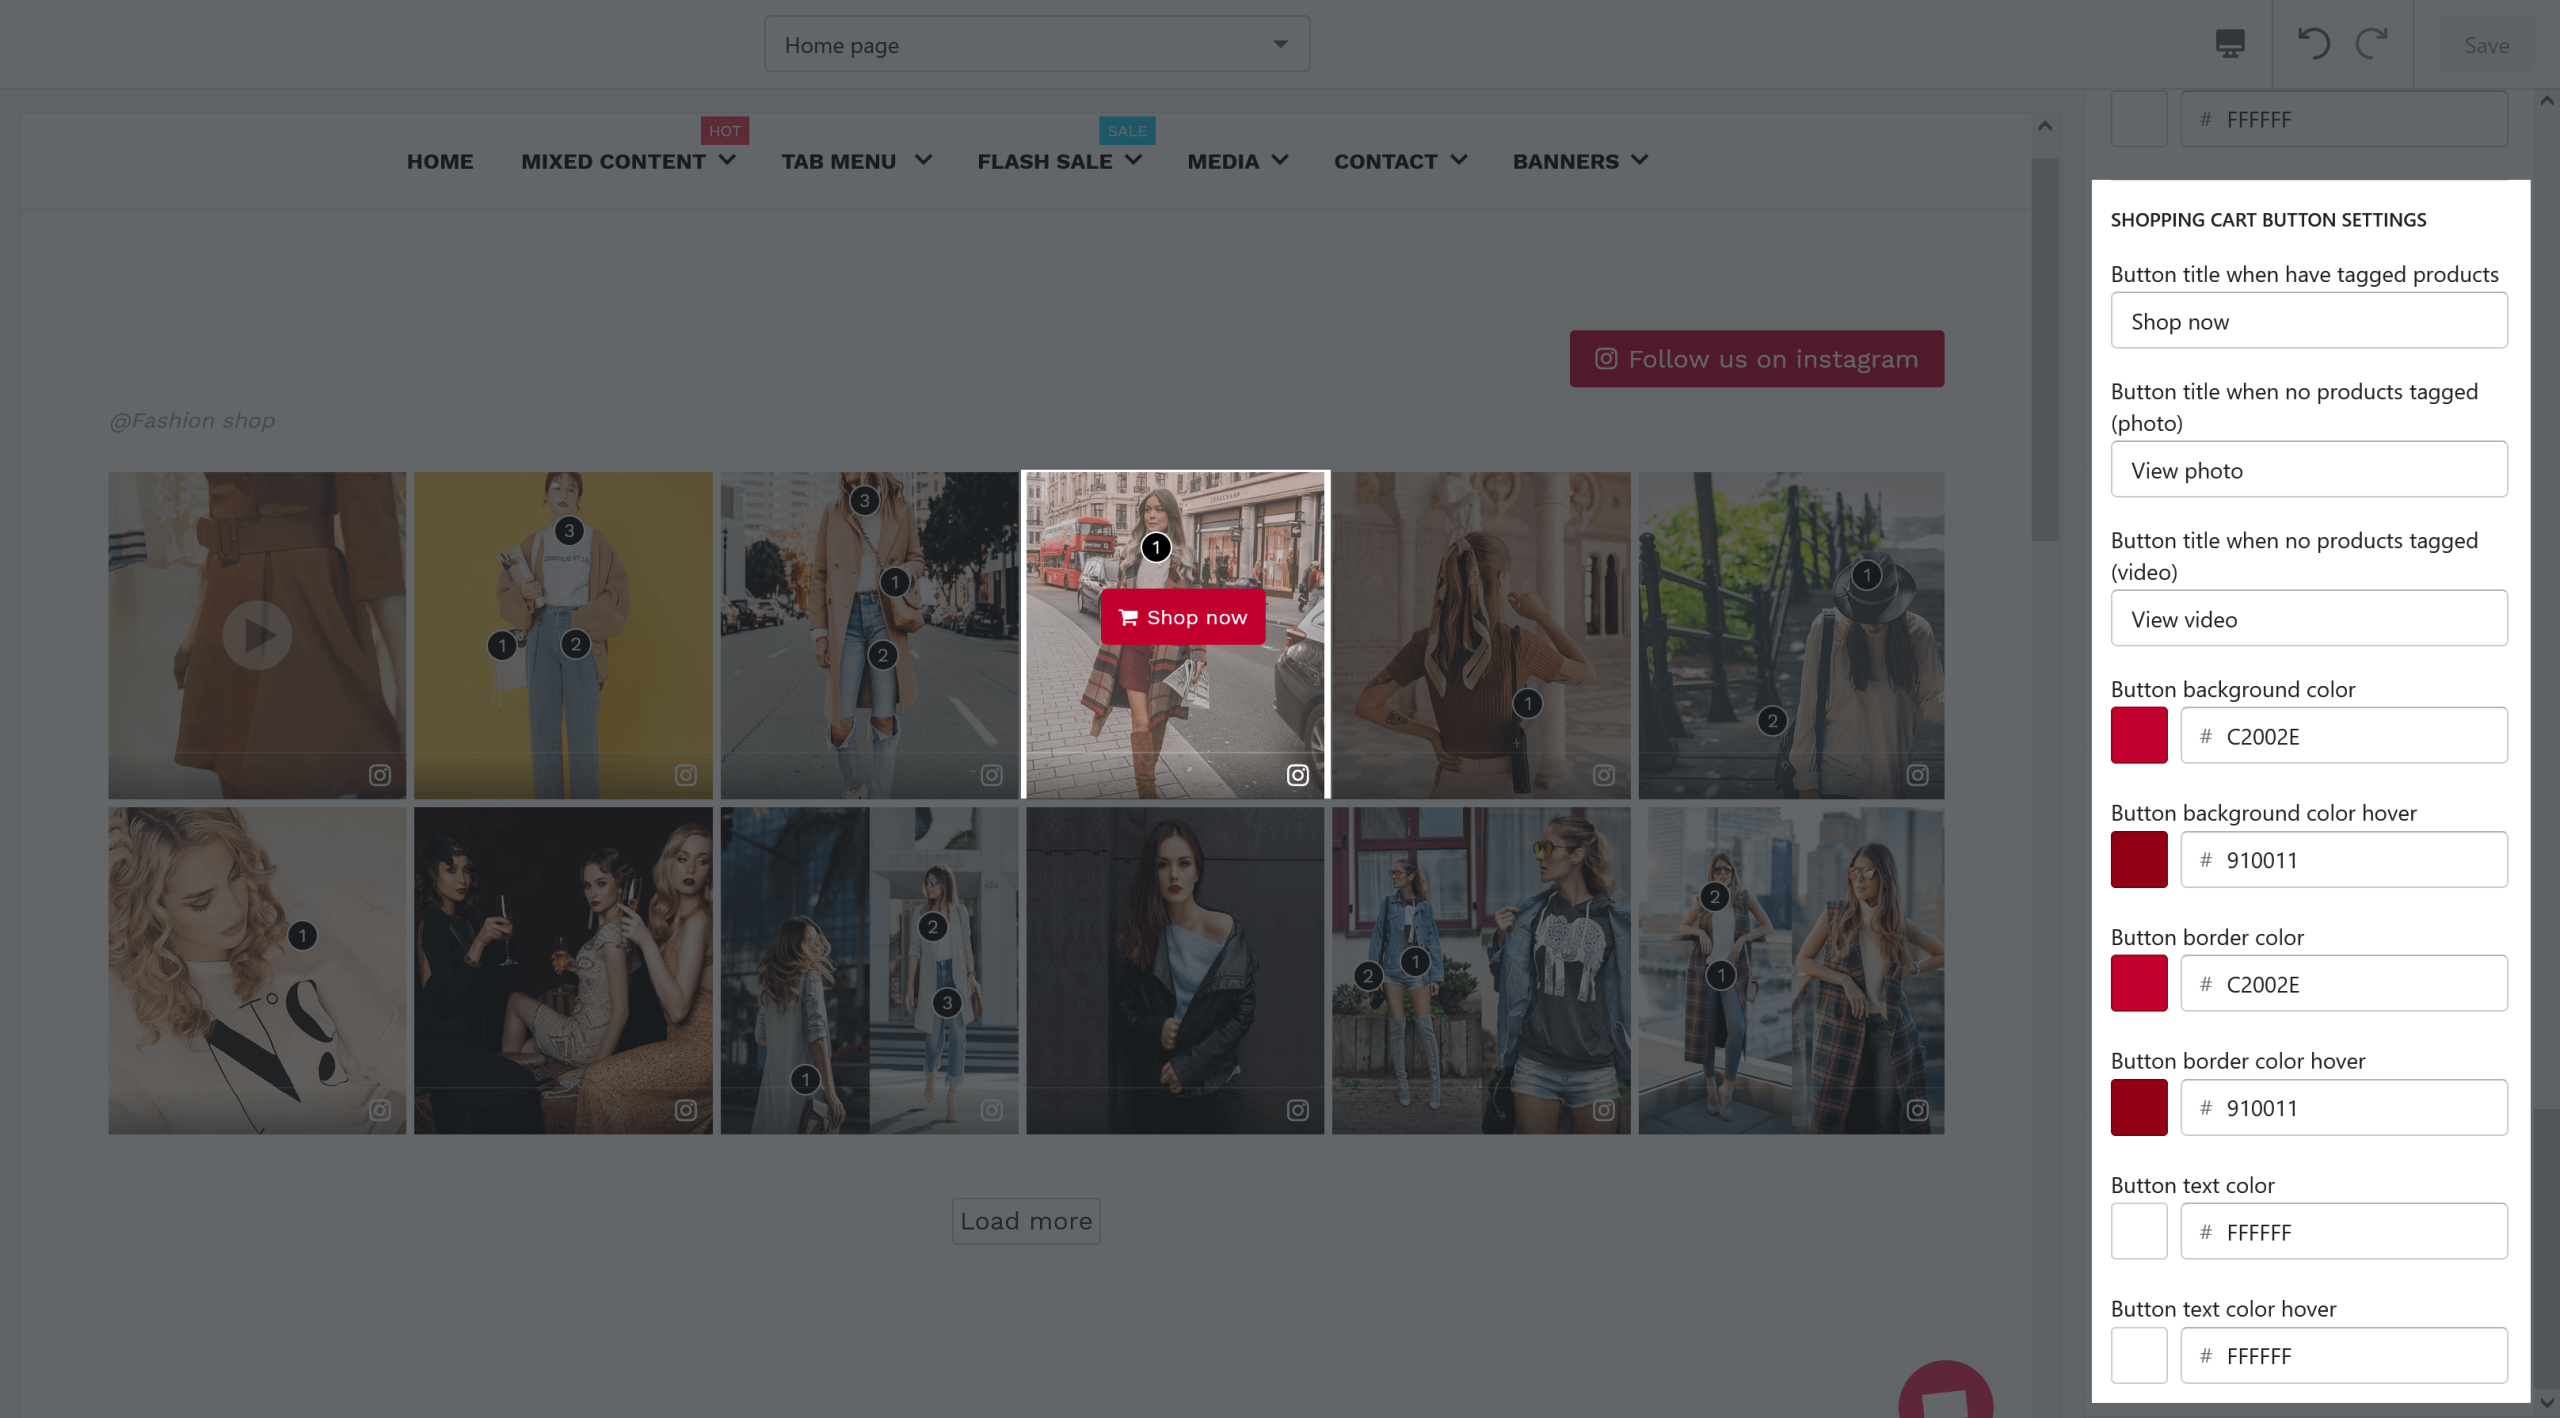
Shopping cart button settings

You can change the button title of the shopping cart button on specific cases and change the button design.

Remember to click “Save” to apply your settings.


B. Display Instagram section anywhere you want with embedded code

In order to display Instagram photos/videos to your online store, normally you should use Instagram section. In case you want to display the photos/videos to a position on your online store but the position is not supported by the Instagram section, Embedded code is useful for you.

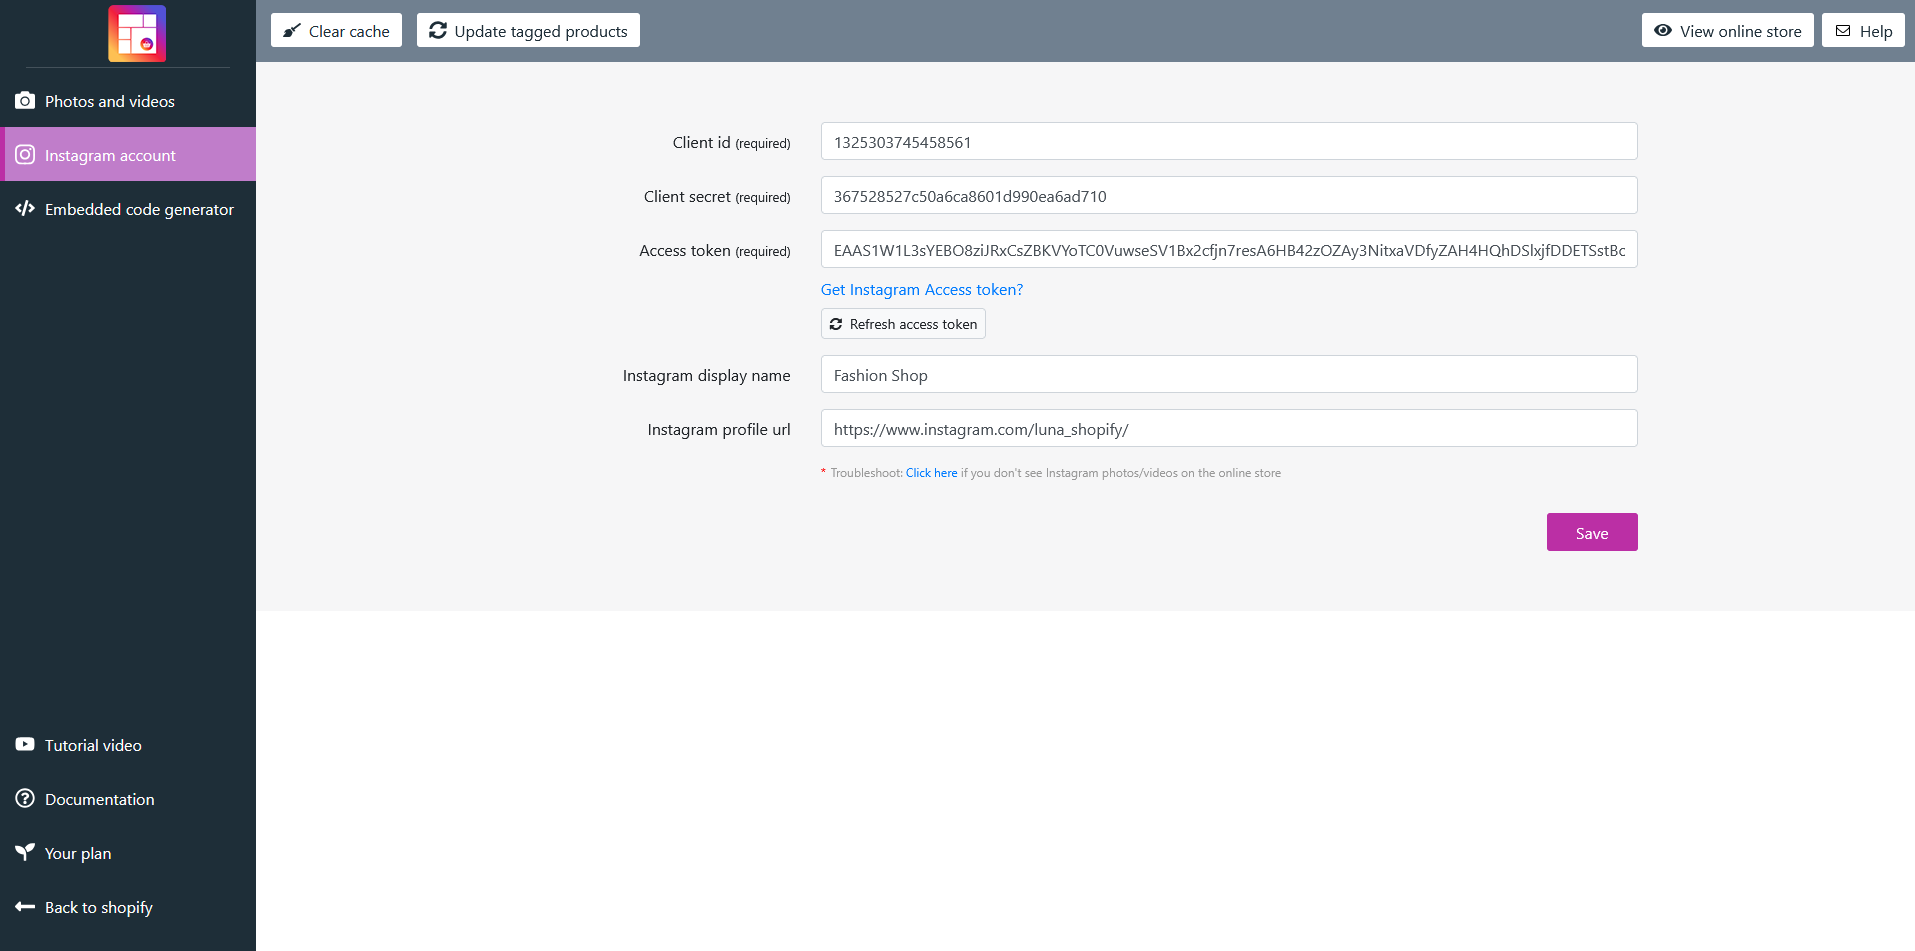
On the app configuration page, just select your preferred settings in the form of “Embedded code generator” tab then click “Generate” button to get embedded code.

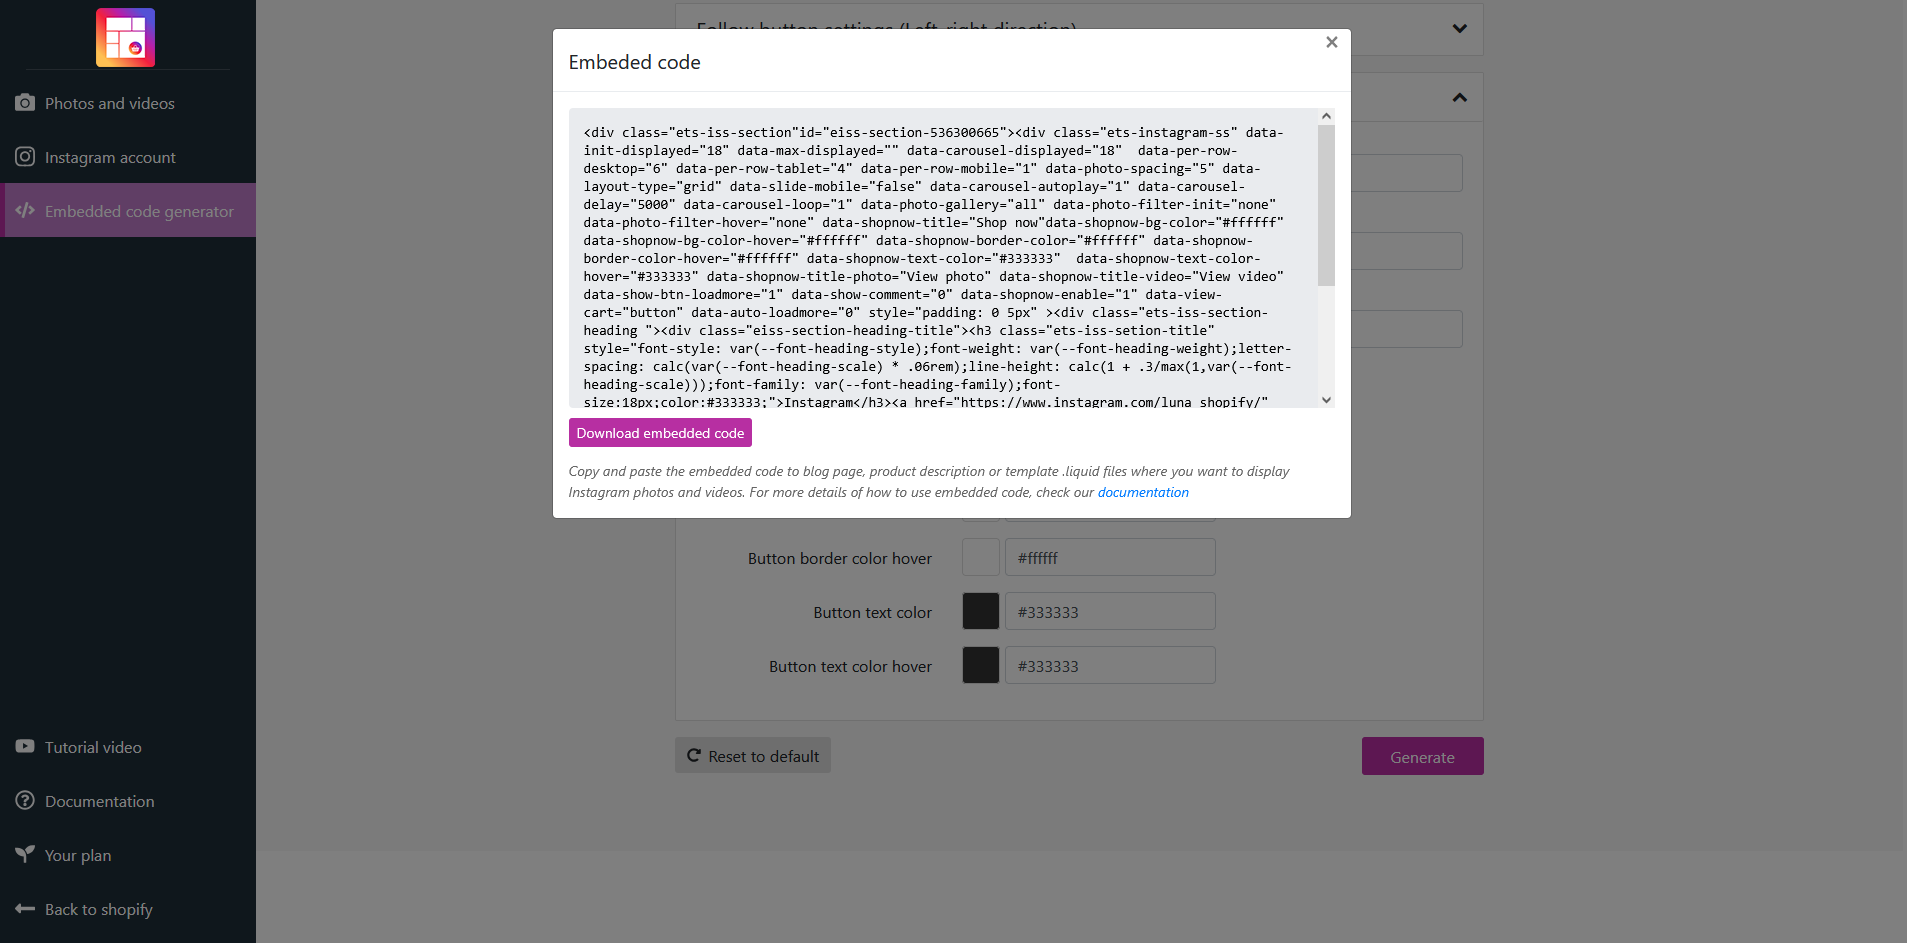
How to use your embedded code

After getting the embed code for the Instagram section as instructed above, you can paste it into any template .liquid file you want to display Instagram section. Here are some examples of using embed code on the product description area, on a .liquid file, and a blog post page.

Embed code on the product description area

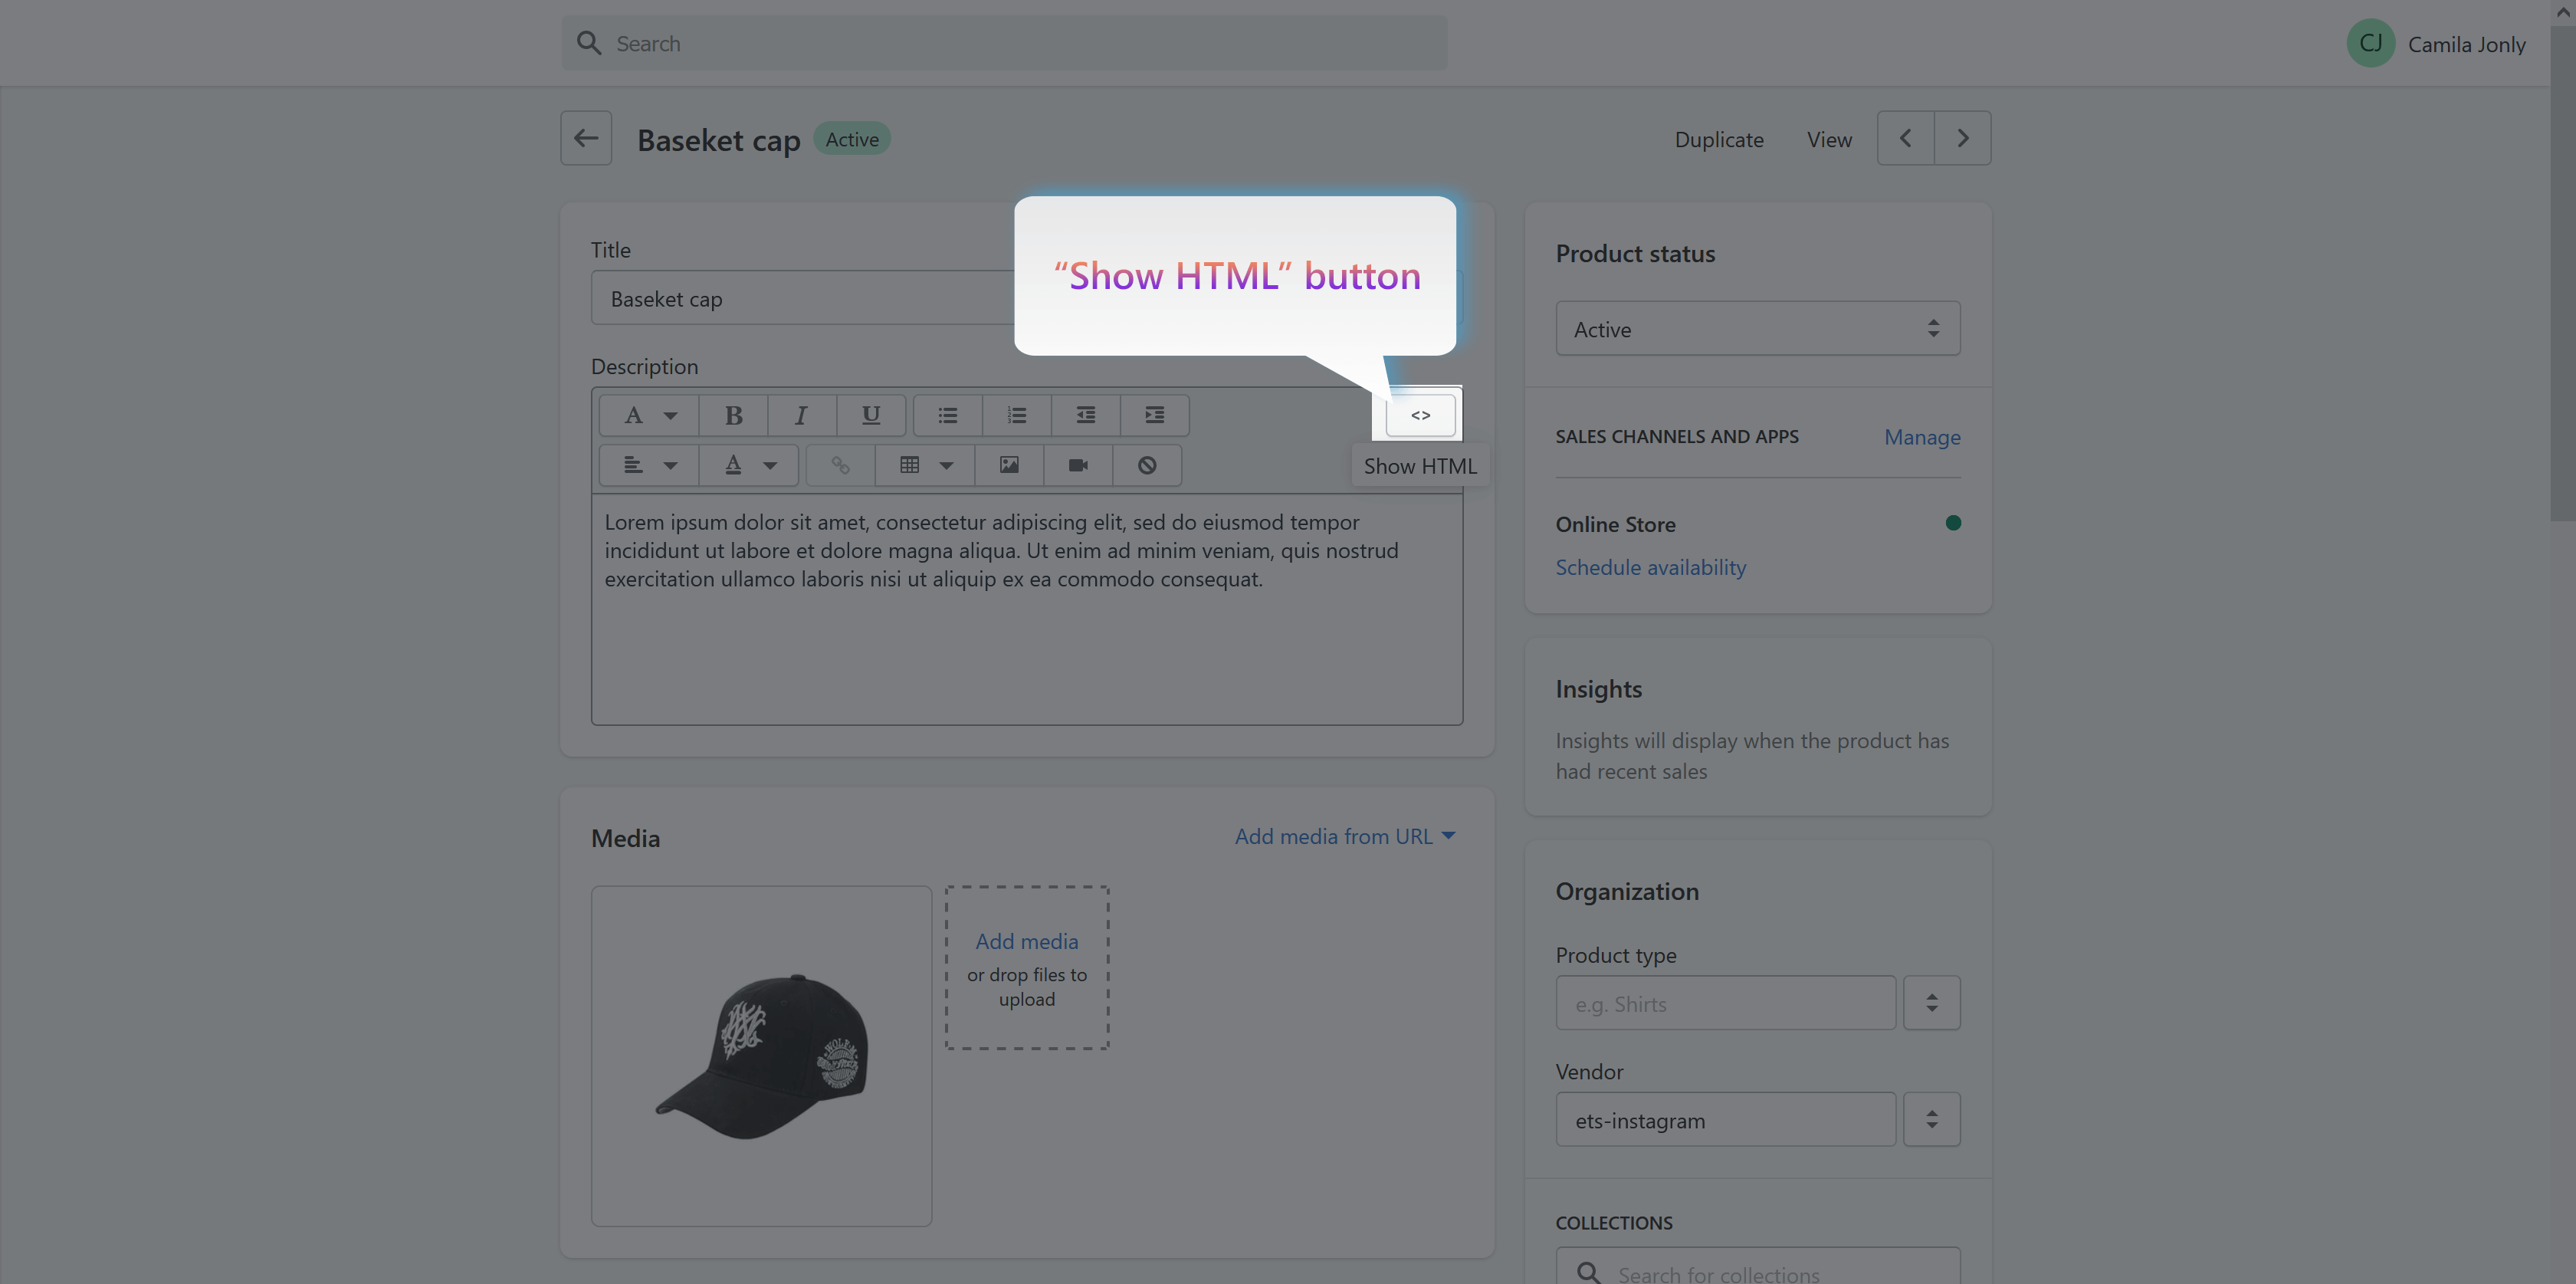
STEP 1: On your Shopify admin, navigate to Products page. Click on a product you want to display Instagram section on the product description area.

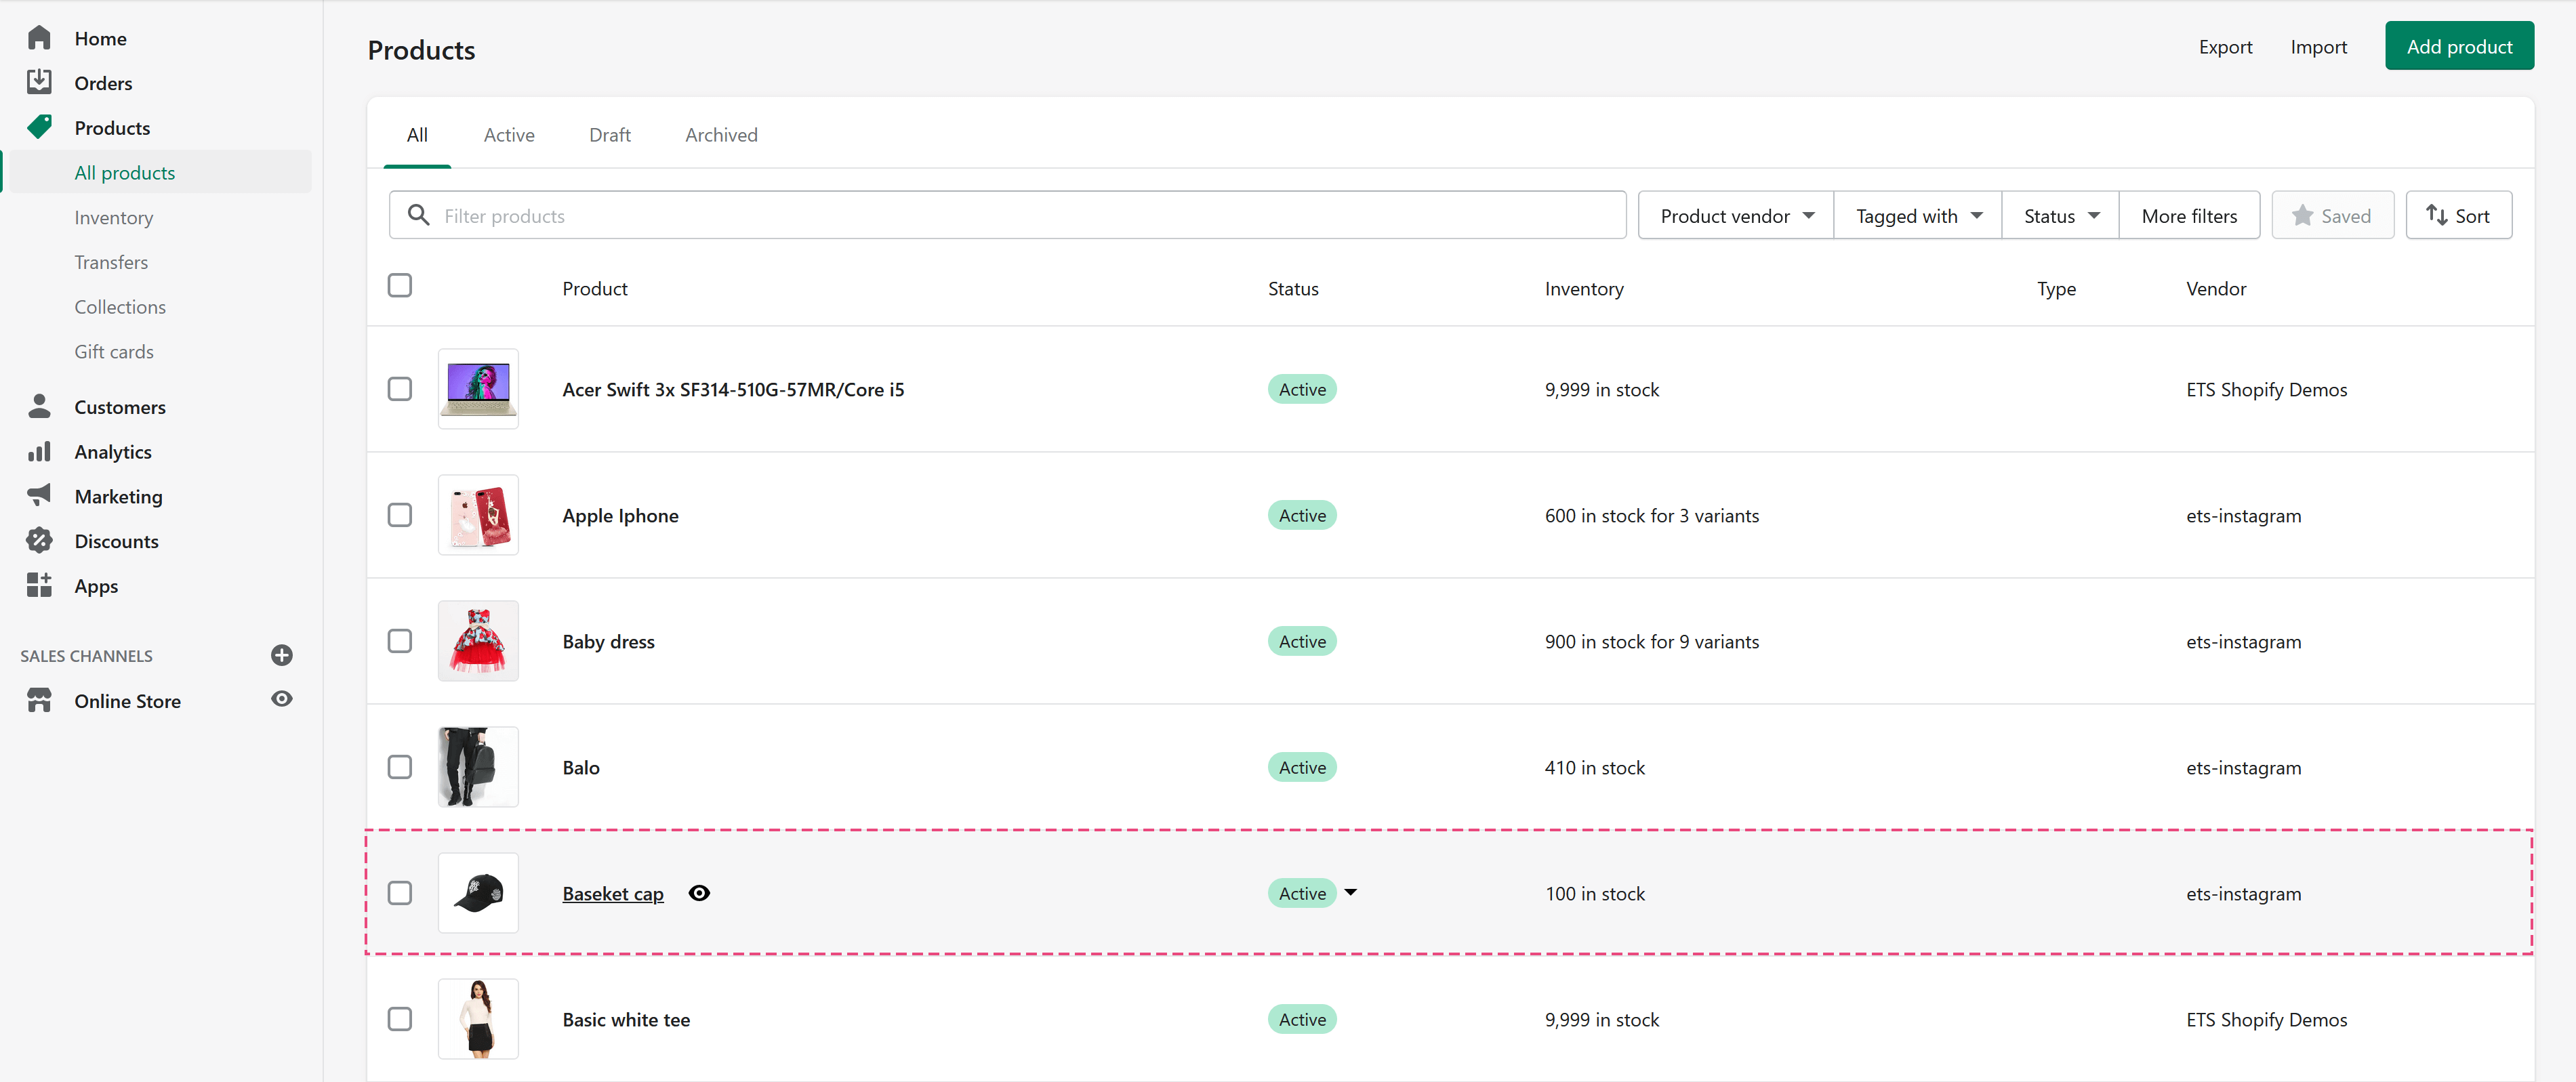
STEP 2: On “Description” field, click on “Show HTML” button. Paste the embed code on “Description” field. Click “Save“.

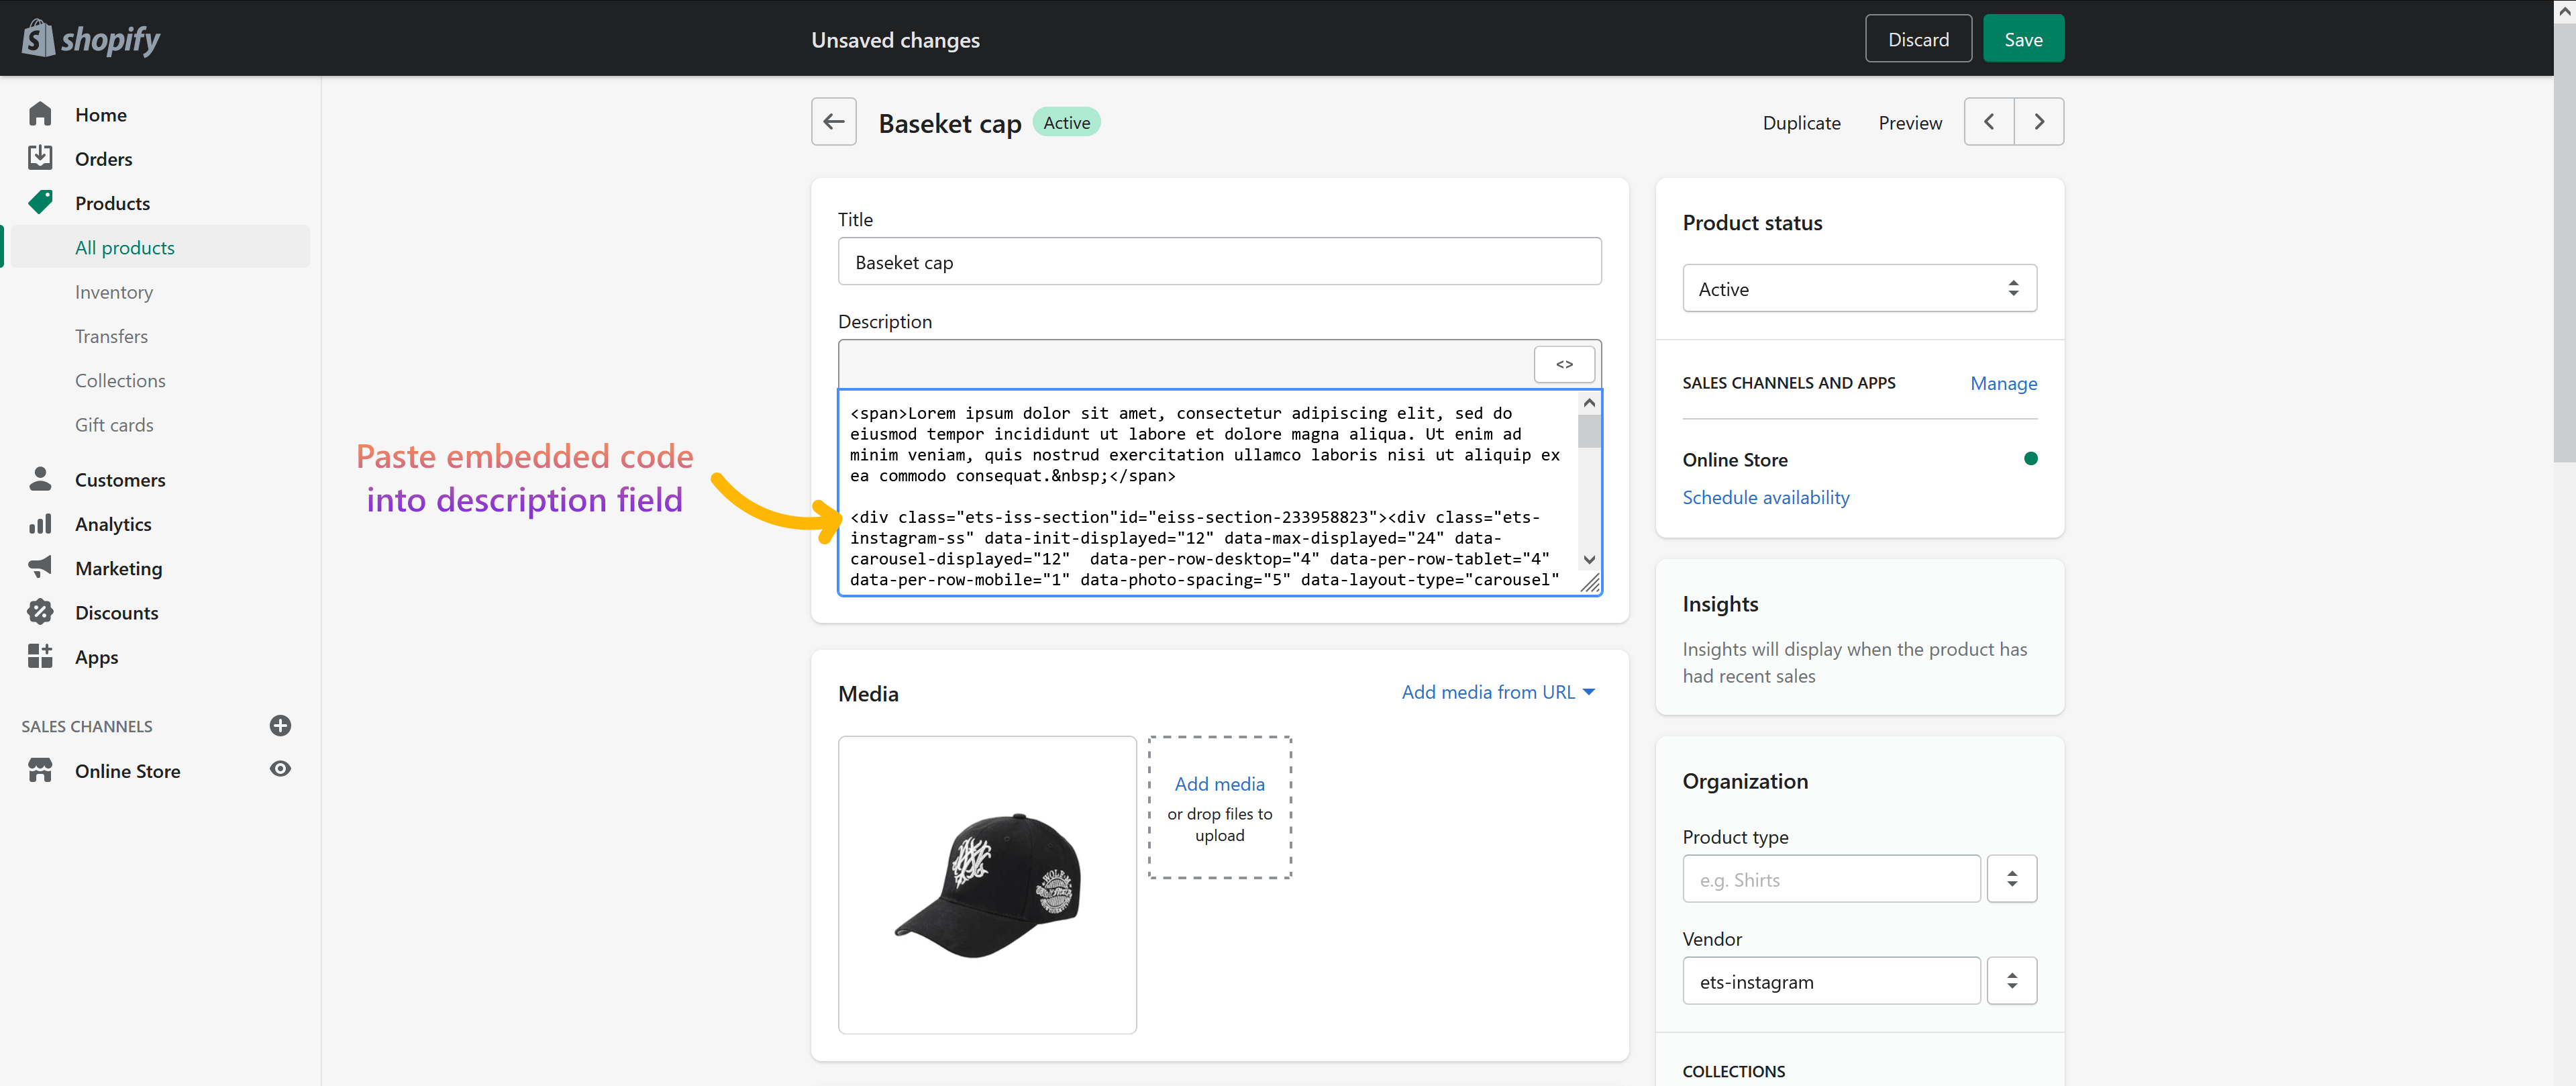
STEP 3: And we’re done! Open your product detail page and see the change!

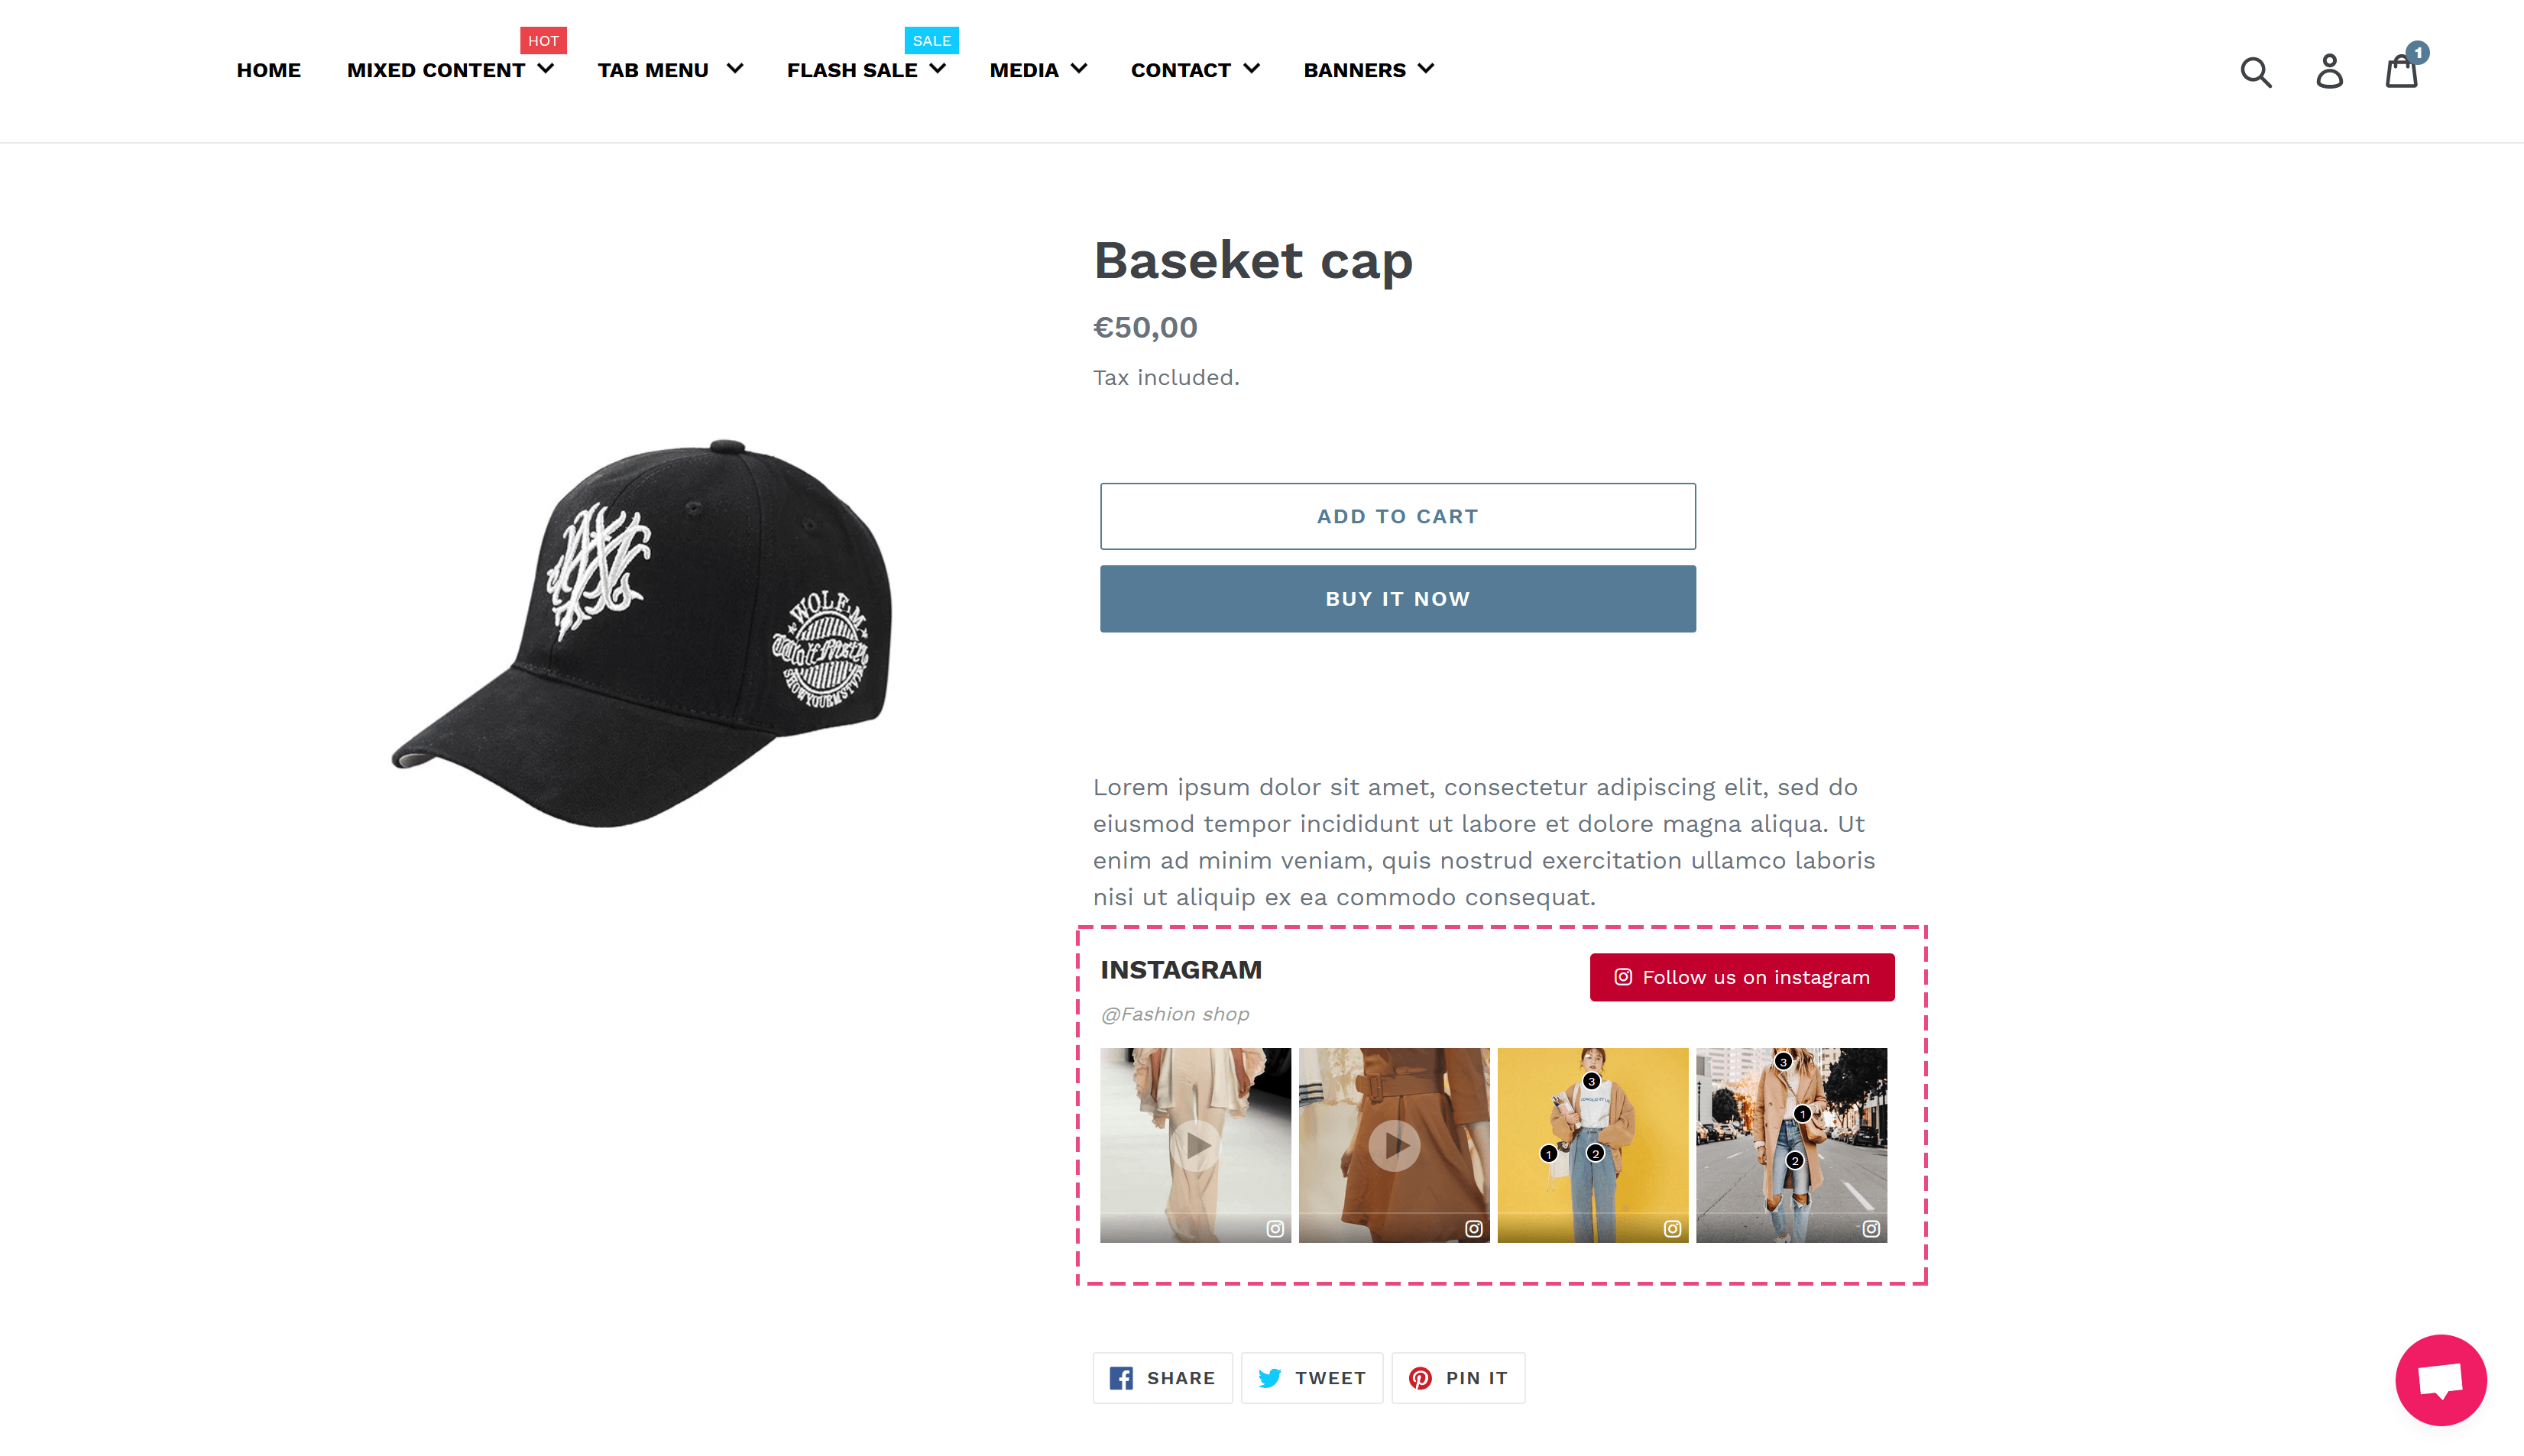
To remove the Instagram section out of the product description area, just delete the embed code on “Description” field.

Embed code on a .liquid file
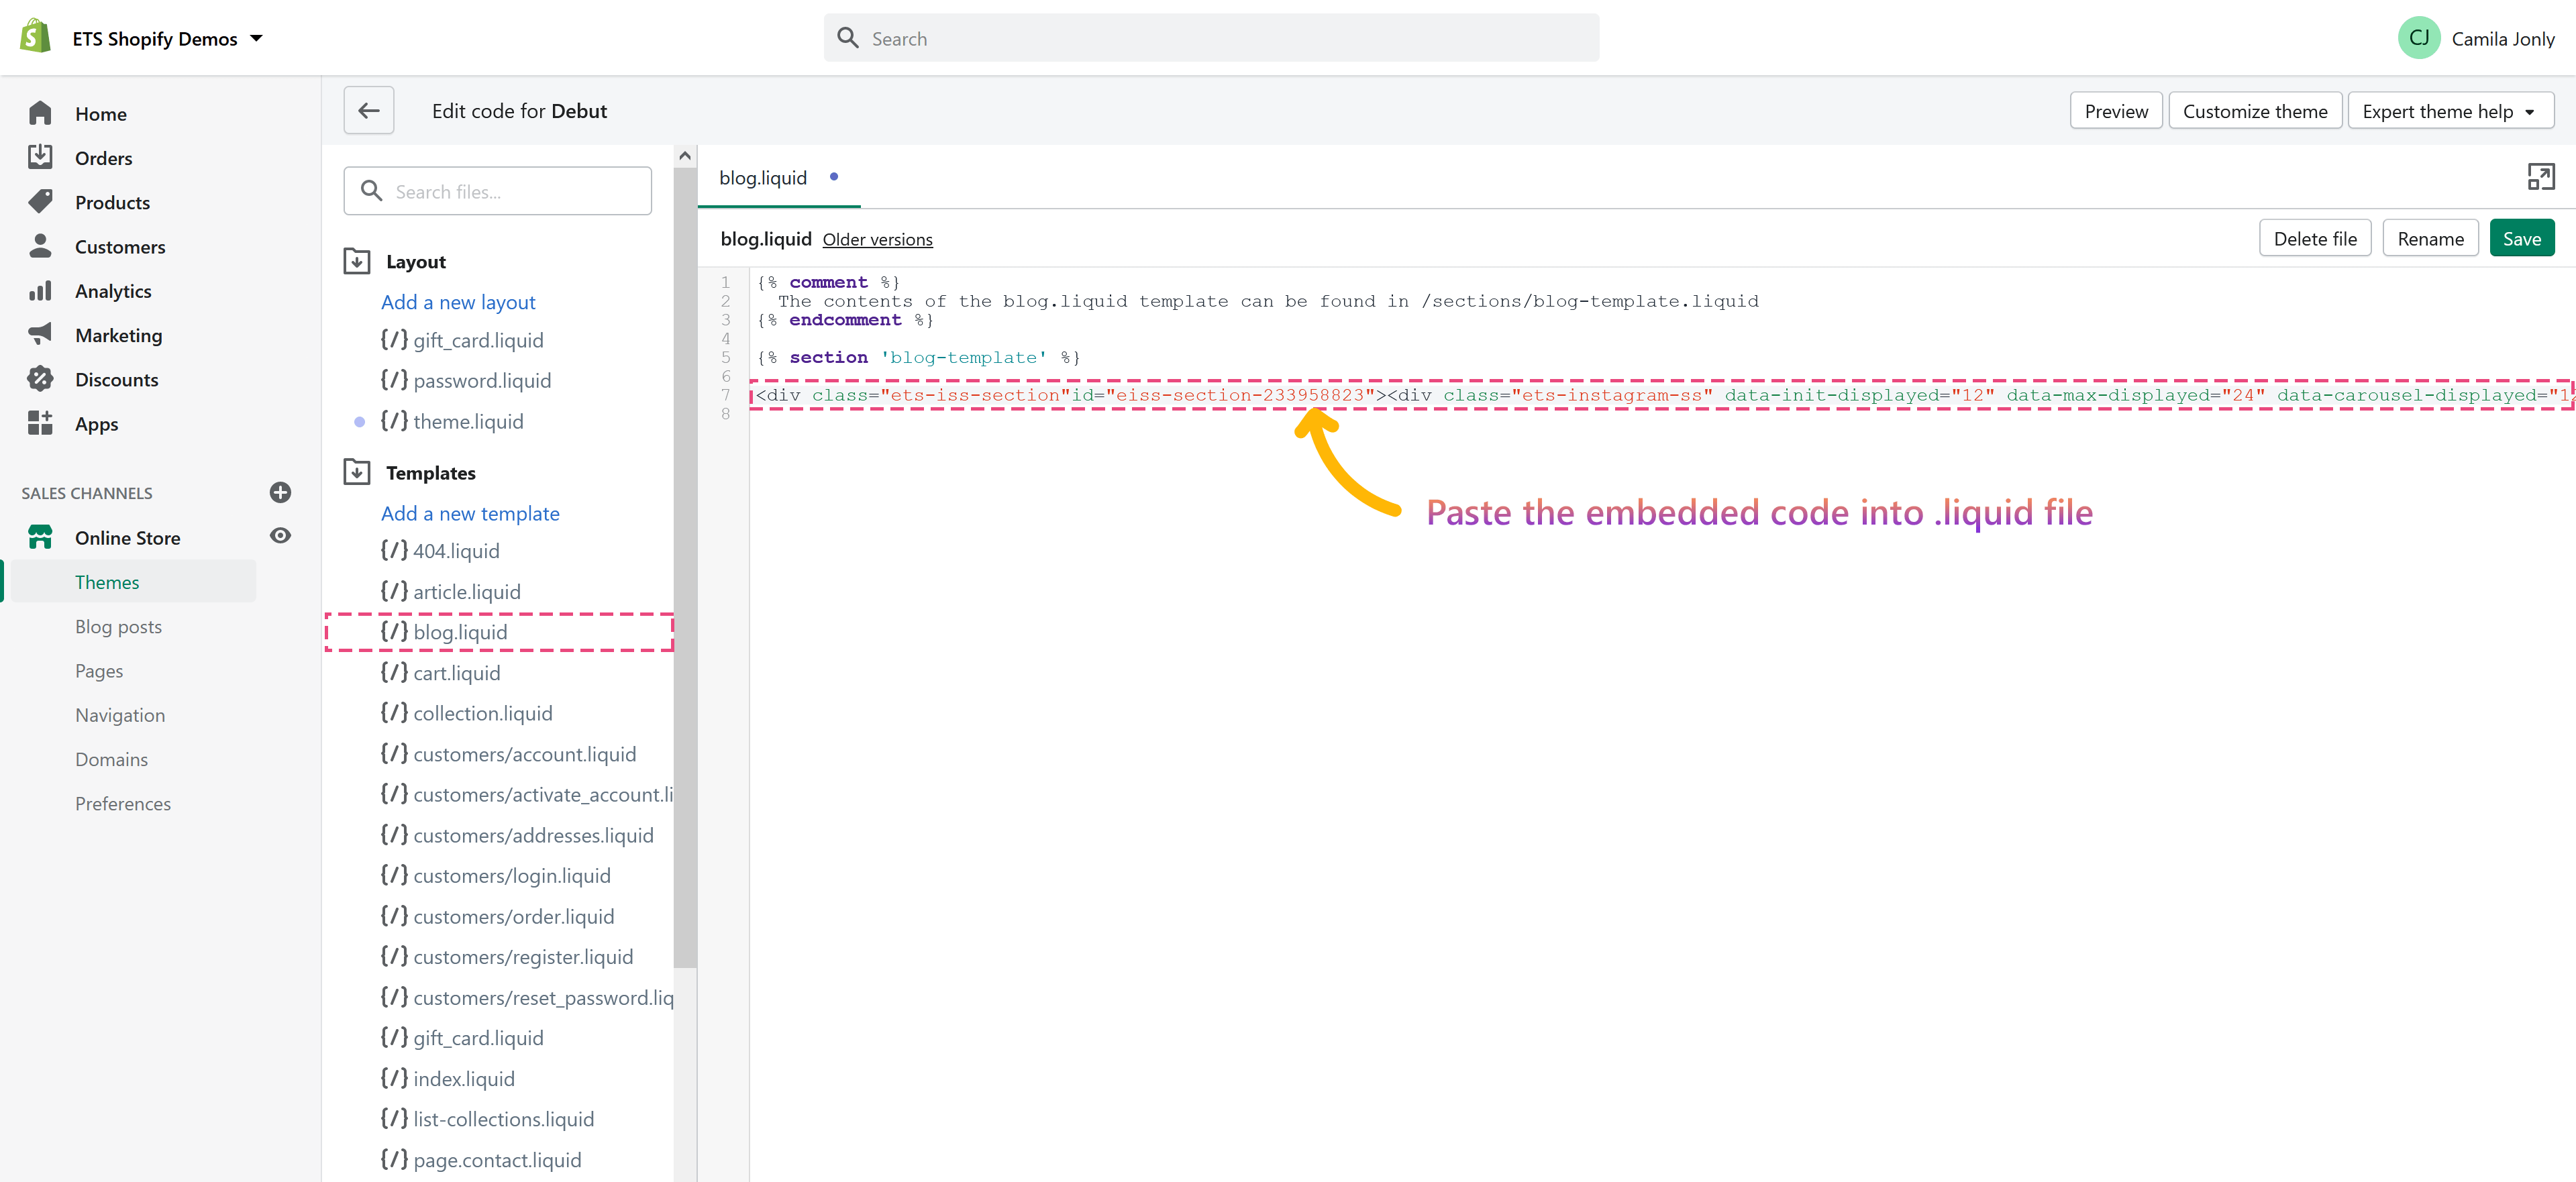
STEP 1: Navigate to “Online store > Themes” page. Click on “Actions” dropdown menu. Select “Edit code“.

STEP 2: Scroll down and select blog.liquid file. Paste the embed code. Click “Save“.

STEP 3: Open your blog page and see the change.

Similar to blog page, you can add an Instagram section to any place you prefer by inserting embed code to the respective .liquid file. If you want to remove the Instagram section from your web page, just delete the embed code on .liquid file.

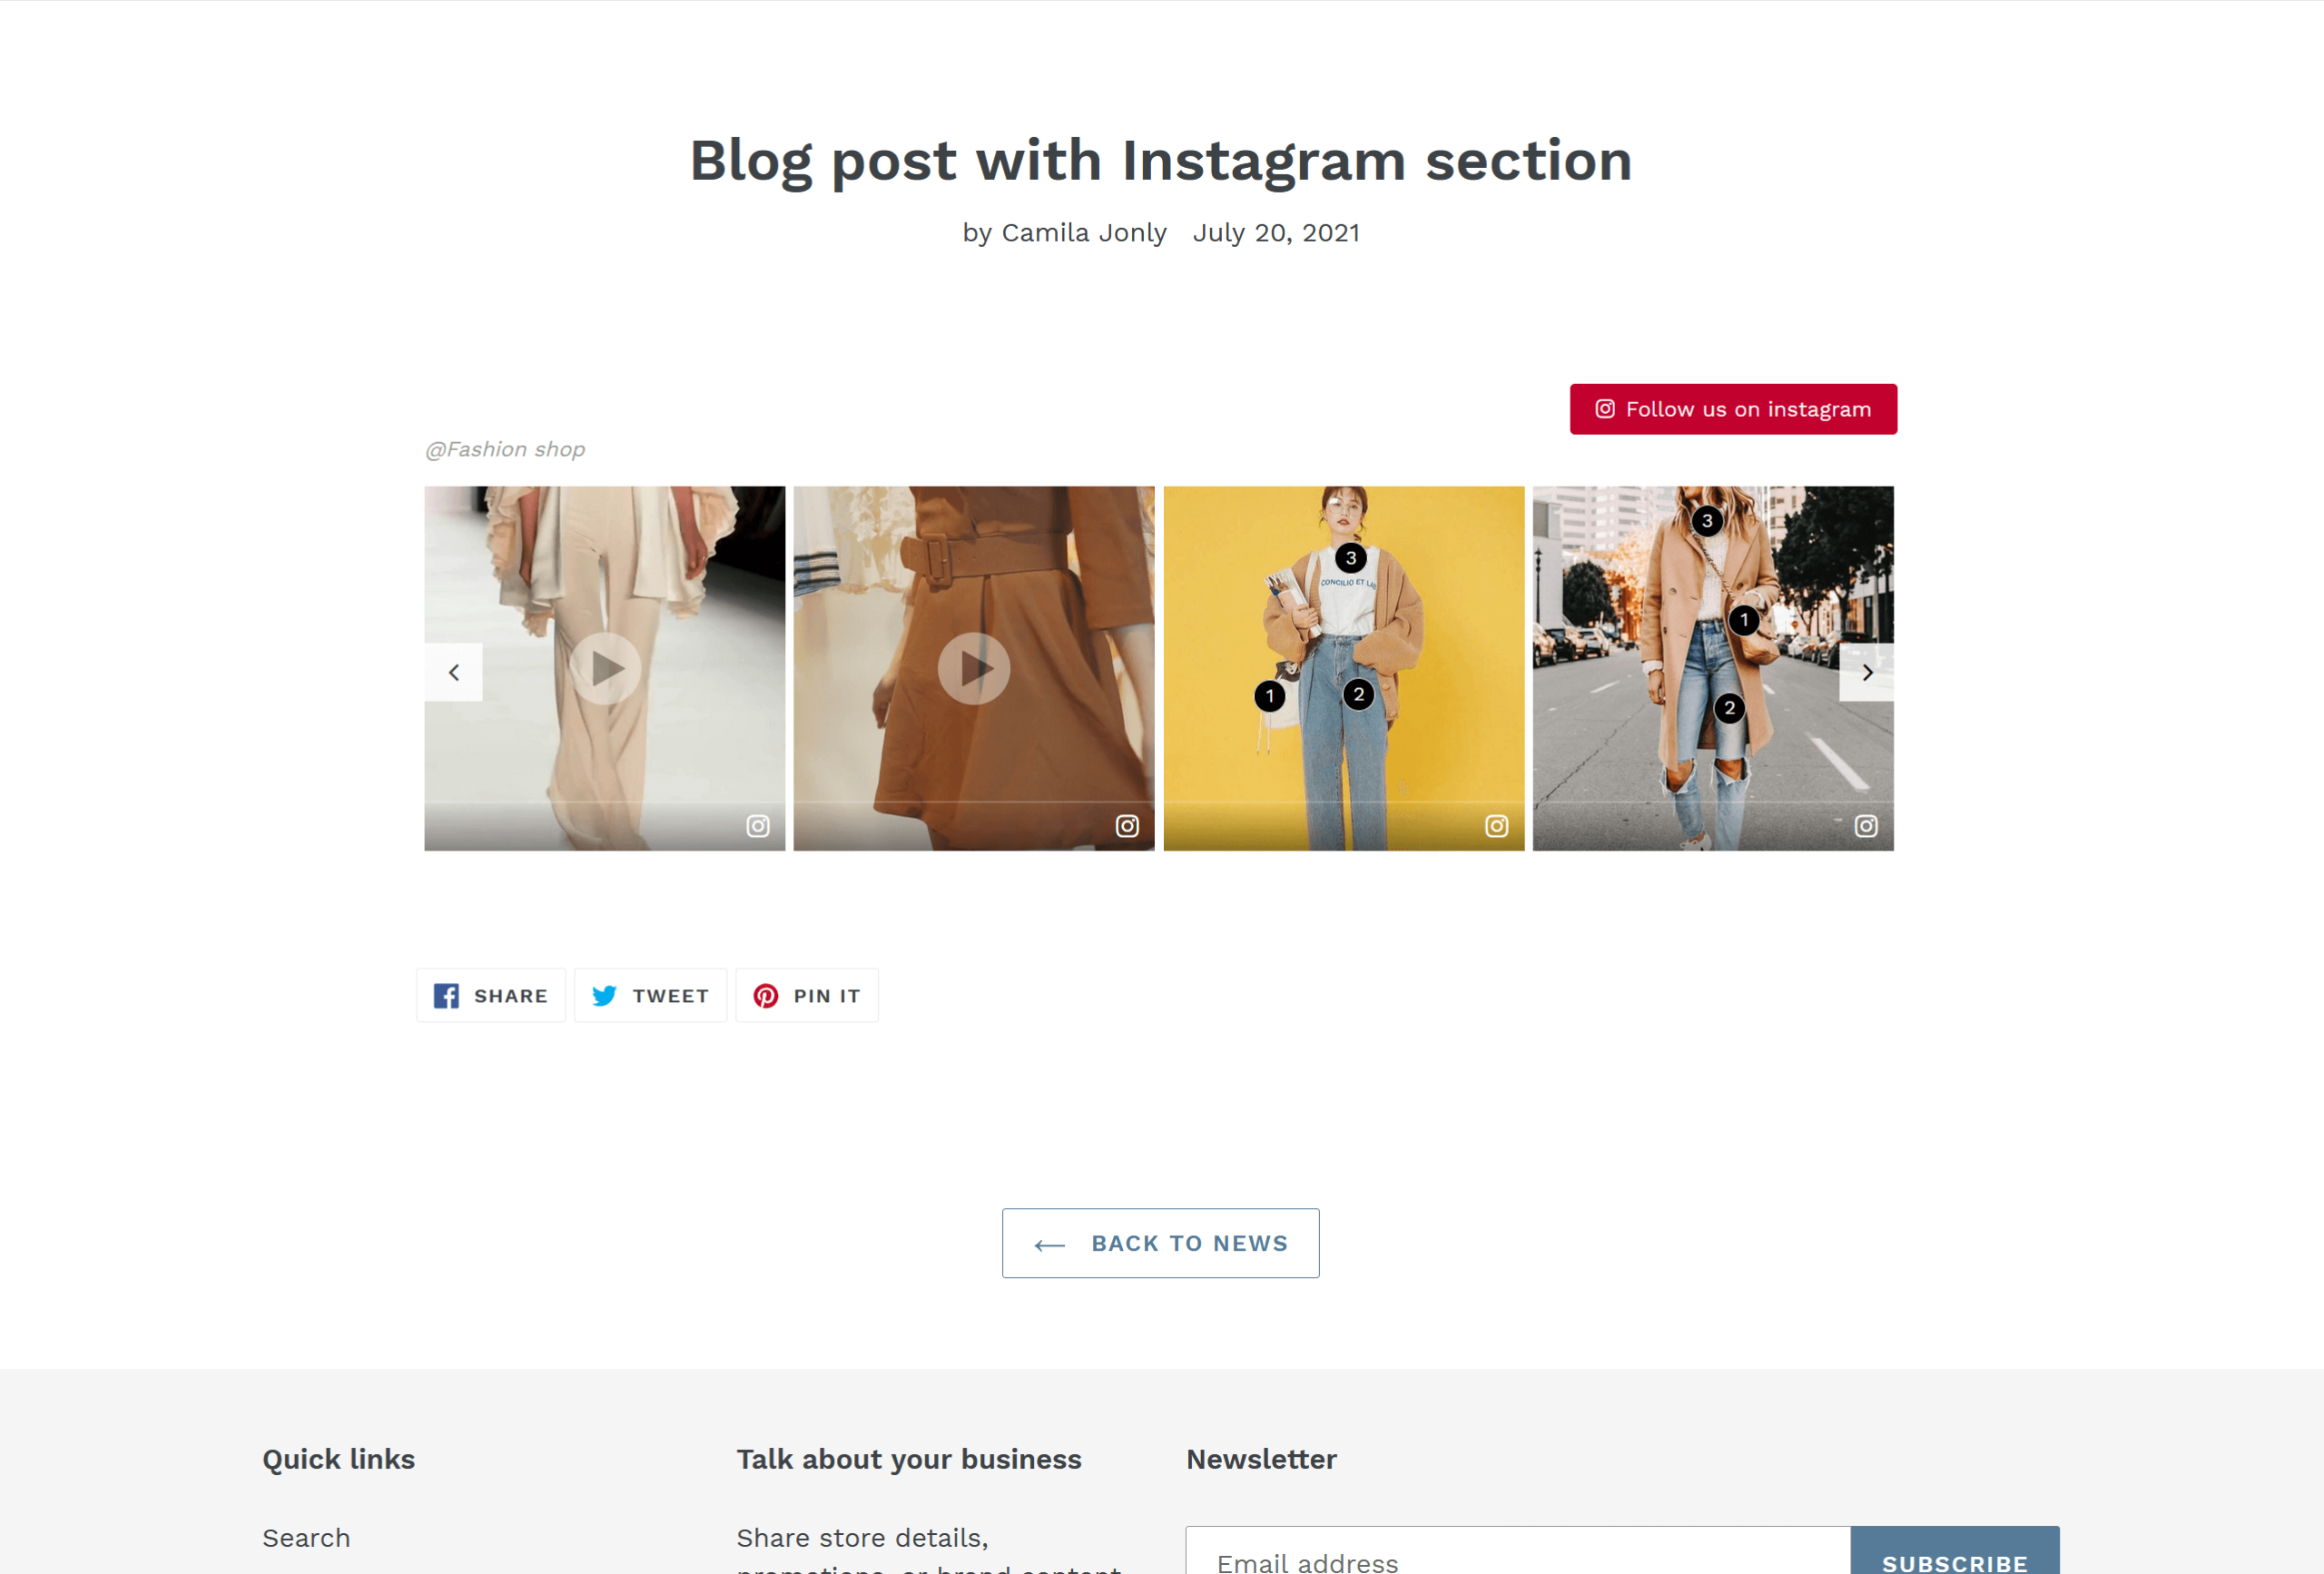
Embedded code on a blog post page

STEP 1: Navigate to Online Store > Blog posts > Add blog post

STEP 2: Enter blog post title, upload featured image, etc.

STEP 3: Click on “Show HTML” button above “Content” field. Paste embedded code into “Content” field.

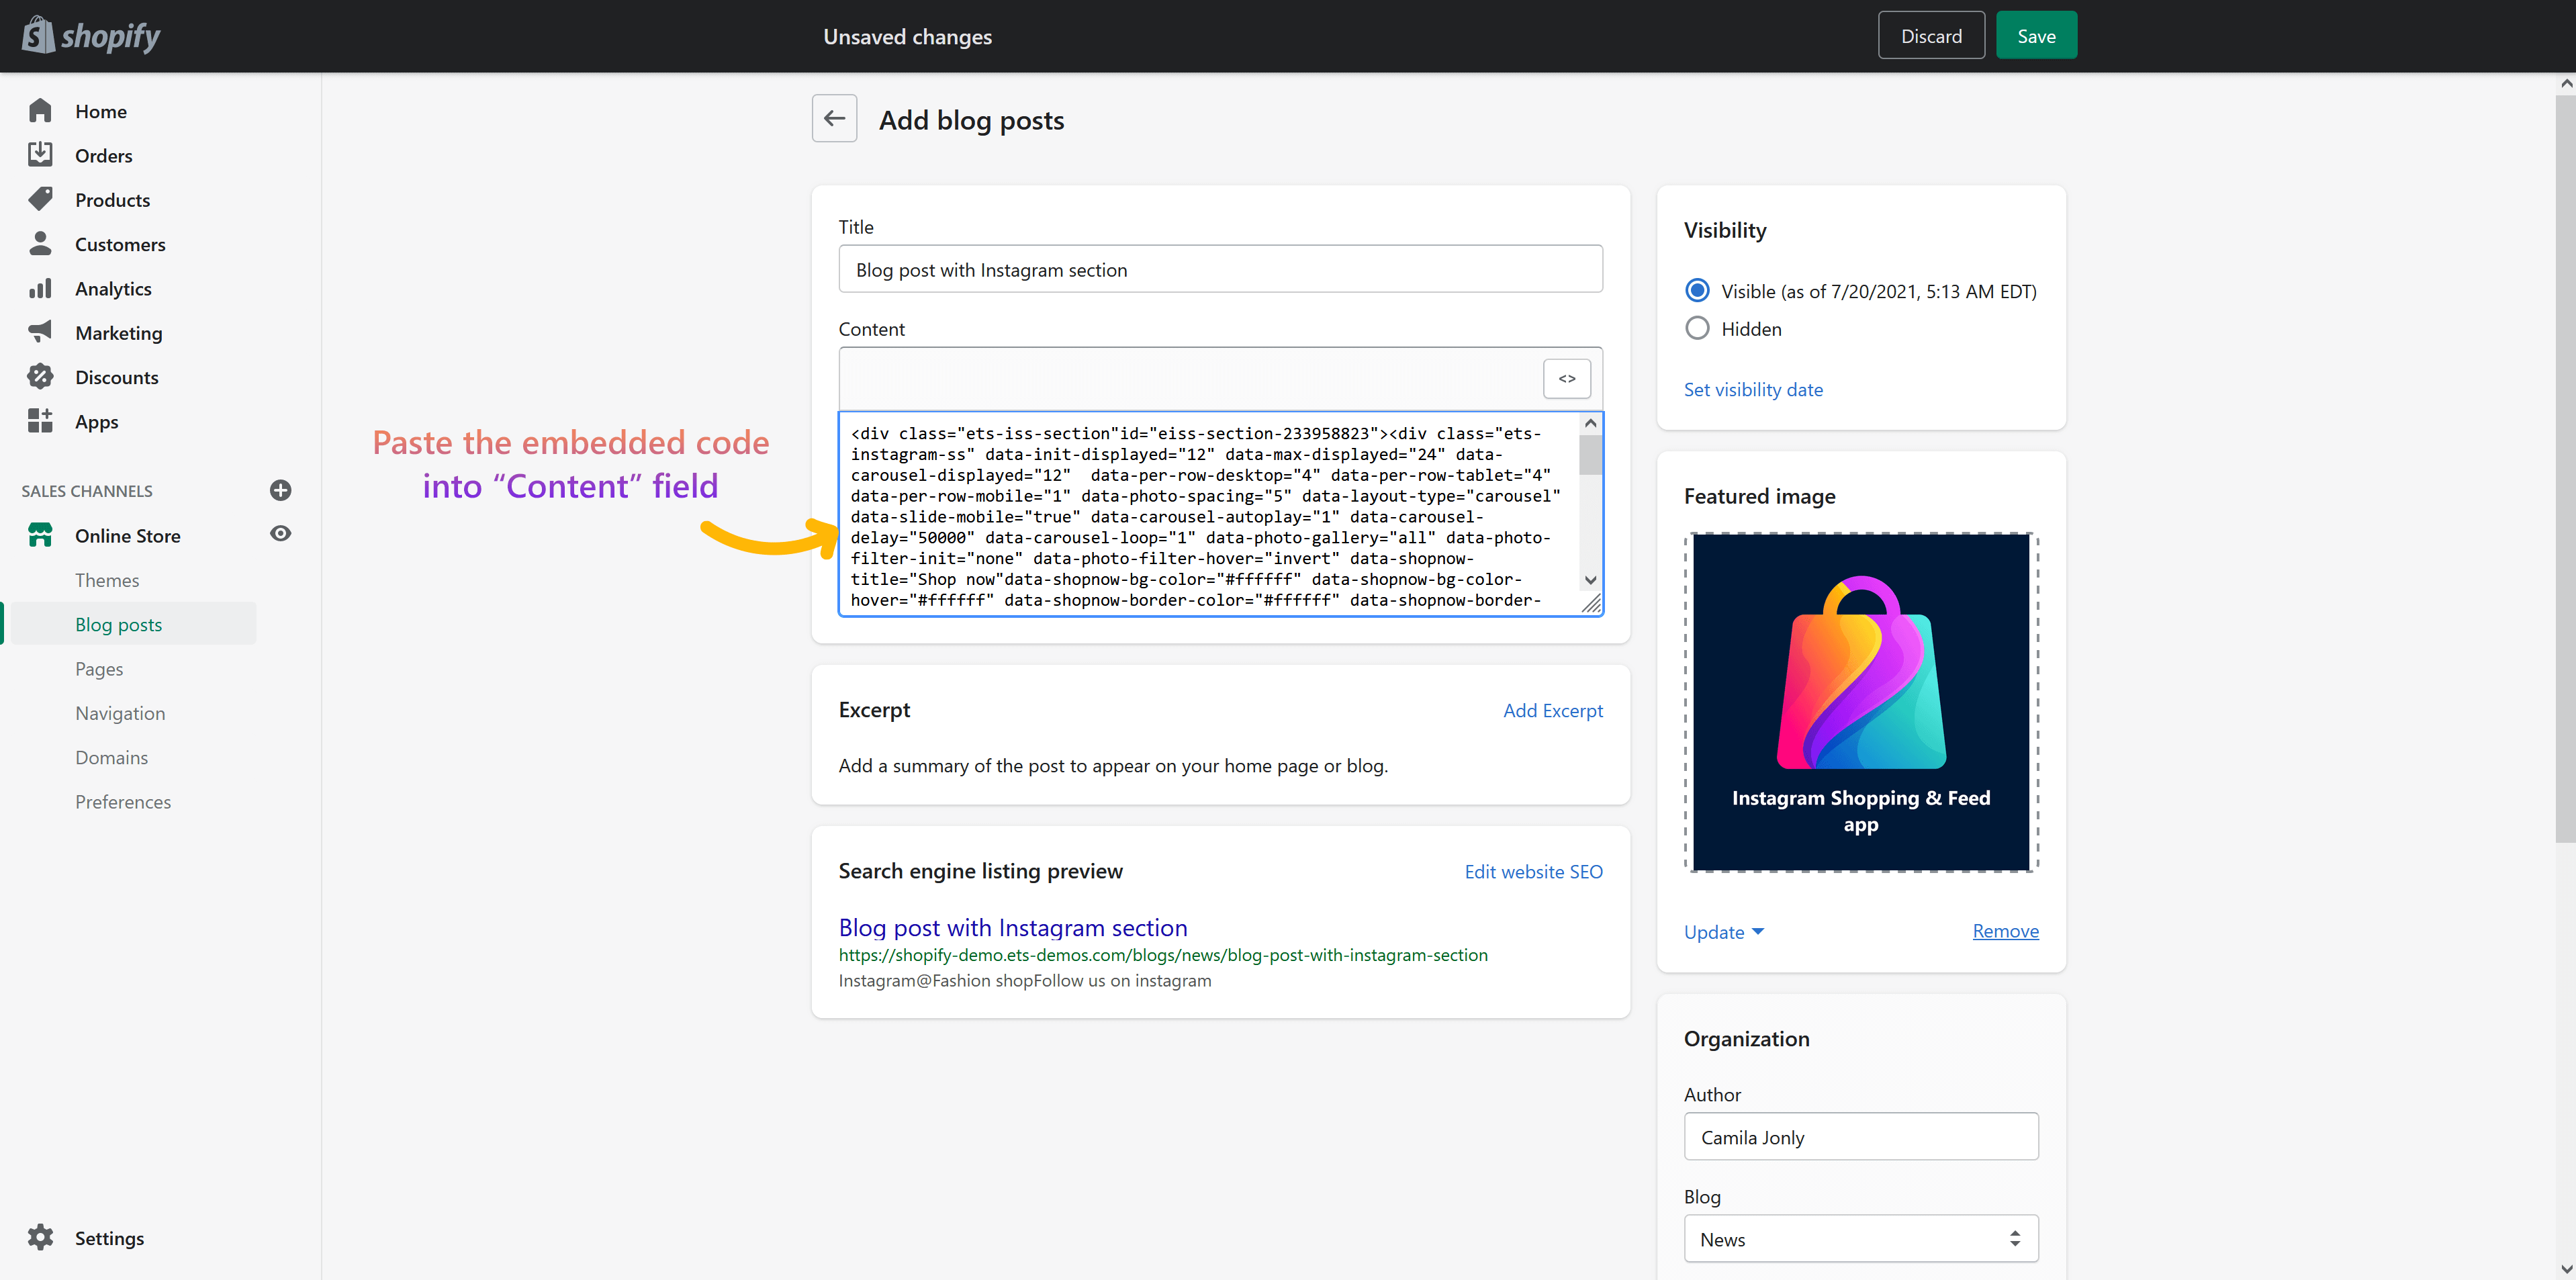
STEP 4: Set your blog post visibility to “Visible“. Click “Save” to publish your post.

Now you have a separate page to showcase all your Instagram photos/videos.

Shopping feature

VA: Instagram Slider & Feed allows your customers to add to cart and buy the preferred items directly from photos/videos on your Shopify store without additional searching. In this section, we will guide you on how to tag related products onto your Instagram photo/video.

Tag a product to Instagram photo

Step 1: Open VA: Instagram Slider & Feed app configuration page > Navigate to “Photos and videos” tab

Step 2: Click on a photo you want to tag product to open it.

Step 3: Click anywhere on the photo to tag products related to this photo > a product mark will appear. You can search for a product by product ID or name. You can drag and drop products to sort their order.

Tag a product to Instagram video

Step 1: Click on a video you want to tag product to open it.

Step 2: You can search for a product by product ID or name. Drag and drop product names to sort their order.

After you make any change on the app configuration page, VA: Instagram Slider & Feed will automatically clear cache and update your online store after 5 seconds.

And we’re done! Now open your online store, refresh it and see the change!

NOTE: The system automatically saves any configurations and update your front store after 5 seconds. If you do not see any change in your store, please click “Clear cache” button or wait for a few seconds and reload your front store.


You can view all photos/videos tagged with products on “Tagged with products” sub-tab. You can also drag and drop photos/videos to sort their order.

With the products that are tagged into Instagram photos/videos, when you open their product detail page on the storefront, you will find an Instagram section that contains all Instagram photos/videos tagged with these products.

You can also customize how the Instagram section will appear on the product detail page:

1. Navigate to Online store > Themes section. Click on “Customize” button to open the settings editor page where you can change the appearance and content of the theme

2. Select Product pages > Select “Instagram” section. You will find the following options to customize the Instagram section:

Featured photos/videos

VA: Instagram Slider & Feed allows you to display featured photos/videos only so that you can inspire customers with highlight Instagram photos/videos on your Shopify online store. You may select “Featured photos/videos only” when setting up the type of photo/video to display on Instagram section or when configure the Instagram section before generating embedded code.

In this section, we will guide you on how to mark a photo/video as a featured photo/video.

Step 1: Open VA: Instagram Slider & Feed app configuration page > Navigate to “Photos and videos” tab

Step 2: Hover your mouse pointer over a photo/video you want to mark as featured.

Step 3: Click on the grey triangle to mark photo/video > Featured photo/video will have a purple triangle.

Unmark featured photo/video

To unmark a featured photo/video, click on the purple triangle on the top–right of that photo/video.

After you make any change on the app configuration page, VA: Instagram Slider & Feed will automatically clear cache and update your online store after 5 seconds.

You can see all featured photos/videos on the “Featured” sub-tab. You can also drag and drop photos/videos to sort their order.

Note: The system automatically saves any configuration and updates your front store after 5 seconds. If you do not see any change in your store, please click on “Clear cache” button or wait for a few seconds and press Ctrl+F5 to reload your front store.

Change app pricing plan

Instagram Shopping & Feed offers competitive 2 pricing plans to help you find one that fits your needs and budget: free plan and premium plan.

If you are unsure which pricing plan to choose, you may use the free plan to see how VA: Instagram Slider & Feed‘s features can help you to sell your products directly through Instagram photos/videos. You can always upgrade your plan to add new features and functionality to your store.

To change the pricing plan, please follow the instruction below:

– On the app configuration page, click on “Your plan” tab sidebar.

– Select a plan suitable for you:

Uninstall app

You can remove VA: Instagram Slider & Feed from your store from the Apps page in Shopify admin. Please follow the instruction below:

From your Shopify admin, go to Apps > Locate VA: Instagram Slider & Feed > Click “Delete

Remove code left after uninstall

Installation of our VA: Instagram Slider & Feed automatically injects certain code snippets into your Shopify theme in order to make the installation process fully automatic and make our app work fast and smoothly. Moreover, during your usage, some embedded code may be pasted into the .liquid file to display Instagram section on specific positions.

Unfortunately, when you uninstall VA: Instagram Slider & Feed we lose programmatic access to your store, thus we cannot remove the code snippets that we injected automatically and the embedded code you pasted into .liquid file.

Although these code snippets that we add do not harm your store even after the uninstallation process, you might want to remove them anyway, the following guide will walk you through this process.

Step 1: Go to Online store in your Shopify Admin Panel > On your ‘Current theme‘ select “Actions” -> “Edit Code”

REMOVE CODE SNIPPETS

Step 2: In the theme.liquid file:

  • Remove the code that contains {% include ‘ets_instagram_shopping_slider_css’ %}
  • Remove the {% include ‘ets_instagram_shopping_slider_js’ %}, which is used to load our JS library

Step 3: In the Sections folder: delete “ets_instagram_shopping_slider.liquid” file

Step 4: In the Snippets folder: delete “ets_instagram_shopping_slider_css.liquid” file and “ets_instagram_shopping_slider_js.liquid” file

Step 5: In the Assets folder: delete “ets_instagram_shopping_slider_css.liquid” file and “ets_instagram_shopping_slider_js.liquid” file

REMOVE EMBEDDED CODE

In the Templates folder:

  • Open the .liquid file which contains embedded code you used to add.
  • Remove the embedded code.