Welcome to SEO Audit app

SEO Audit is an all – in – one SEO manager for your Shopify website. This app helps you analyze and detect any SEO problems with the content on all web pages; automatically create customizable meta titles and descriptions, image alt texts, sitemap, search engines management, etc. Thanks to better SEO status, your website will get higher ranking on search result pages and attract more potential customers, boost site traffic and earn more sales.

Within this document, we will describe the installation, creation and setting up the SEO Audit app process.

We did our greatest to create this manual info to be presented in a very straightforward, simple manner. But if you have any questions that are beyond the scope of this documentation, please feel free to contact us via our email address: [email protected]


Install SEO Audit App

Step 1: Navigate to SEO Audit app in the Shopify App Store by clicking on this link: https://apps.shopify.com/seo-audit

Step 2: Click on “Add app” button >> Log in to your Shopify store and authorize the app in your Shopify admin.

Step 3: And you’re ready! Your newly installed app will appear in the Apps section of your Shopify Admin.


Dashboard

SEO Audit helps you analyze and detect any SEO problem needed to resolve. From the Dashboard, you will find the analysis results for products, collections, pages, blog post, and their related images. The dashboard will provide an overview of the SEO status of your website.

To view and edit the SEO content for each object, click on “View more” link respectively to be navigated to “SEO Analysis” page.

To automatically fix missing image alt text, click on “Fix automatically” button.

SEO Analysis

SEO Audit app will make sure your site meets the highest technical SEO standards. It also gives you the tools to optimize your content for SEO and overall readability.

1. Products

Navigate to “SEO Analysis” > “Products” page to see the list of all products on your Shopify store with their respective SEO score and readability score.

You can use the filter block to search and filter the products that you want to manage.

Analyze a specific product:

From the product list, click on a specific product you want to view and edit the content. For example, we will try to edit “PRODUCT_NAME” as a demonstration.

2. Collections

Navigate to “SEO Analysis” > “Collections” page to see the list of all collections on your Shopify store with their respective SEO score and readability score.

You can use the filter block to search and filter the collections that you want to manage.

Analyze a specific collection:

Similar to the product, you can also edit the SEO elements for the collection. From the collection list, click on a specific collection you want to view and edit the content.

3. Blog posts

Navigate to “SEO Analysis” > “Blog posts” page to see the list of all blog posts on your Shopify store with their respective SEO score and readability score.

You also can use the filter block to search and filter the blog posts that you want to manage.

Similar to products and collections, blog posts also have similar SEO elements and you can freely edit them. From the blog post list, click on a specific blog post you want to view and edit the content.

4. Blogs

Navigate to “SEO Analysis” > “Blogs” page to see the list of all blog posts on your Shopify store with their respective SEO score and readability score.

Similar to the sections above, blog also has similar SEO elements. Click on a specific blog you want to view and start editing as you want.

5. Pages

Navigate to “SEO Analysis” > “Pages” page to see the list of all pages on your Shopify store with their respective SEO score and readability score.

You can use the filter block to search and filter the pages that you want to manage.

From the page list, click on a specific page you want to view and edit the content.

Auto optimization

If not defined specifically for each item (product, collection, page, etc.) in Edit pages (refer to SEO Analysis section for more details), the meta title and meta description will be displayed according to the meta templates on this page.

In the case meta template is empty, meta title and meta description will display as the default of Shopify.

You can set up a meta template for the following items:

1. Products

You can set up the meta template (meta title, meta description) and Image alt text for the products using the available tags provided by the app. Just copy the available tags and paste them in their respective positions and SEO Audit app will automatically generate meta title, meta description, and Image alt text the way you set it up.

You can custom apply Auto optimization (automatically generate meta title, meta description, and Image alt text that you just set up above) to all or any of the products you want with options like all products, specific products, including products, or excluding products. Just click on each field and select the products that fit your needs.

In case the product already has an SEO element, you can choose to keep existing SEO elements or replace them with auto-generated SEO elements.

Click on “Auto optimize” and “Save”; the app will automatically optimize products according to the meta templates you just set up.

2. Collections

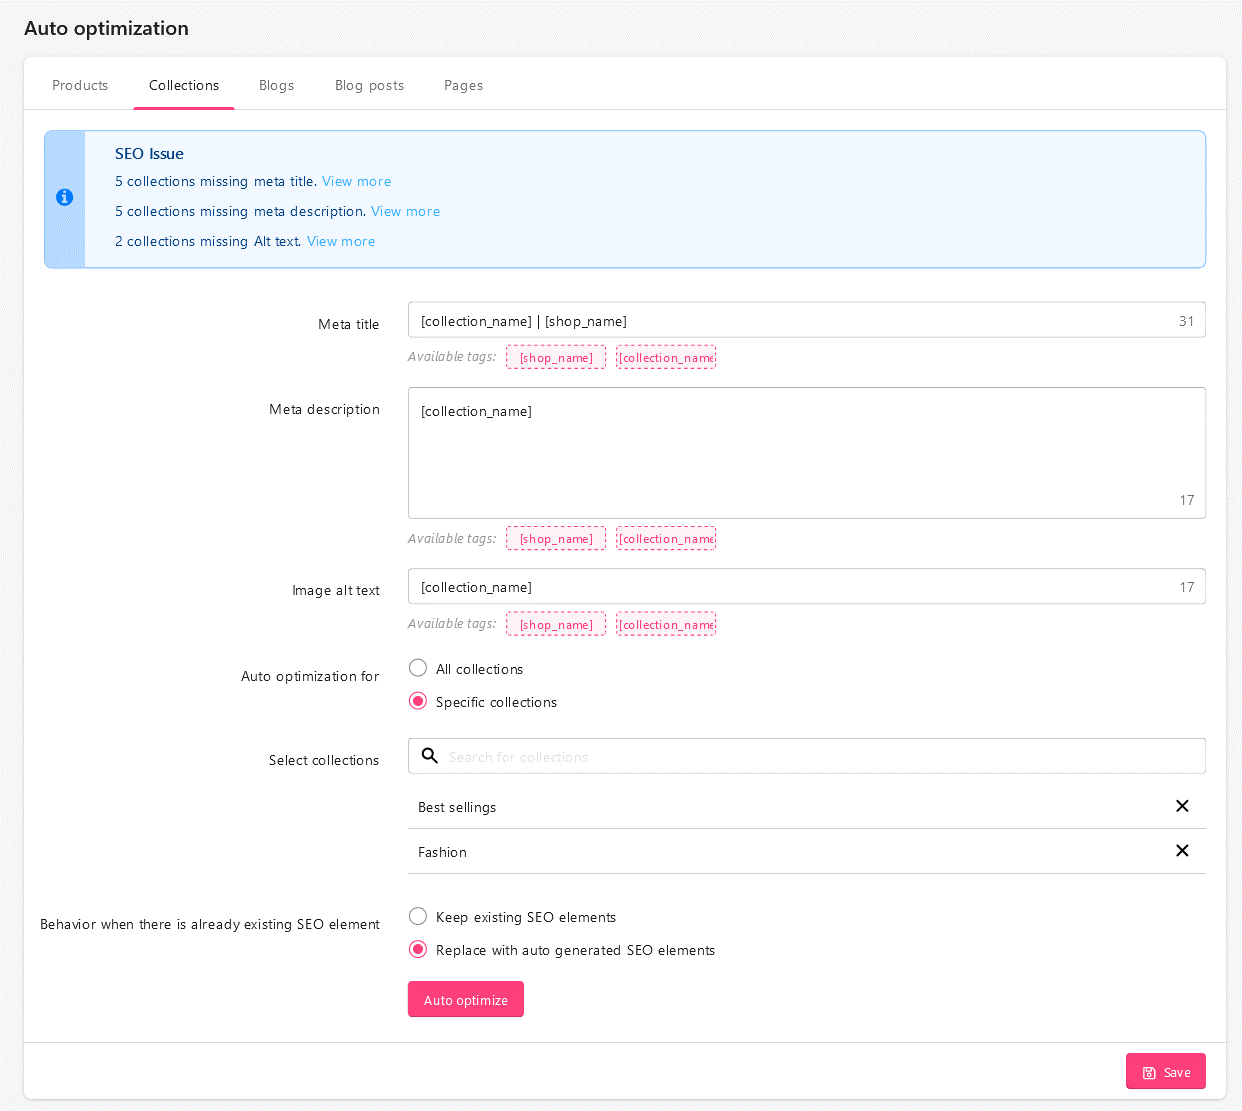
Similar to auto-optimization for products, you can also create meta templates and image alt text for collections using available tags.

Our app allows you to select collections that apply auto-optimization and choose to keep or replace SEO elements when the collection already has SEO elements in place.
3. Blogs

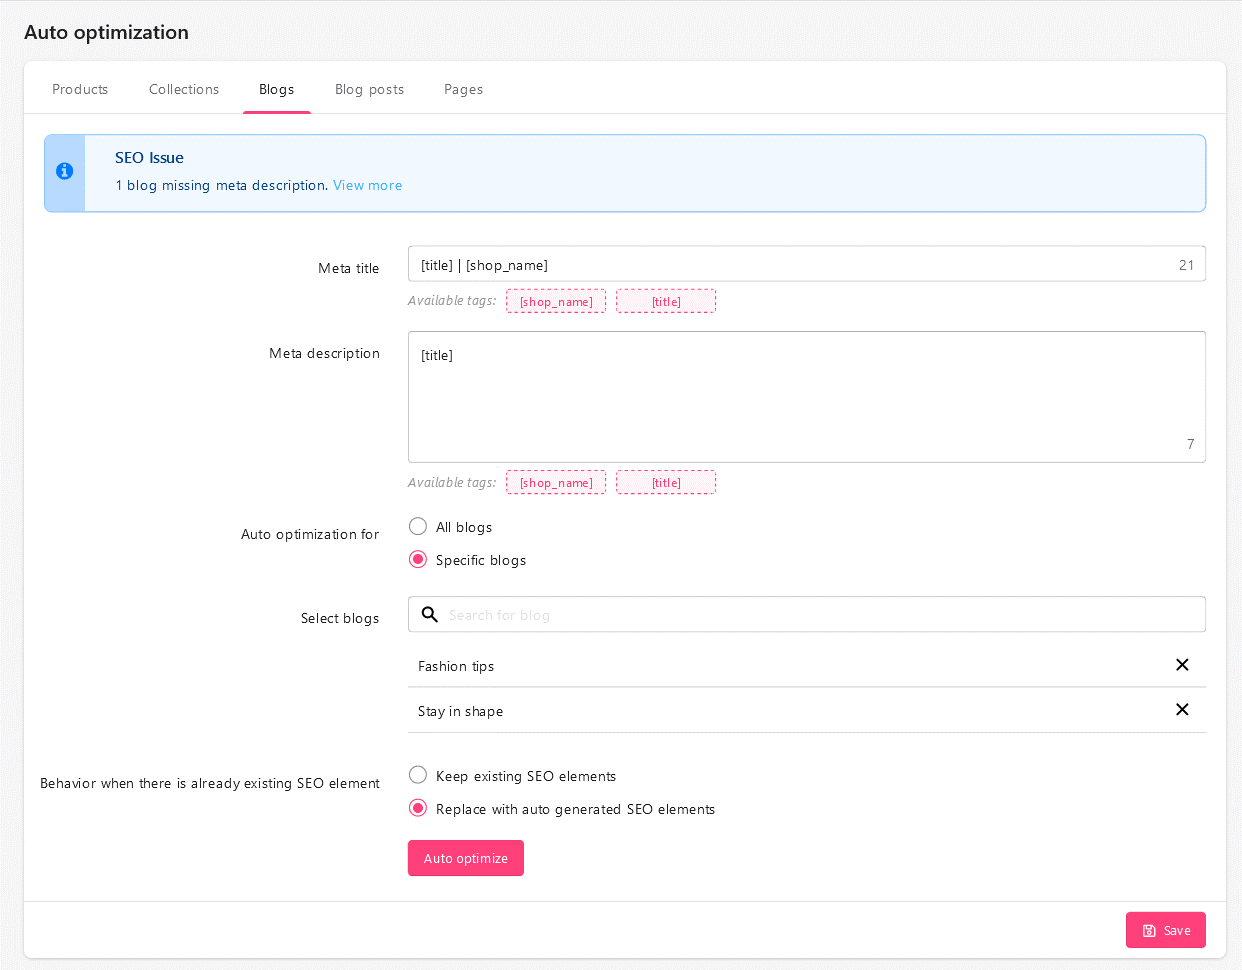
The sections in “Blog” and the way to set up auto-optimization are similar to those in “Products” and “Collections”. But for “Blog”, there will be no image alt text generation. Look at the image below for more details!
4. Blog post

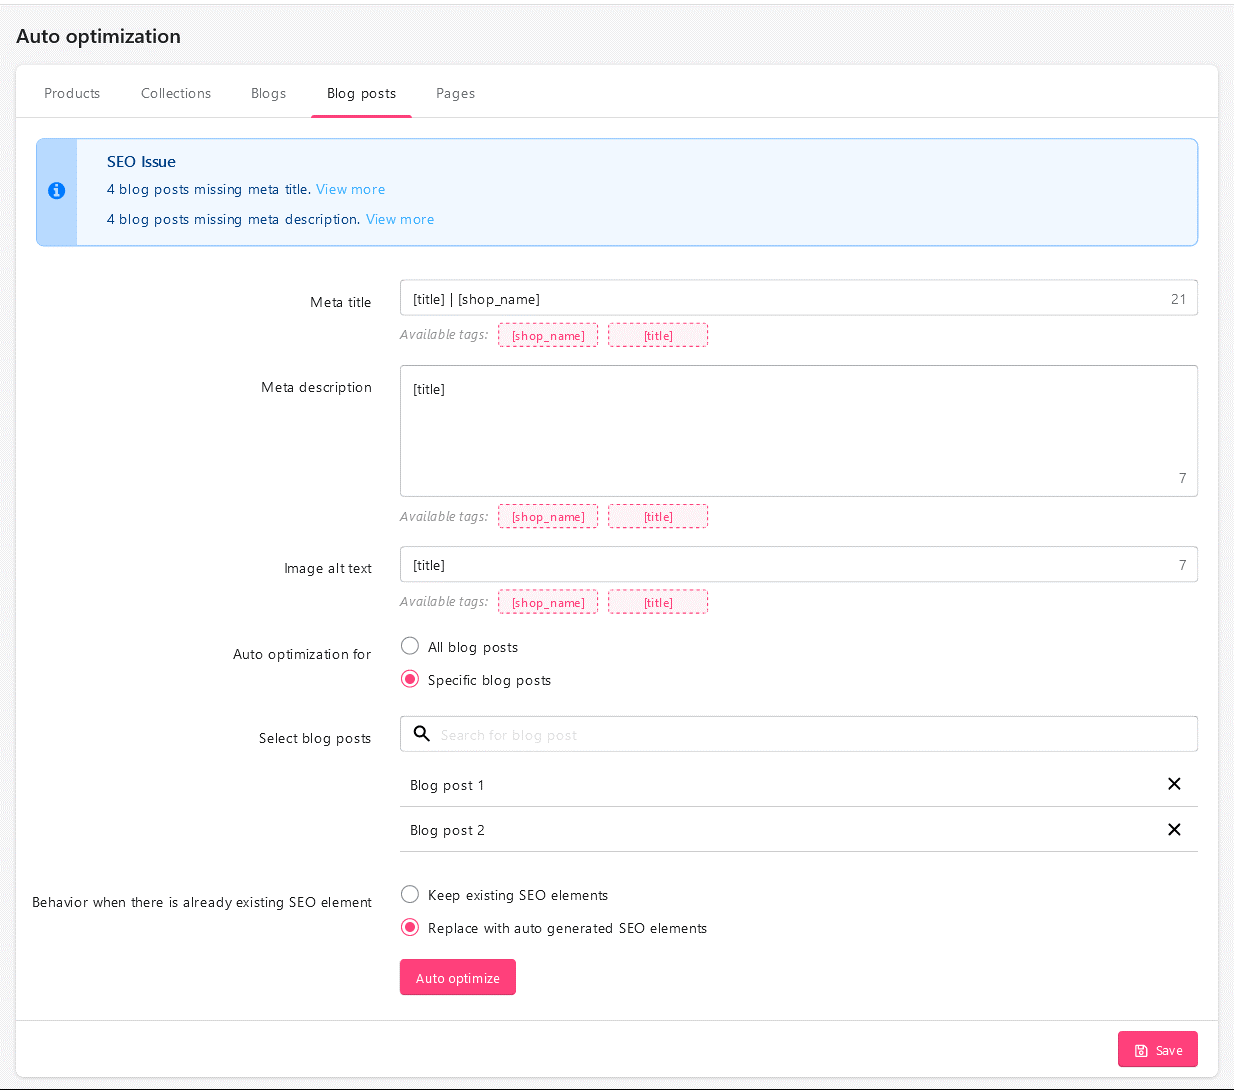
The sections and settings are the same as in “Products” and “Collections”. Refer to those 2 sections in this documentation and look at the picture below for more information.
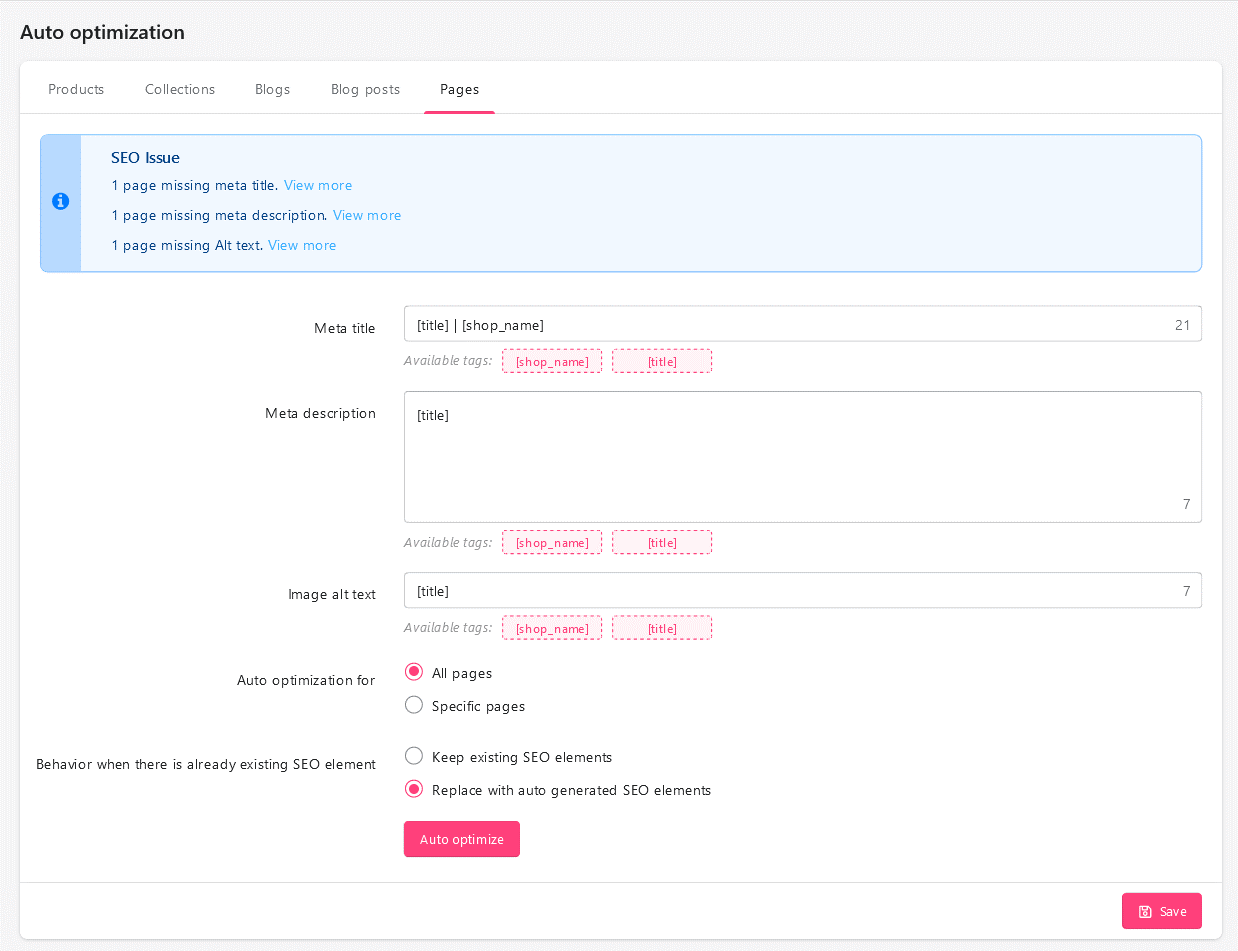
5. Pages

Similar to the sections above, you can set up meta templates and image alt text to optimize the pages of your website. The setup is the same as “Products“, “Collections“, and “Blog posts“.
 

Search engine

You can use the boxes in this section to verify with the different Webmaster Tools. This feature will add a verification meta tag on your home page. Follow the links to the different Webmaster Tools and look for instructions for the meta tag verification method to get the verification code. If your site is already verified, you can just forget about these.

Use this app and enter the corresponding verification code to link with search engines. If you don’t know how to get the verification code, click on the link below the corresponding box to learn more.

Social sharing

Sharing profile

While social shares may or may not affect a web page’s position in search listings, your social profiles definitely influence the content of your search results. In fact, social media profiles are often amongst the top results in search listings for brand names.

Adding your organization social profiles into SEO Audit to manage better your social sharing activities.

Social URL

We also integrated Open Graph into SEO Audit to help you easily set up and share your content through the most popular social networks such as Facebook, Twitter and Pinterest, etc.

Robot.txt

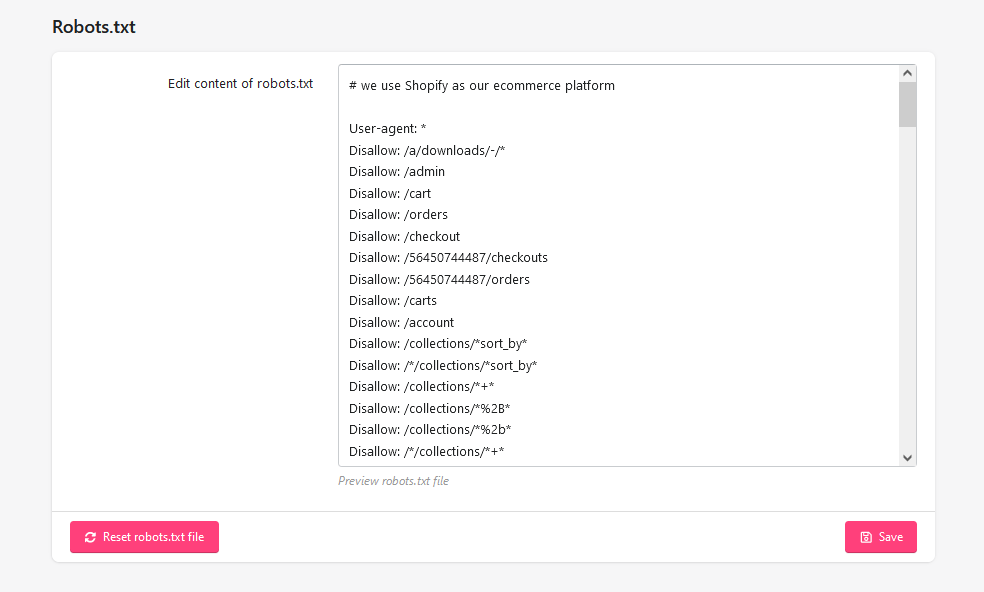
A robots.txt file enables you to block specific automated bots and web spiders that crawl the Web in order to find more web pages to add to their company’s servers. Some bots you want to have full access to your website, such as Google’s or Yahoo!’s, and some others you would rather not, such as spambots, content thieves, e-mail collectors, etc.

SEO Audit’s robots.txt generation tool simply creates a file with exclusion directives for files and directories that are not meant to be public, and should not be indexed. You can edit the content of robots.txt file or restore it to the default configuration.

Sitemap

A sitemap is a way of organizing a website, identifying the URLs and the data under each section. Sitemap can be submitted to Google, Bing, and other search engines to help them crawl your website better and allow website visitors to easily navigate on your site.

SEO Audit generates a sitemap containing sub-sitemaps to all your pages without cronjob. It also provides a sitemap for each language if your website has multi-language mode. You can customize sitemap settings to satisfy your requirements.

Limit items: you can set a limited number of sites for each item. This is a dynamic sitemap, so when you add any new sites (new products, for example), the app will automatically update to the sitemap. However, you must ensure that the website you just added does not exceed the limit items. If the number of sites per item exceeds the limit items, you need to reset and increase the limit items to display enough sites on the sitemap.

In addition, if you want to add a site that is not in the choice list, you can add it to the sitemap by clicking “Add URL” then entering the URL and the site’s name. Click “Save” and you’ve done!

Others

1. Live support

If you have any problem using the app, you can navigate to “Live support” to contact the web developer. We are happy to support you solve the problems related to this app whenever you need it.

2. Document

Click on “Document” to open this app documentation when needed.


Uninstall App

To uninstall our app, please go to your Shopify Store admin – “Apps” section – find “SEO Audit” and click the “Delete” button on the right.

How to delete all the SEO Audit code

Installation of our SEO Audit app automatically injects certain code snippets into your Shopify theme in order to make the installation process fully automatic and make our app work fast and smoothly.

Unfortunately, when you uninstall SEO Audit, we lose programmatic access to your store, thus we cannot remove the code snippets that we injected automatically.

Although these code snippets that we add do not harm your store even after the uninstallation process, you might want to remove them anyway, the following guide will walk you through this process.

Step 1: Go to “Online store” in your Shopify Admin Panel > On your “Current theme” select “Actions” -> “Edit Code”.

Step 2: Find and open the “theme_ets_seo.bak.liquid” file:

– Copy all the content of this file.

– Open the “theme.liquid” file then paste the copied content into “theme.liquid” file. Save your change.

– Delete the “theme_ets_seo.bak.liquid” file.

Step 3: In the “Snippets” folder: delete “ets-seo-template.liquid” file.

Step 4: In the “Assets” folder: delete “ets_seo_app.css” file.